
Support Centre is a PHP Ticketing system that allows you to offer support to your customers using our support application. Users can create tickets and staff can respond to them.
Quick Setup Guide - top
This guide is intended for quick setup. If you want a more detailed version, check out the Setup & Installation document.
Uploading Files
- First locate the core files in the folder: core_files/core.zip and extract them.
- Upload the files to your main web directory. A sub folder is fine too.
- Modify the file: application/config/config.php and edit the following code with your own URL to the system:
$config['base_url'] = 'http://www.example.com/';
- Modify the file: application/config/database.php with your database settings:
$db['default']['hostname'] = 'localhost';
$db['default']['username'] = 'your_username';
$db['default']['password'] = 'your_password';
$db['default']['database'] = 'database_name';
- Import the SQL file core_files/database.sql to the database you specified in the above settings.
- Run the install file on your website. This URL is usually: http://www.example.com/install/
- Alternative install URL: http://www.example.com/index.php/install/
- Delete the file application/controllers/Install.php after.
If you want a more detailed install guide which explains everything more clearly, check out our Setup & Installation document.
Setup & Installation - top
Uploading Files
Once you have downloaded your file from the Envato Marketplace, you will need to extract the files from the ZIP file. You will need to upload the product core files to a webserver. First locate the core files in the folder: core_files/core.zip. You will need to extract the files from the zip and upload them so that these files are in your main directory on your webserver, usually this is the public_html folder. If you wish to upload them to a sub-folder, this is fine too- just make sure you read the footnotes about installing in a sub-folder.
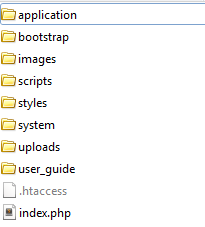
Your webserver's main directory should look something like this:
Config Settings
Before you can use your product, you will need to edit the config files. First locate the config file in: application/config/config.php and open it up using a text editor such as notepad. The only line you should need to edit is the:
$config['base_url'] = 'http://www.example.com/';
Replace the http://www.example.com with your own domain name, making sure you keep the quotation tags around it as above. There are some other settings that you can also edit in this file if you feel the need to customise your product further but for a basic installation this is all you should need to edit. Save the file and overwrite the existing one on your webserver.
Database Settings
The second file you will need to edit is your database file. Find the file: application/config/database.php and open it up using a text editor like Notepad. You will need to edit the lines listed below with your own database login information. For the most part, host stays the same as localhost unless your web host specifies to you otherwise. You will need your database name, database username and database password.
$db['default']['hostname'] = 'localhost';
$db['default']['username'] = 'your_username';
$db['default']['password'] = 'your_password';
$db['default']['database'] = 'database_name';
Once you have modified this file, save it and overwrite the existing one on your webserver.
Next you will need to execute the SQL file that came with the product download. This file will create the database tables that are used to store the data of your application. Usually you can import the SQL tables by using a database management system like PHPmyAdmin. The SQL file is located in core_files/database.sql in the product download.
To Import the file, login to your database management system, such as PHPmyAdmin. Make sure you are on the database that you named in the database.php config file then locate the Import Tab on PHPmyAdmin.
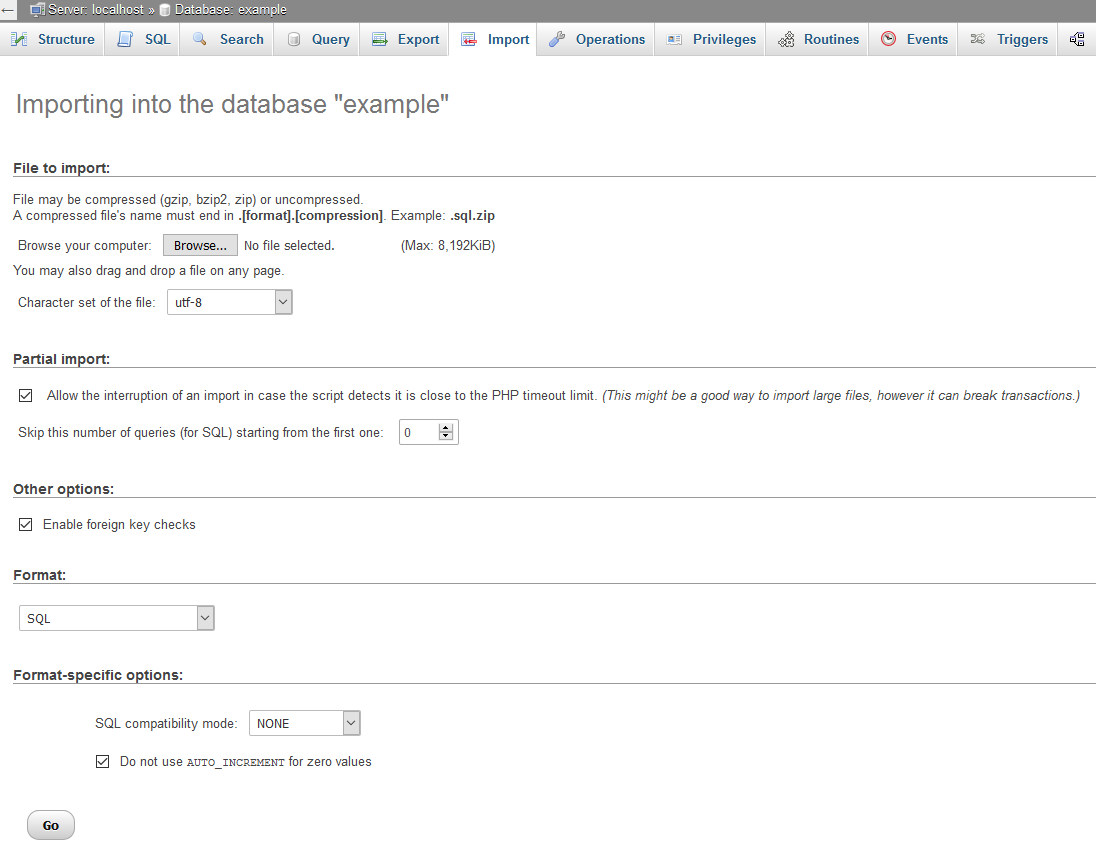
Next select the browse button (as shown in the screenshot above) and locate the SQL file (core_files/database.sql) from your product download file. Next click the Go! button and you should now see database tables appear in the left sidebar.
Mod Rewrite
We use a URL routing trick called mod_rewrite. This is normally installed by default on most web servers and allows for URLS like: http://www.example.com/some/file/here/ instead of http://www.example.com/myfile.php.
If you don't have mod_rewrite settings enabled on your web server, you can still use the application by setting your index_page value to the following line in the application/config/config.php file:
$config['index_page'] = 'index.php';
This setting will make it so your URLs have index.php in them. However, the default setting is to remove this and assumes you have mod_rewrite enabled on your webserver.
Creating the Admin Account and Setup Site
Finally, you will need to run the install file in your web browser. A notification will pop-up on the site once you have filled out all the database settings and config settings linking you to the install file. Or you can locate it by going to http://www.example.com/install/ where example.com is replaced by your own. Here you'll be able to create the Admin account with full access to the site as well as some initial site settings.
If you're having problems accessing this URL, double-check that you entered the correct information in the application/config/config.php file. If you are sure that it is correct, it may be something to do with your webserver's settings with allowing mod_rewrite. The problem most notably is usually with the .htaccess file in the main directory- make sure this file is in your main directory (like in the directory screenshot above). If you still have problems, check out our Knowlege Base or feel free to contact us.
If you added index.php to your config setting index_page in the application/config/config.php file, the URL to install will be: http://www.mydomain.com/index.php/install/.
IMPORTANT: Once you have installed the product, please delete the file application/controllers/install.php! This will prevent other users from messing up your settings.
Installing In A Sub-Folder
If you're installing the software in a sub-folder, such as http://www.example.com/my_subfolder/ then you will need to modify the .htaccess file inside the main directory (the one that holds the application, bootstrap folders etc). All you need to do is open up the .htaccess file in your text editor and copy the following code, replacing the sub-folder with the name of your sub-folder (in this example, the sub-folder is called sub_folder_name_here. Replace this with the name of your sub-folder).
RewriteEngine On
RewriteBase /sub_folder_name_here
RewriteCond %{REQUEST_FILENAME} !-f
RewriteCond %{REQUEST_FILENAME} !-d
RewriteRule ^(.*) index.php?/$1
Save the file as .htaccess and overwrite the one inside your main directory that you used to install the software in (the folder containing the application, bootstrap folders etc). You can skip this step if you're installing in your main folder.
Application Structure - top
This application is built up around the CodeIgniter framework. CodeIgniter is built directly into the software, so you don't have to do anything extra to use it.
For developers, this framework is freely available on the internet and documentation for using the source code can be founded on their website: http://www.codeigniter.com/user_guide/.
CodeIgniter is a PHP Framework written in MVC (model-view-controller) format which allows developers to create applications that are structured in a very clean and efficient way. When you unzip the product download (core_files/code.zip), you will be presented with the following directory structure. Below is a quick overview of where you can find various files if you are new to using CodeIgniter.
- application - This is where the main application files are kept. It includes the configuaration files, the class controllers, models and view files. If you want to make changes to the application, you should modify these files.
- bootstrap - The bootstrap Javascript and CSS files.
- images - Images used in the application are stored here.
- scripts - Custom Javascript files made for use with the application.
- styles - Custom CSS files made for use with the application.
- system - The core CodeIgniter files are present here. These should not be modified unless upgrading the CodeIgniter version.
- uploads - This folder is used to store user uploads.
- user_guide - Documentation on how to use CodeIgniter.
- .htaccess - This file is used to tell your web server to process URLs.
- index.php - The application bootup file.
You can find more information on directory structure at the CodeIgniter website and reading the User Guide: http://www.codeigniter.com/user_guide/
Where Everything Is - top
This part of the guide is to show you where the most common elements of the site are located. Remember, this site uses CodeIgniter Framework, so for well-documented additional support, please use their website and user guide: http://www.codeigniter.com/user_guide/
Styling & CSS
The site's styling is based off Bootstrap 3; Bootstrap 3 comes with lots of predefined CSS elements that you can use to create well presented websites with. You can view the Bootstrap documentation and examples here: http://getbootstrap.com/. If you wish to upgrade the Bootstrap version or make your own changes to it, you can find the files in the bootstrap/ directory.
The product also uses it's own custom styling to create the site layout. You can find the stylesheet file in styles folder.
Modify HTML / Frontend interface
The template files, also known as views, can be found in application/views/. These files contain the HTML of the site and modifying these files allows you to change the way the site presents data. These files also contain some PHP code so it's important to know what you're doing when editting these files.
The layout file can be found in application/views/layout/layout.php.
PHP Logic & Database Models
The controller files, which contain the site logic, can be found in application/controllers/ folder. These are PHP files that are used to control how the site works.
The model files can be found in application/models/ which contain the database logic.
Javascript & Libraries
The Javascript files can be found in the scripts/ folder. The custom/ folder contains custom made scripts for the site and the libraries/ folder contains 3rd-party plugins that we use.
Dashboard - top
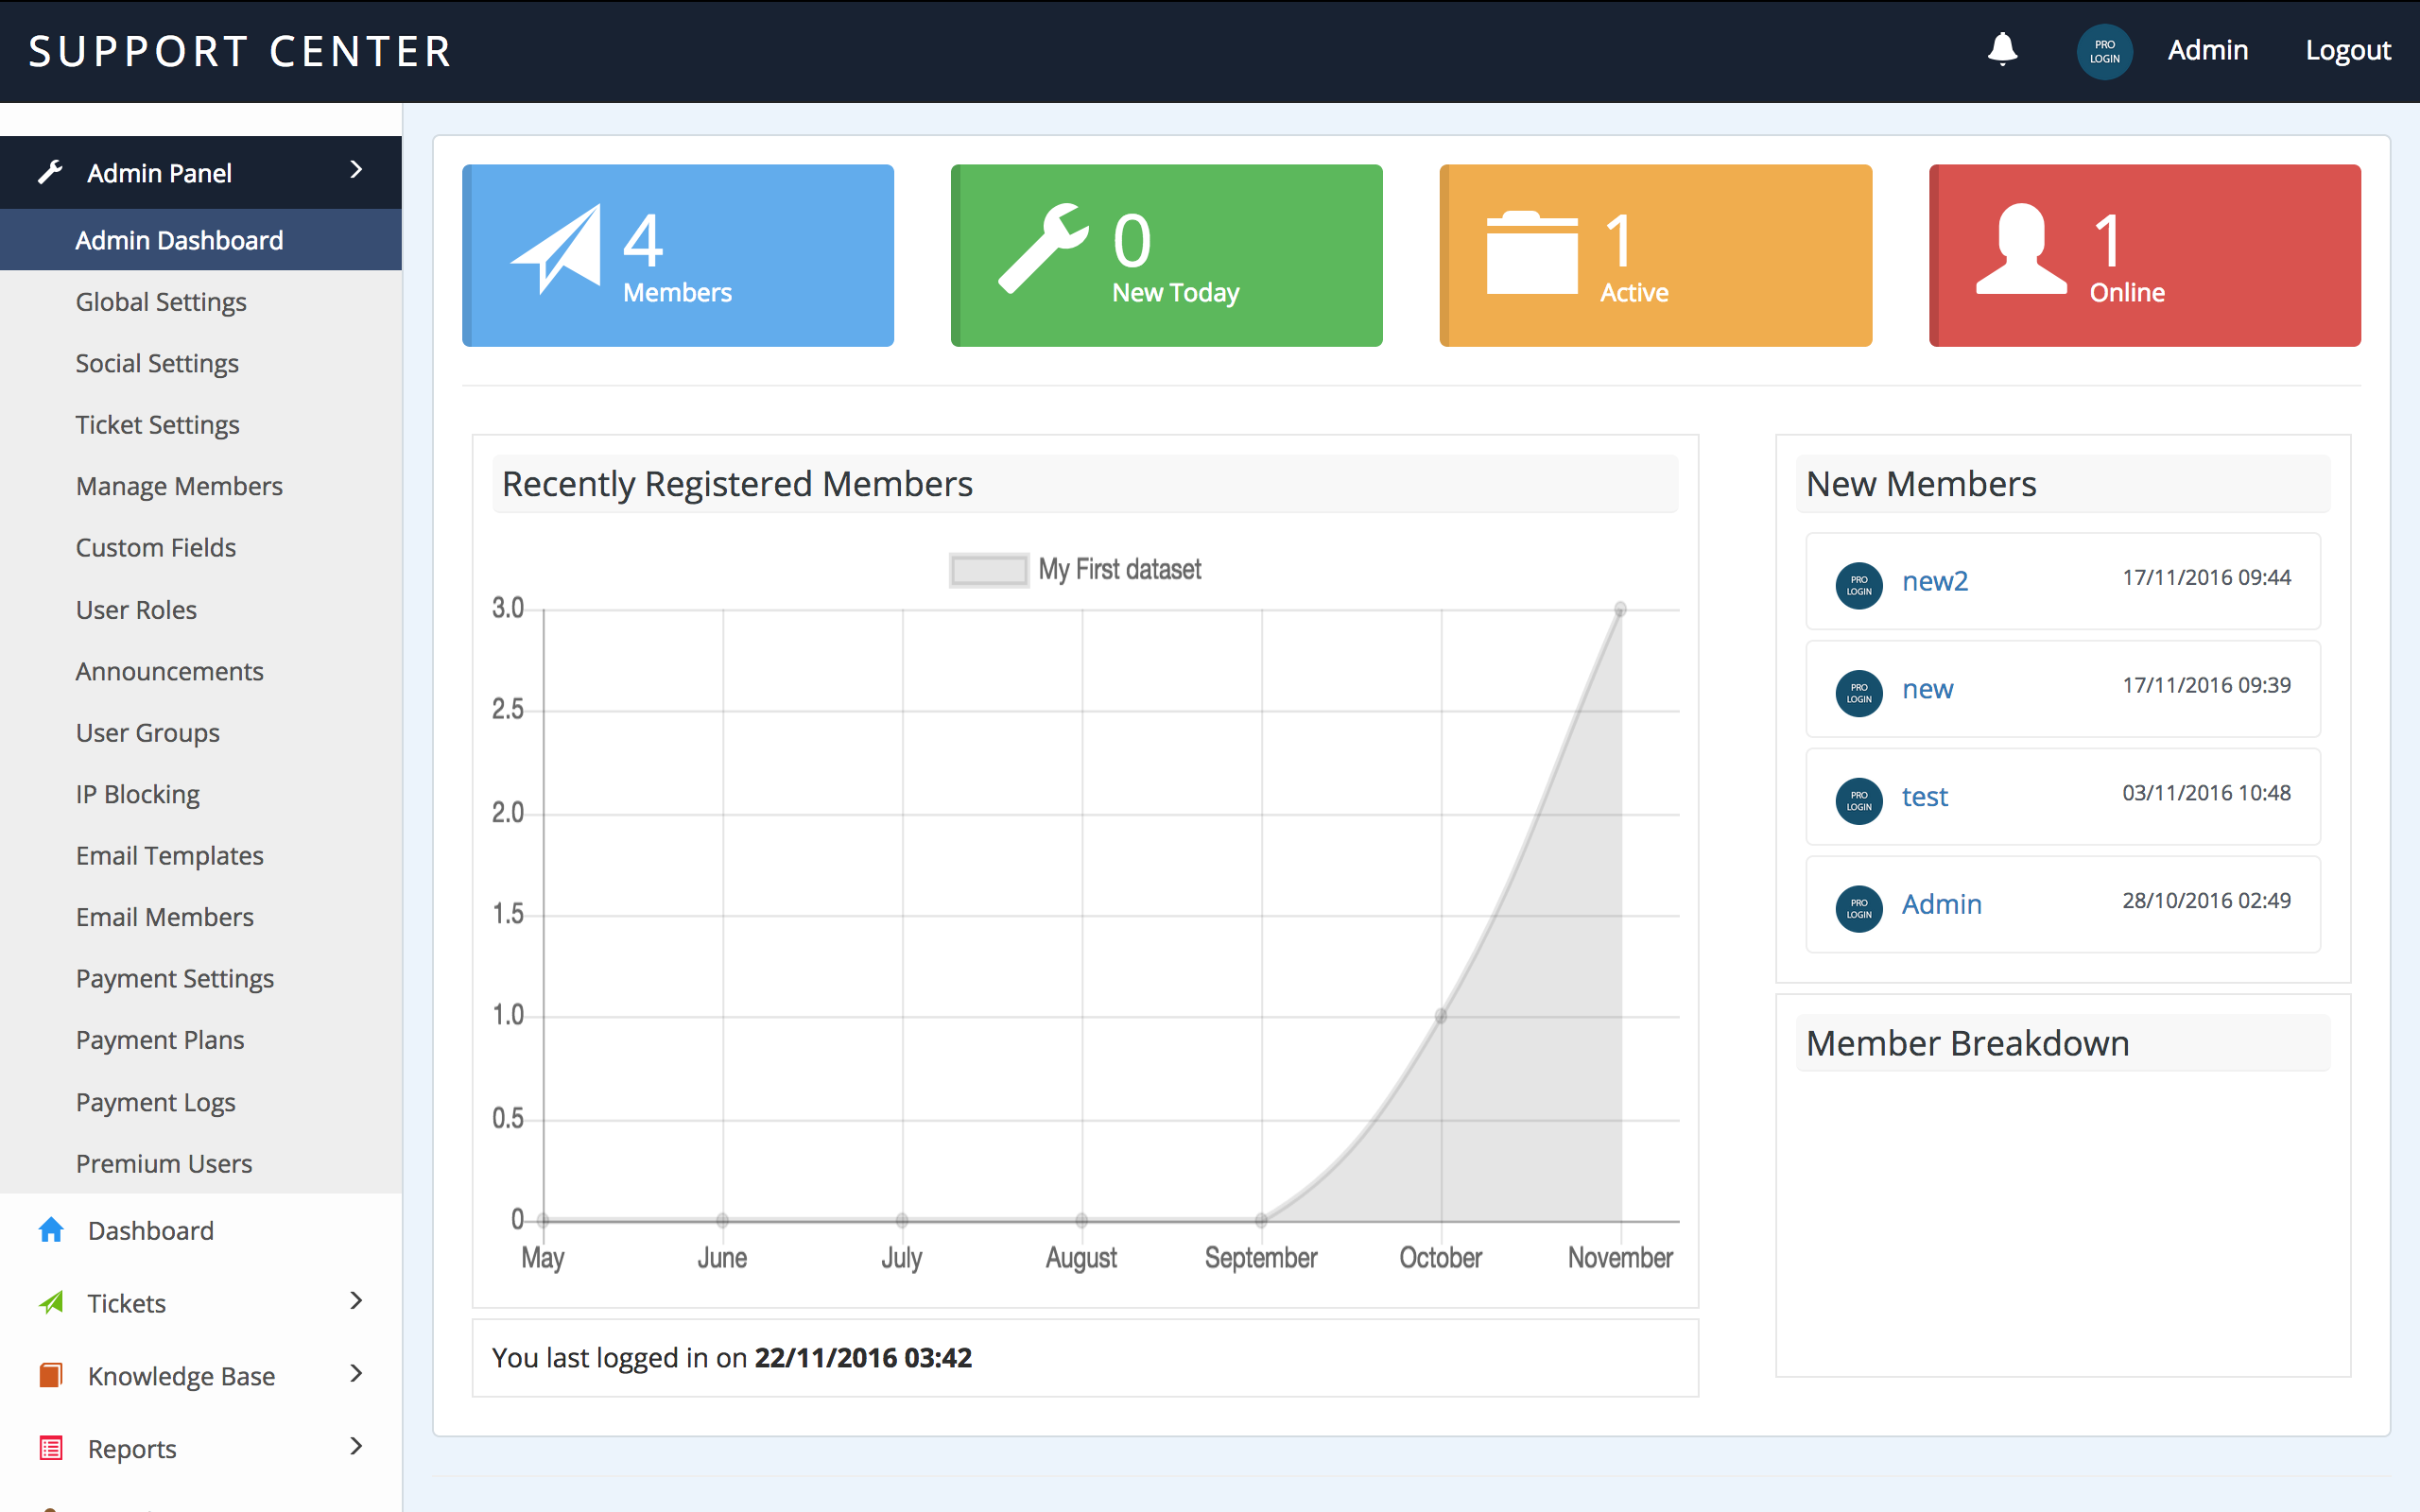
The dashboard for the Support Centre will give you a quick overview of your system. This dashboard is only seen by users with staff privlidges i.e. Admins, Ticket Managers, Knowledge Managers etc.
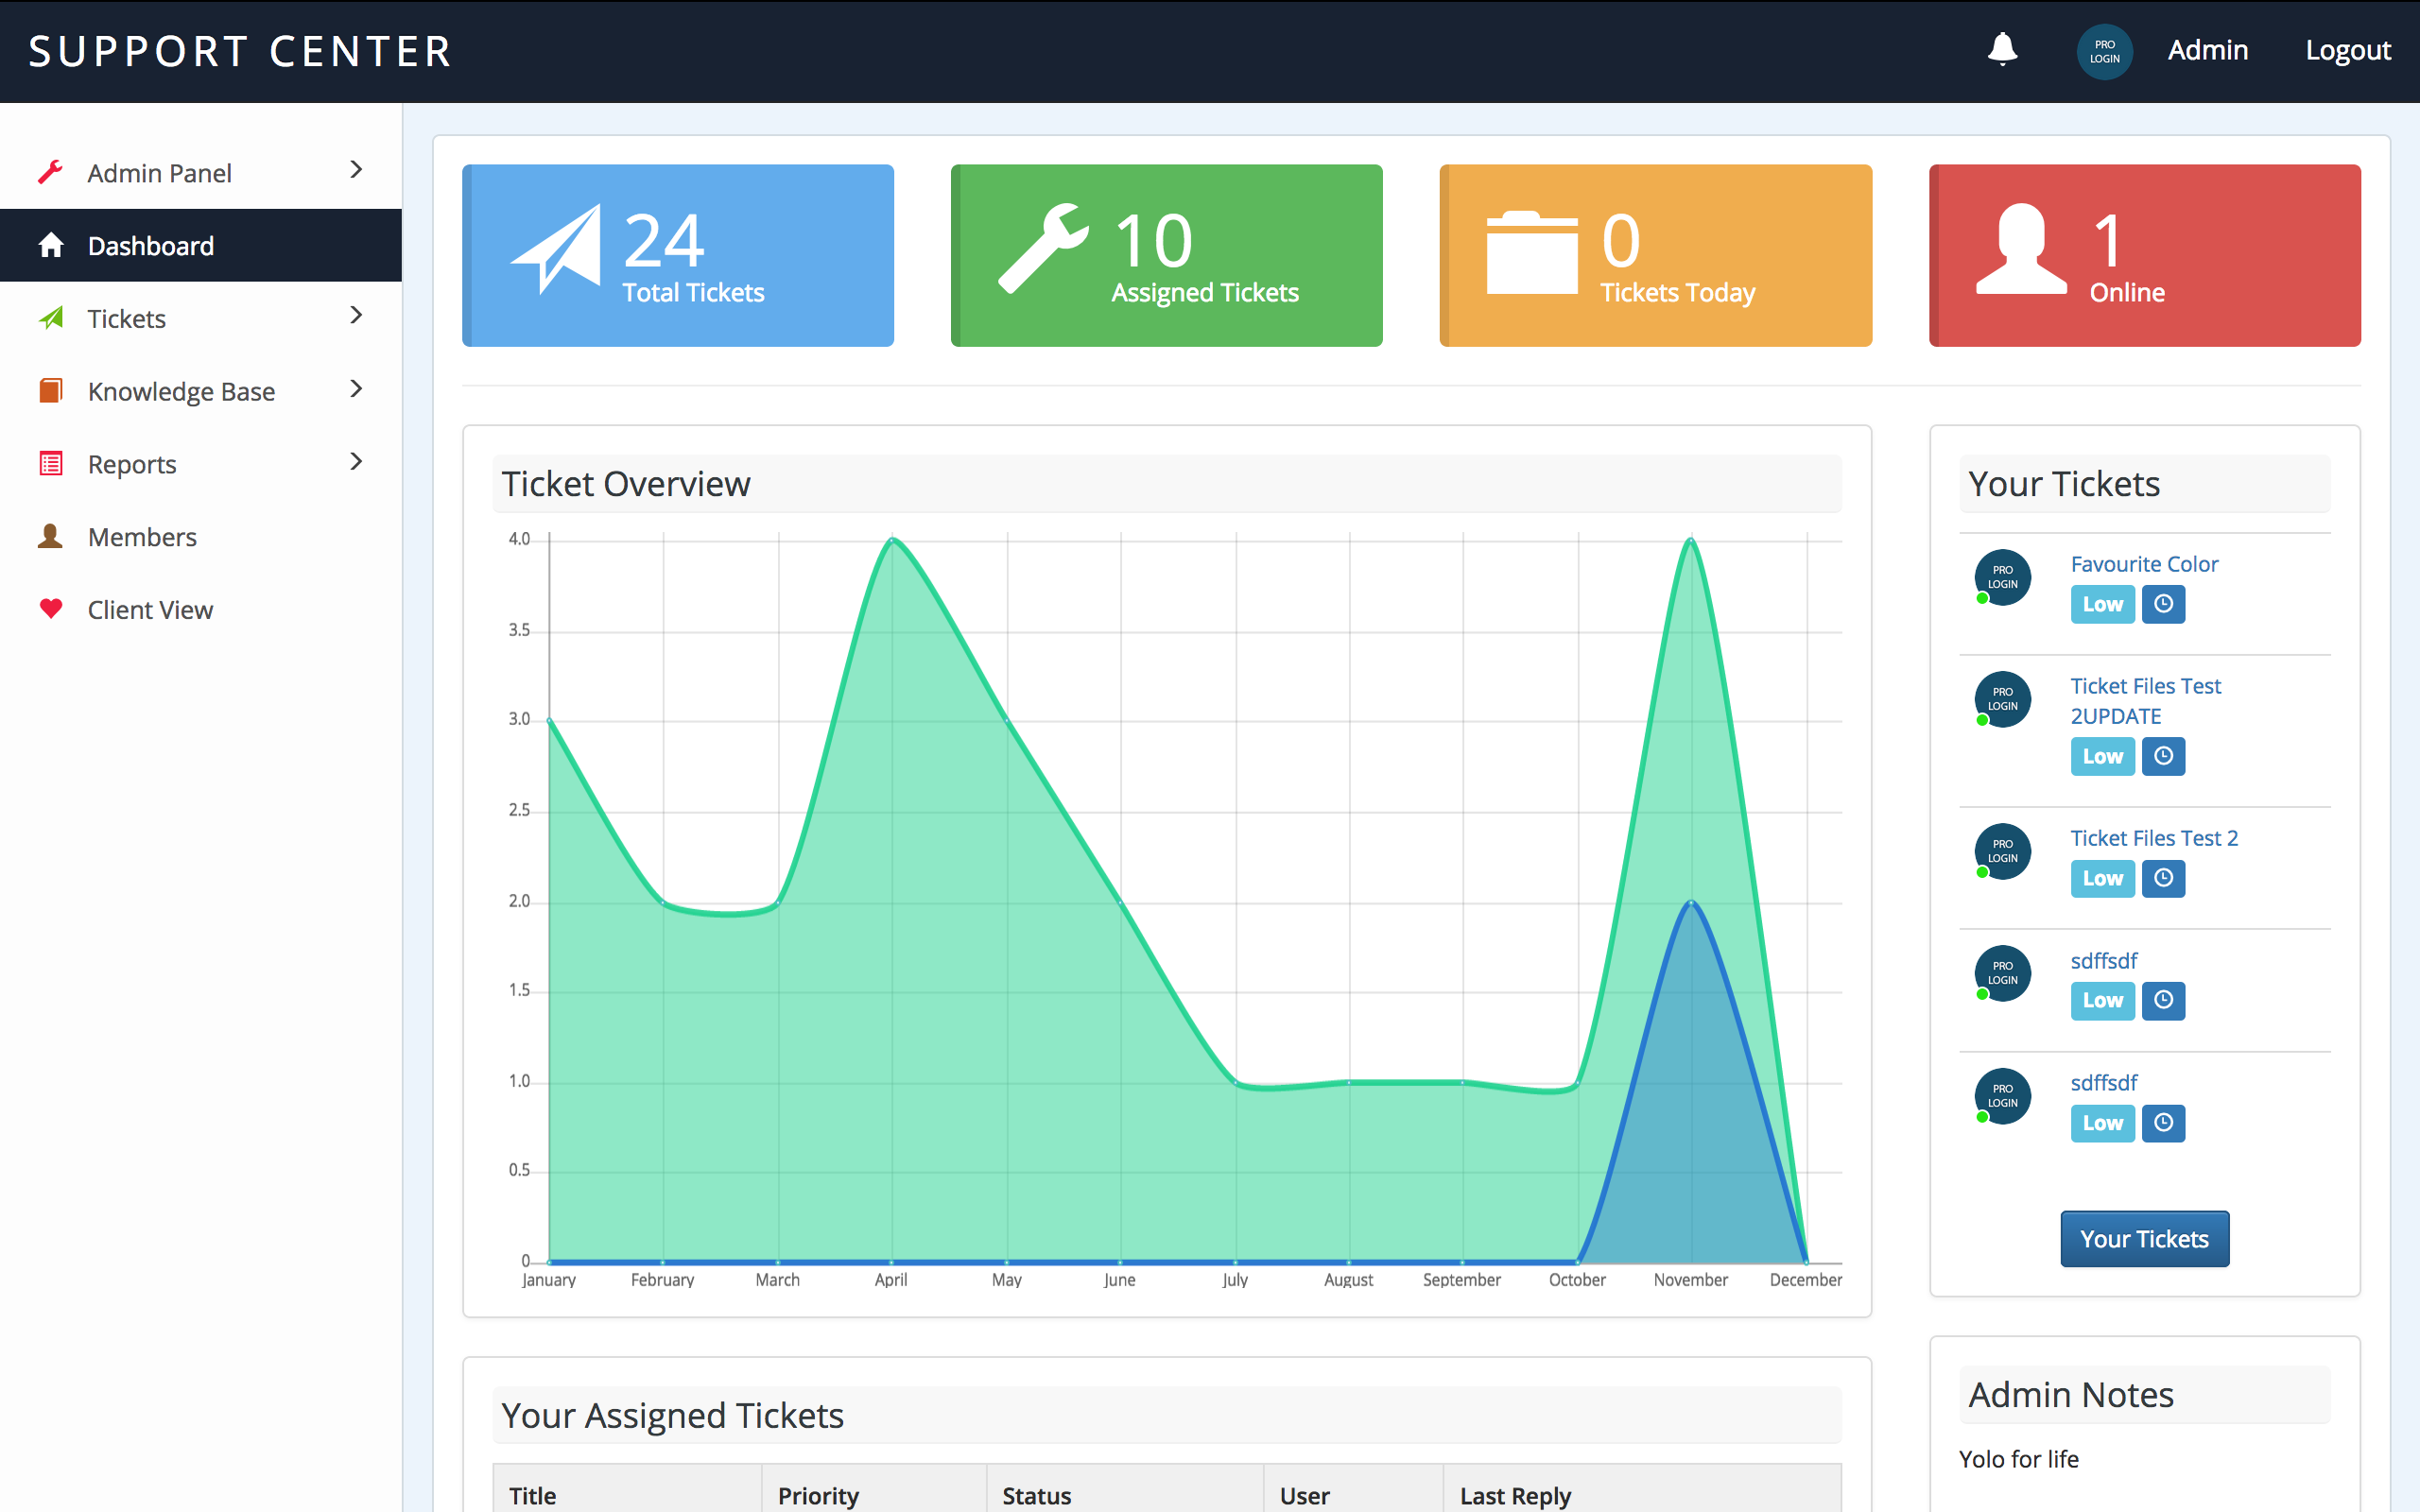
The first thing you'll see is some basic stats about how many tickets have been created. This data is cached and will update every 6 hours to help save resources.
The Ticket Overview graph will show how many tickets have been opened in a month and how many have been closed.
You'll see two sections for tickets: Your Tickets and Your Assigned Tickets.
Your Tickets will show tickets that have been created in categories you are assigned to. These are tickets your support staff will want to look at when looking for new work.
Your Assigned Tickets are tickets which you have been assigned to. A ticket can only have one staff member assigned to it in order to stop overlays.
There is also a section called Admin Notes which allows Admin users to post notes to the front page that only staff will see.
Ticket System - top
The Ticket System is the core of the Support Centre application. Your users will create tickets for your staff to reply to. This section details all the key areas of the system.
First off, we will look at the Staff section of the Ticket System. A user with the user roles Admin, Ticket Manager, Ticket Worker can use the Ticket System in the staff area.
Admin and Ticket Manager can use all sections whereas Ticket Worker will only have access to Your Tickets and Your Assigned Tickets.
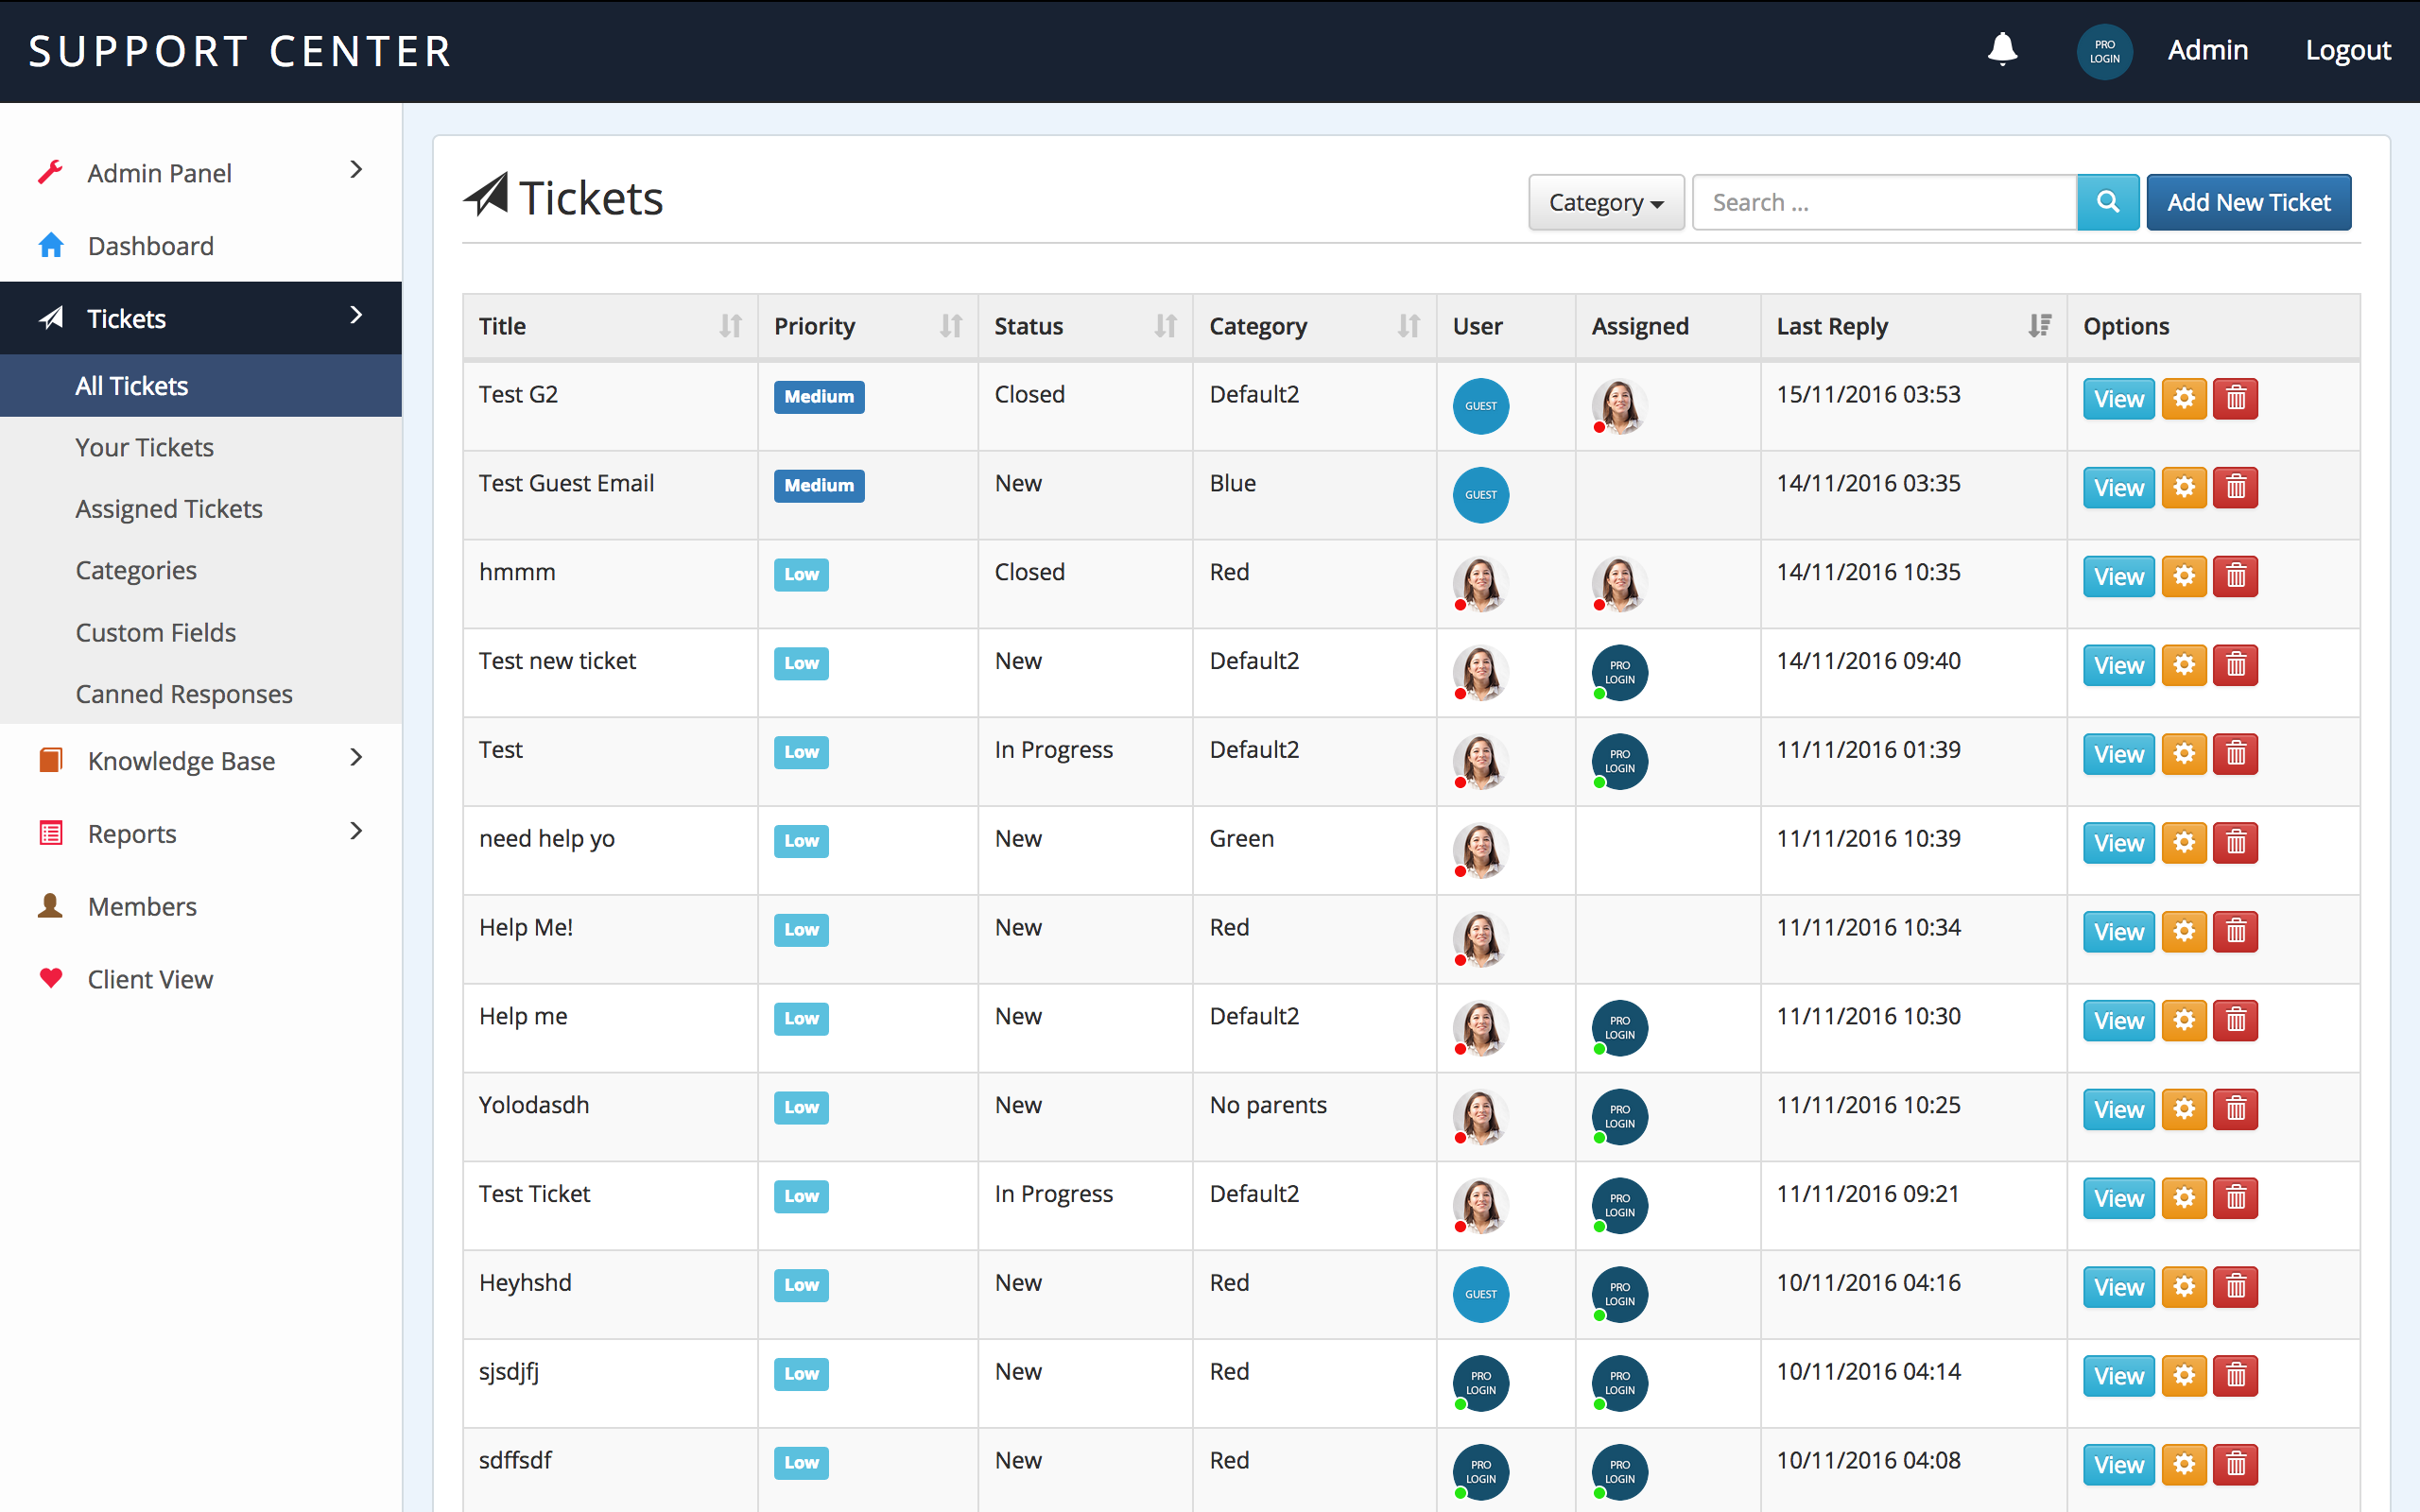
All Tickets will display every ticket created on the system. It's ordered by the most recently updated ticket. You can search through all tickets using the search bar at the top (it updates in real time). You can also view tickets in an individual category by selecting a category from the dropdown list.
Staff can also create tickets manually for their clients. Clicking on the Add New Ticket allows them to do this.
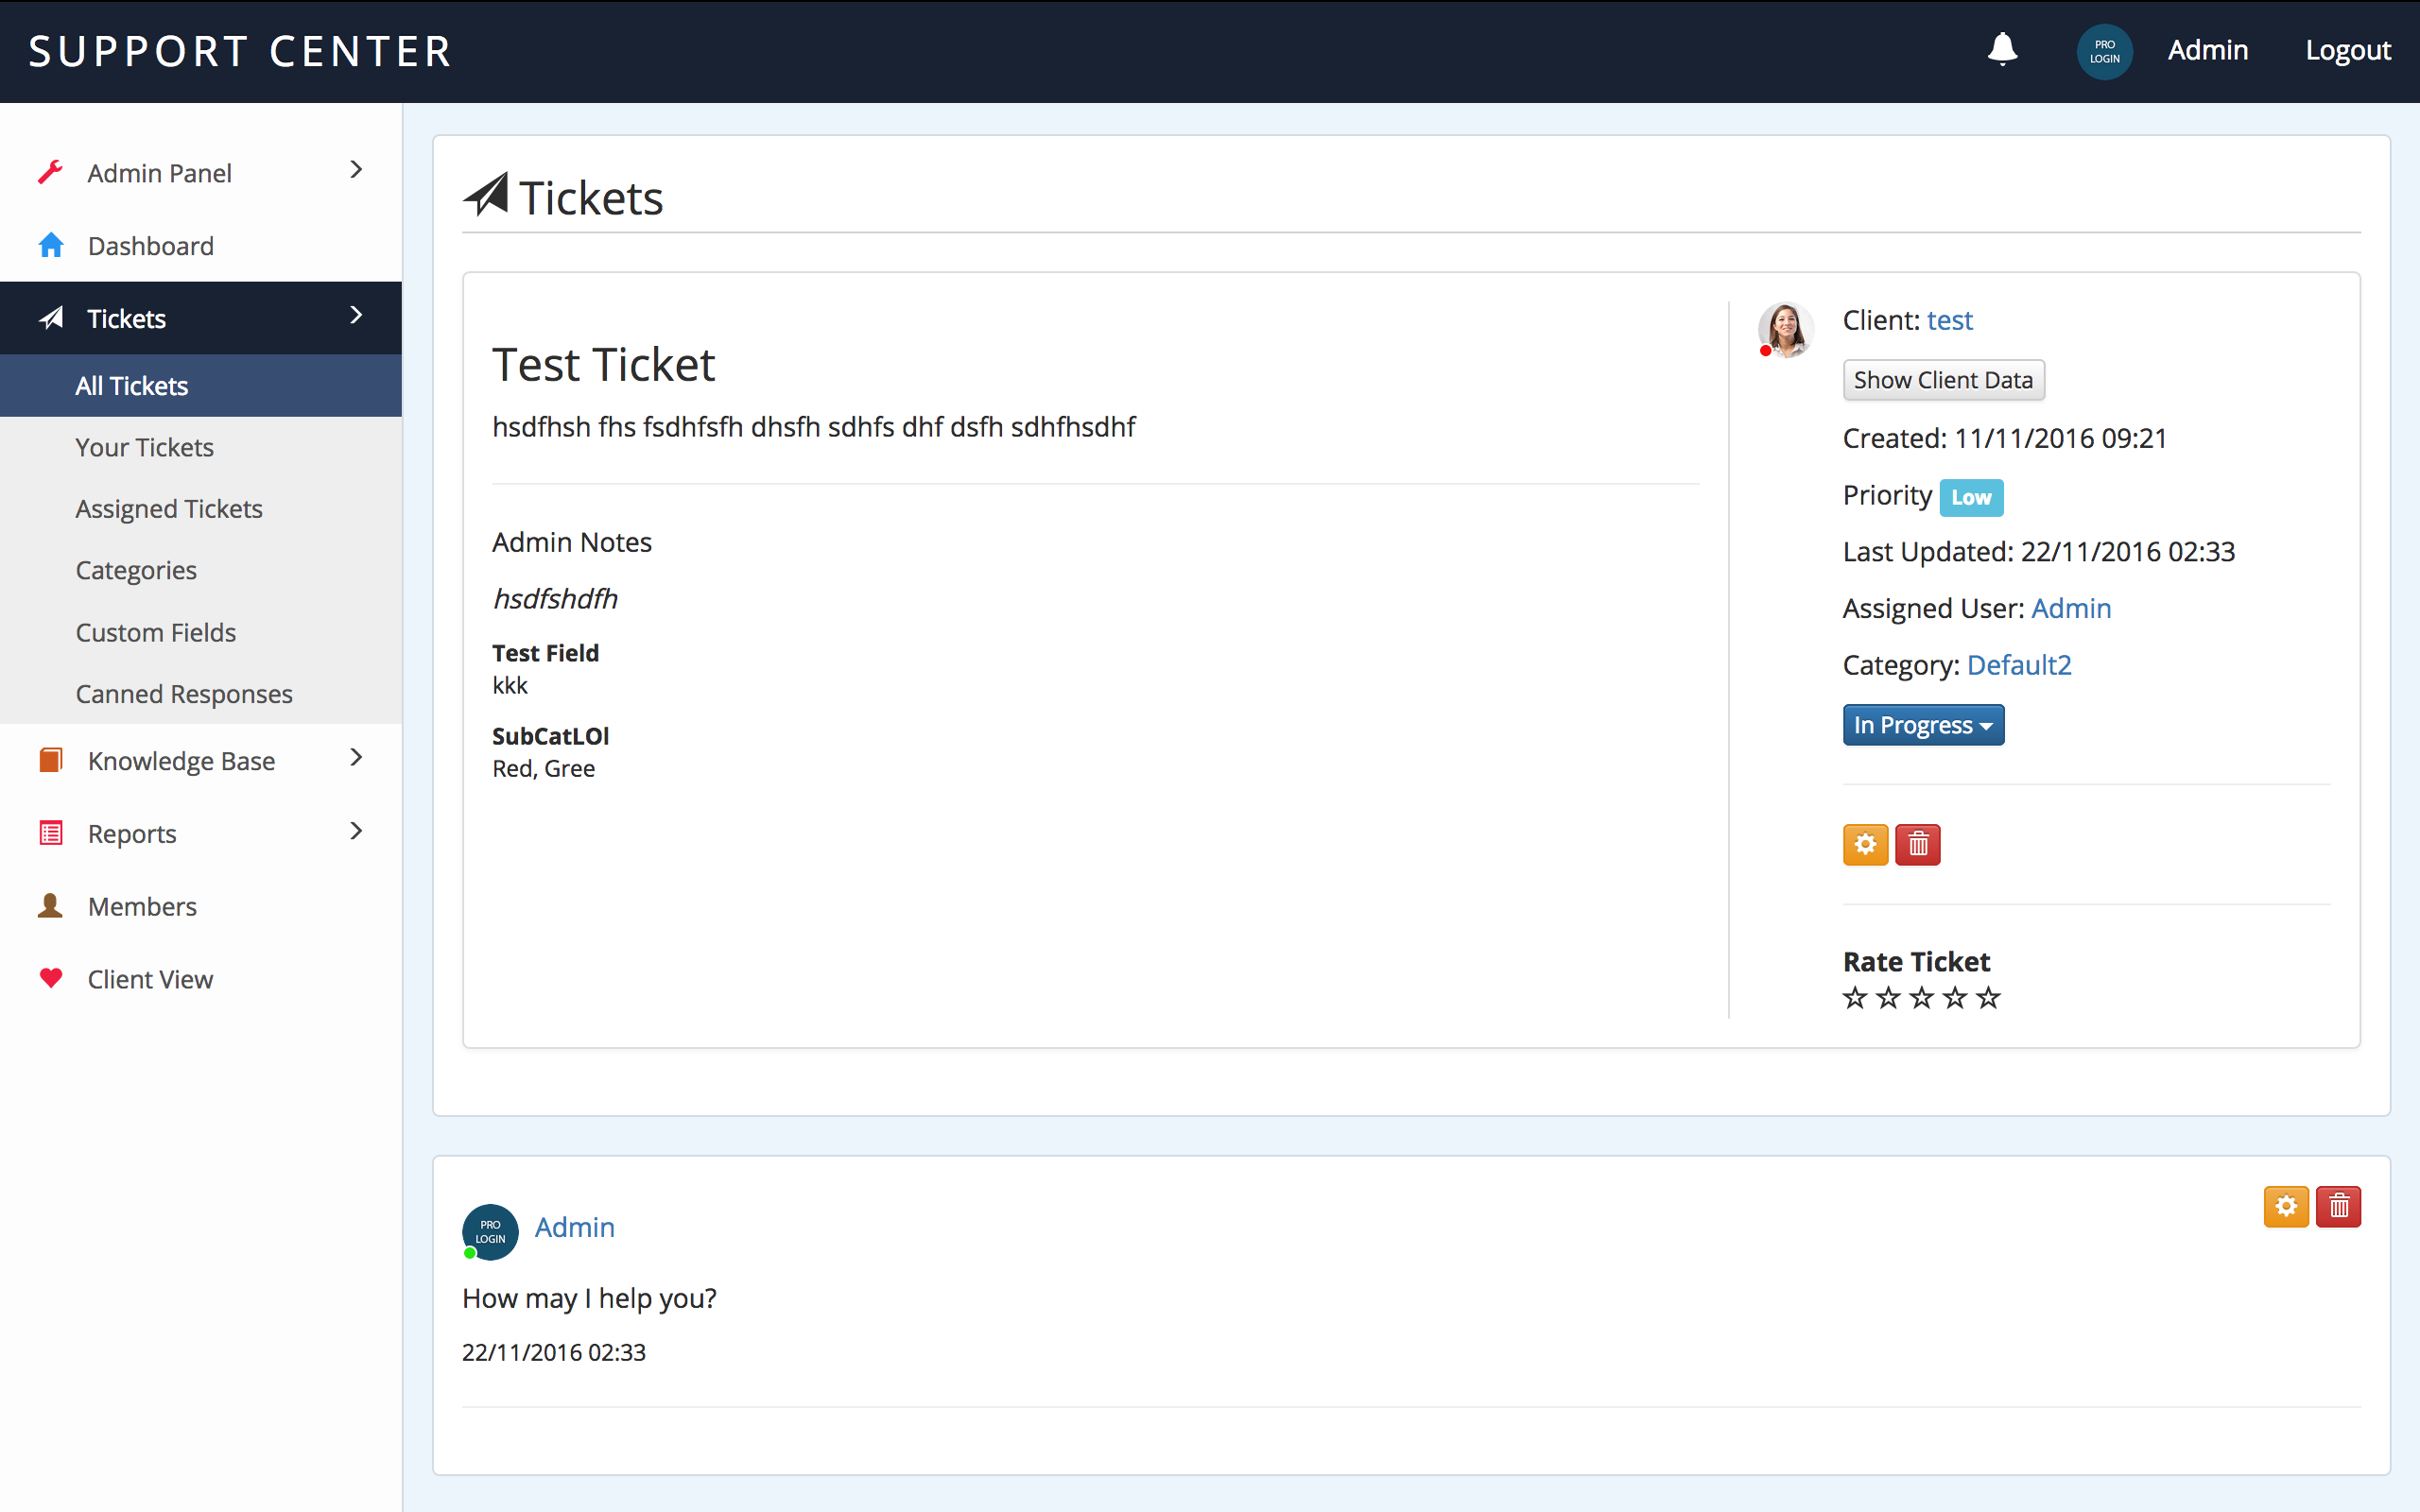
When you click on View Ticket, you'll be able to see all the details of the ticket, including the Client, Ticket Replies, Status, Priority and any custom fields you have created. From this page you can also reply to a ticket, update the status and edit/delete responses.
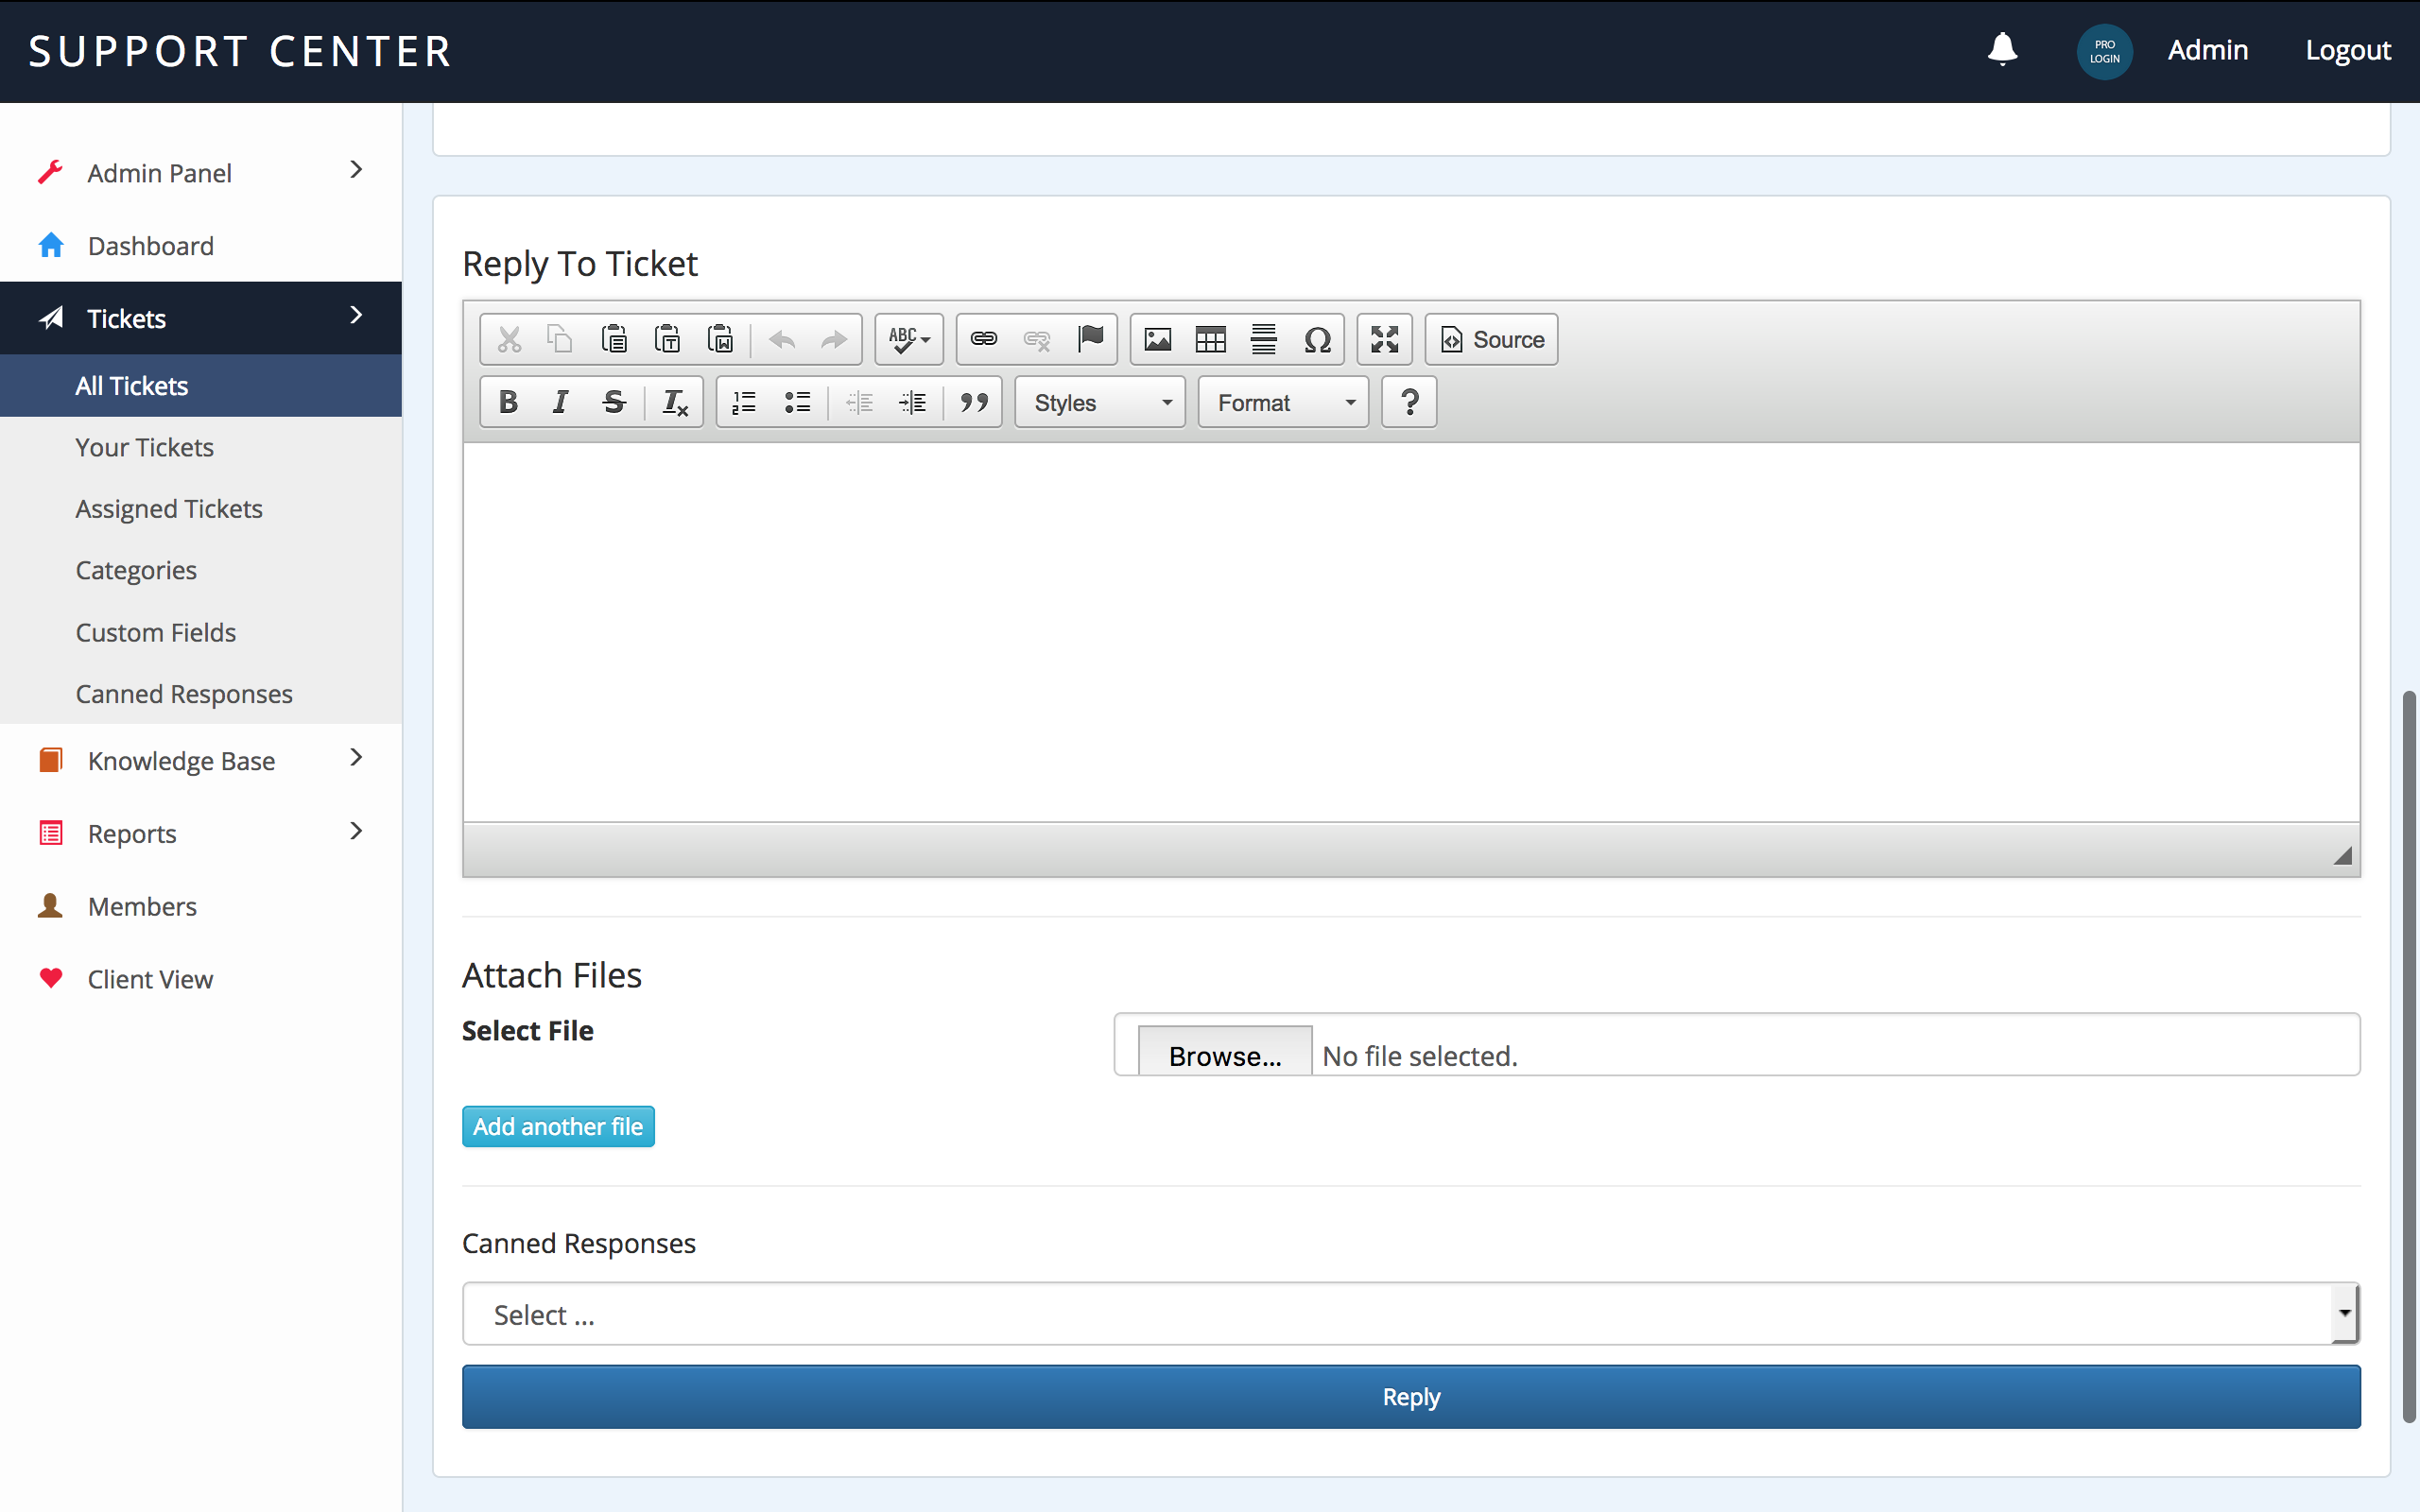
Staff also have the option of using Canned Responses. These are replies that have been created in the Canned Responses section that allow you to quickly reply to tickets with a standard response.
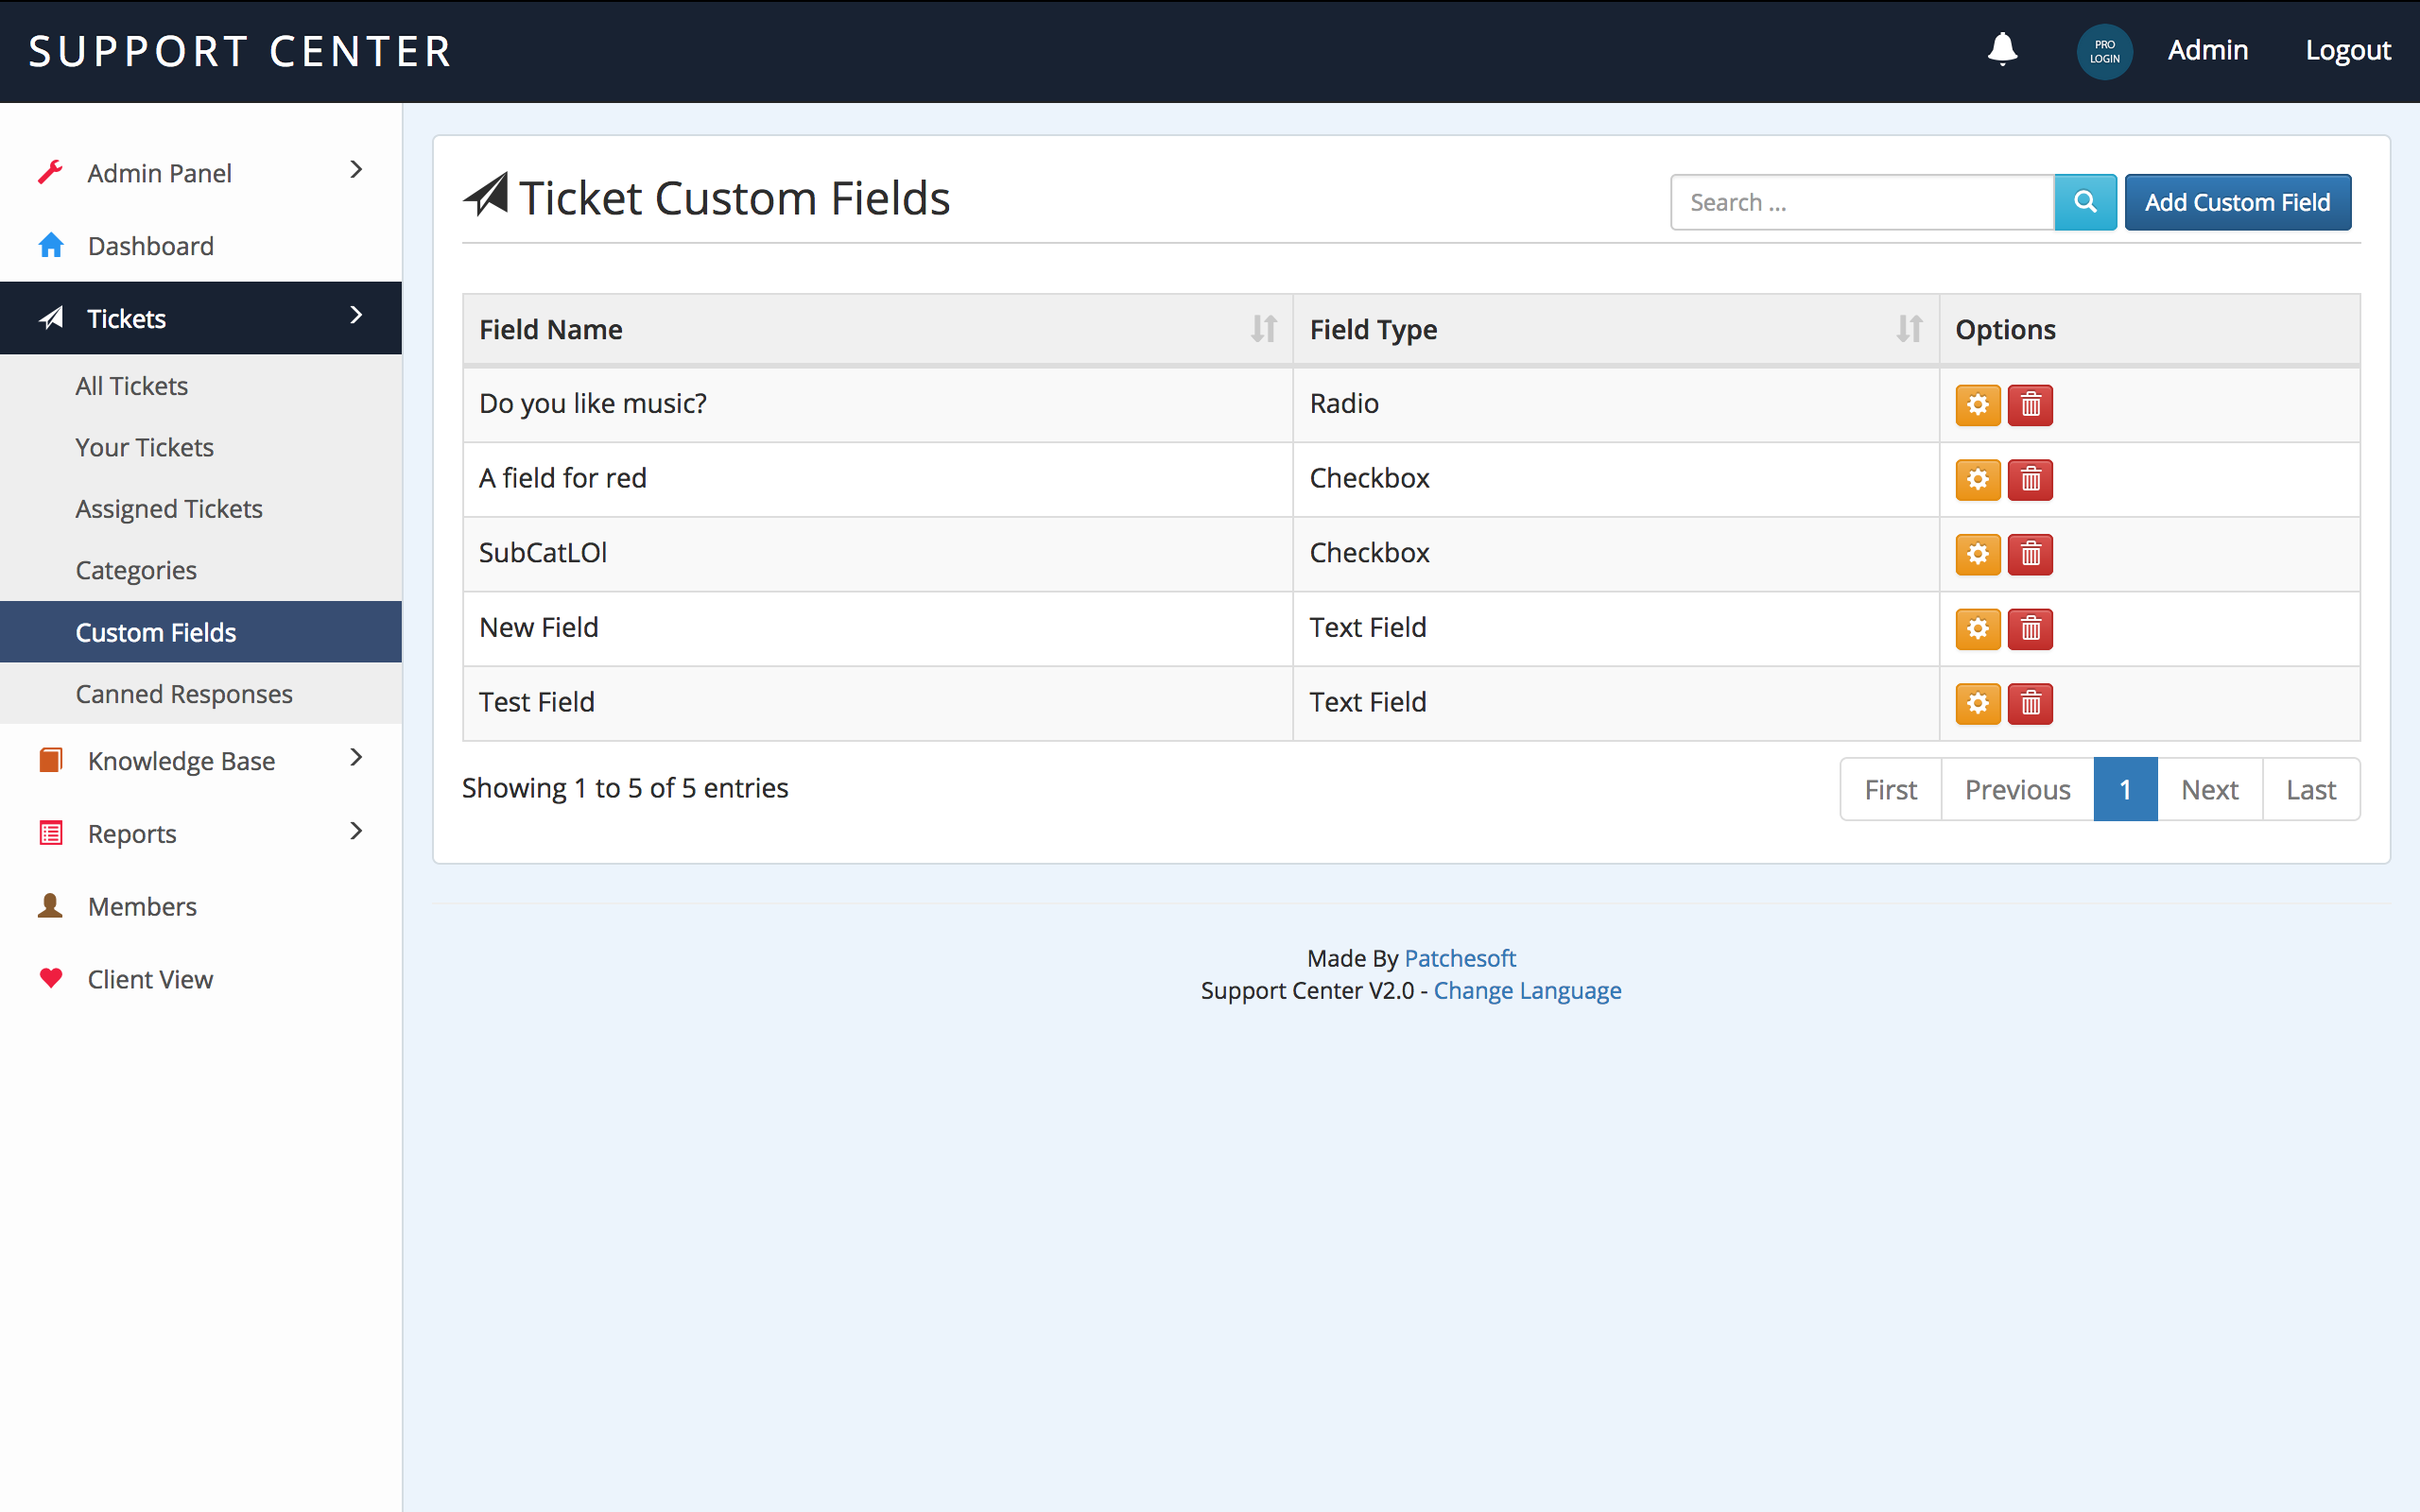
You can also create custom fields for Tickets. These fields are added automatically to the Create Ticket form for your users to fill out. The information can be viewed on the View Ticket page. You have the choice of creating Input fields, textareas, radio fields, checkboxes and select areas.
Custom fields can also be assigned to only show up when a specific category is selected.
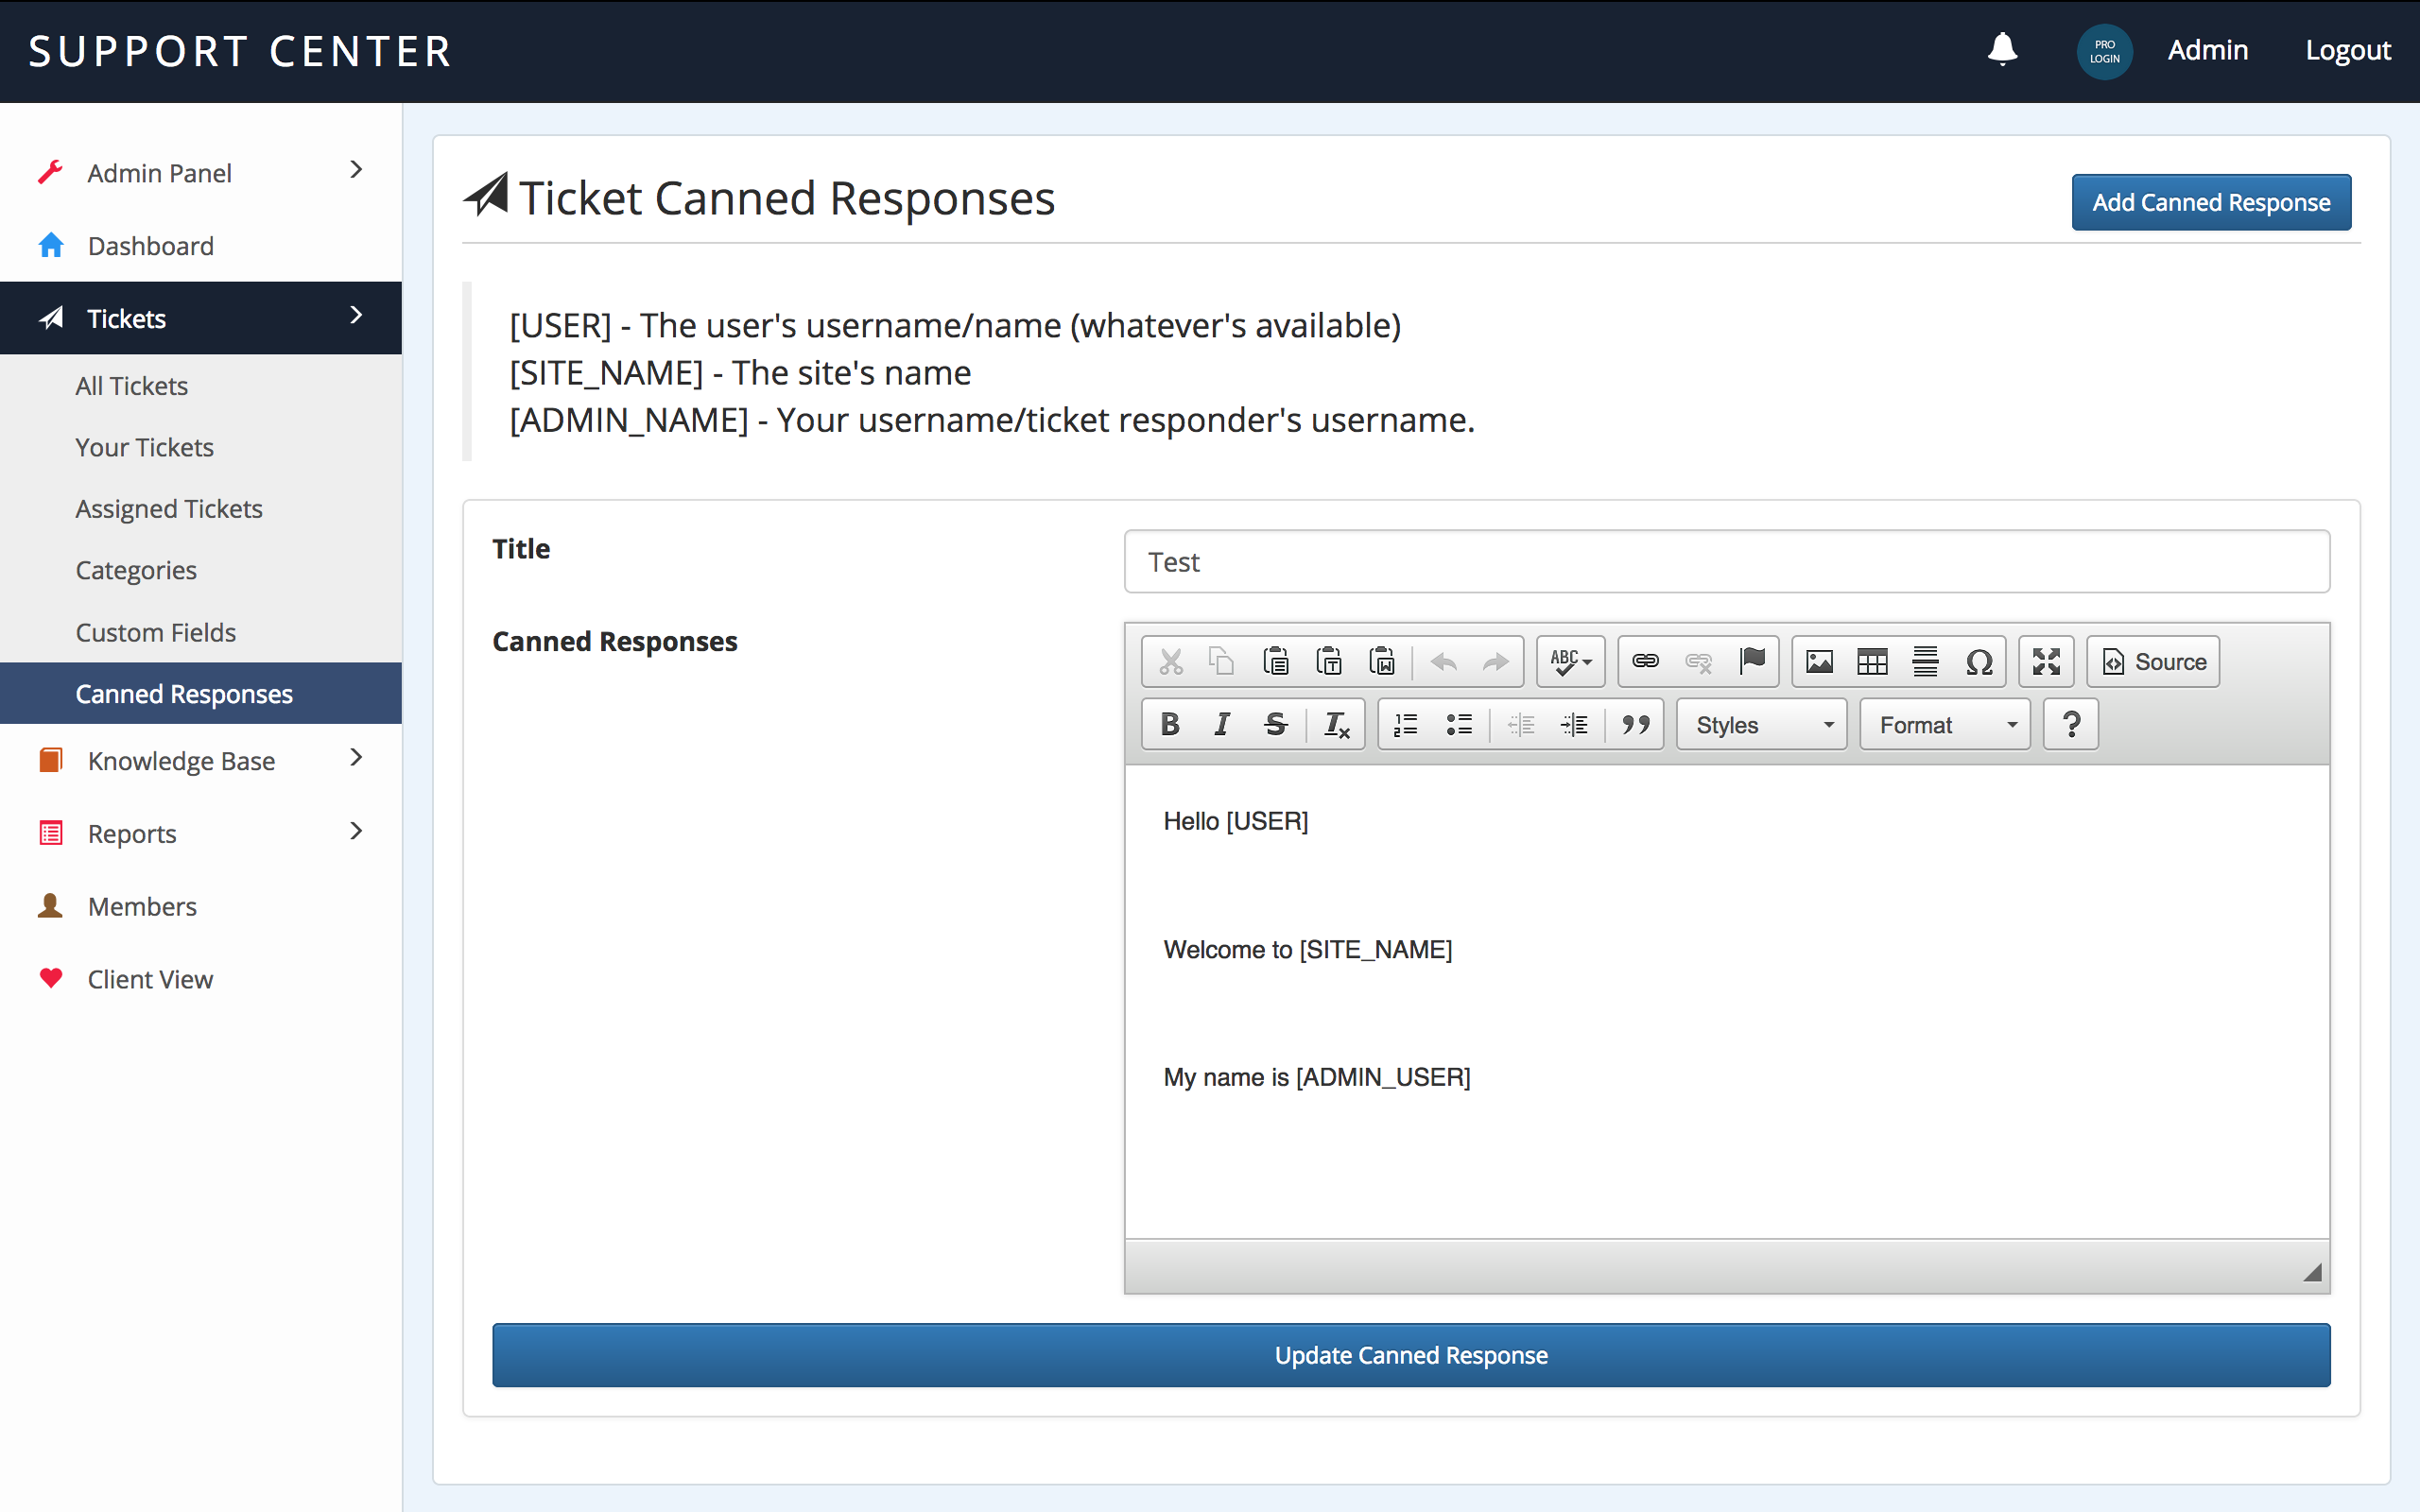
Canned Responses can be easily created in the system. You can use some of our dynamic text blocks for your responses which get automatically replaced when you reply with a canned response.

You can also create categories to better organise your Ticket system. Categories can also have parents and allow you to create sub categories (1 level). Each category can also be assigned a User Group. This allows you to assign staff members to specific categories and will mean they only see tickets created in those categories.
The No Tickets option allows you to make Parent Categories have no tickets created in them. It will force the user to pick a sub-category from that Parent Category.

Users with the Admin use role will be able to modify Ticket Settings in the Admin Panel. Some of the options include disabling file uploads, disabling guest tickets and more.
Knowledge Base - top
The Knowledge Base can be modified by users with the user role Admin and Knowledge Manager. The Knowledge Base allows you to create useful and helpful articles that can help your users.
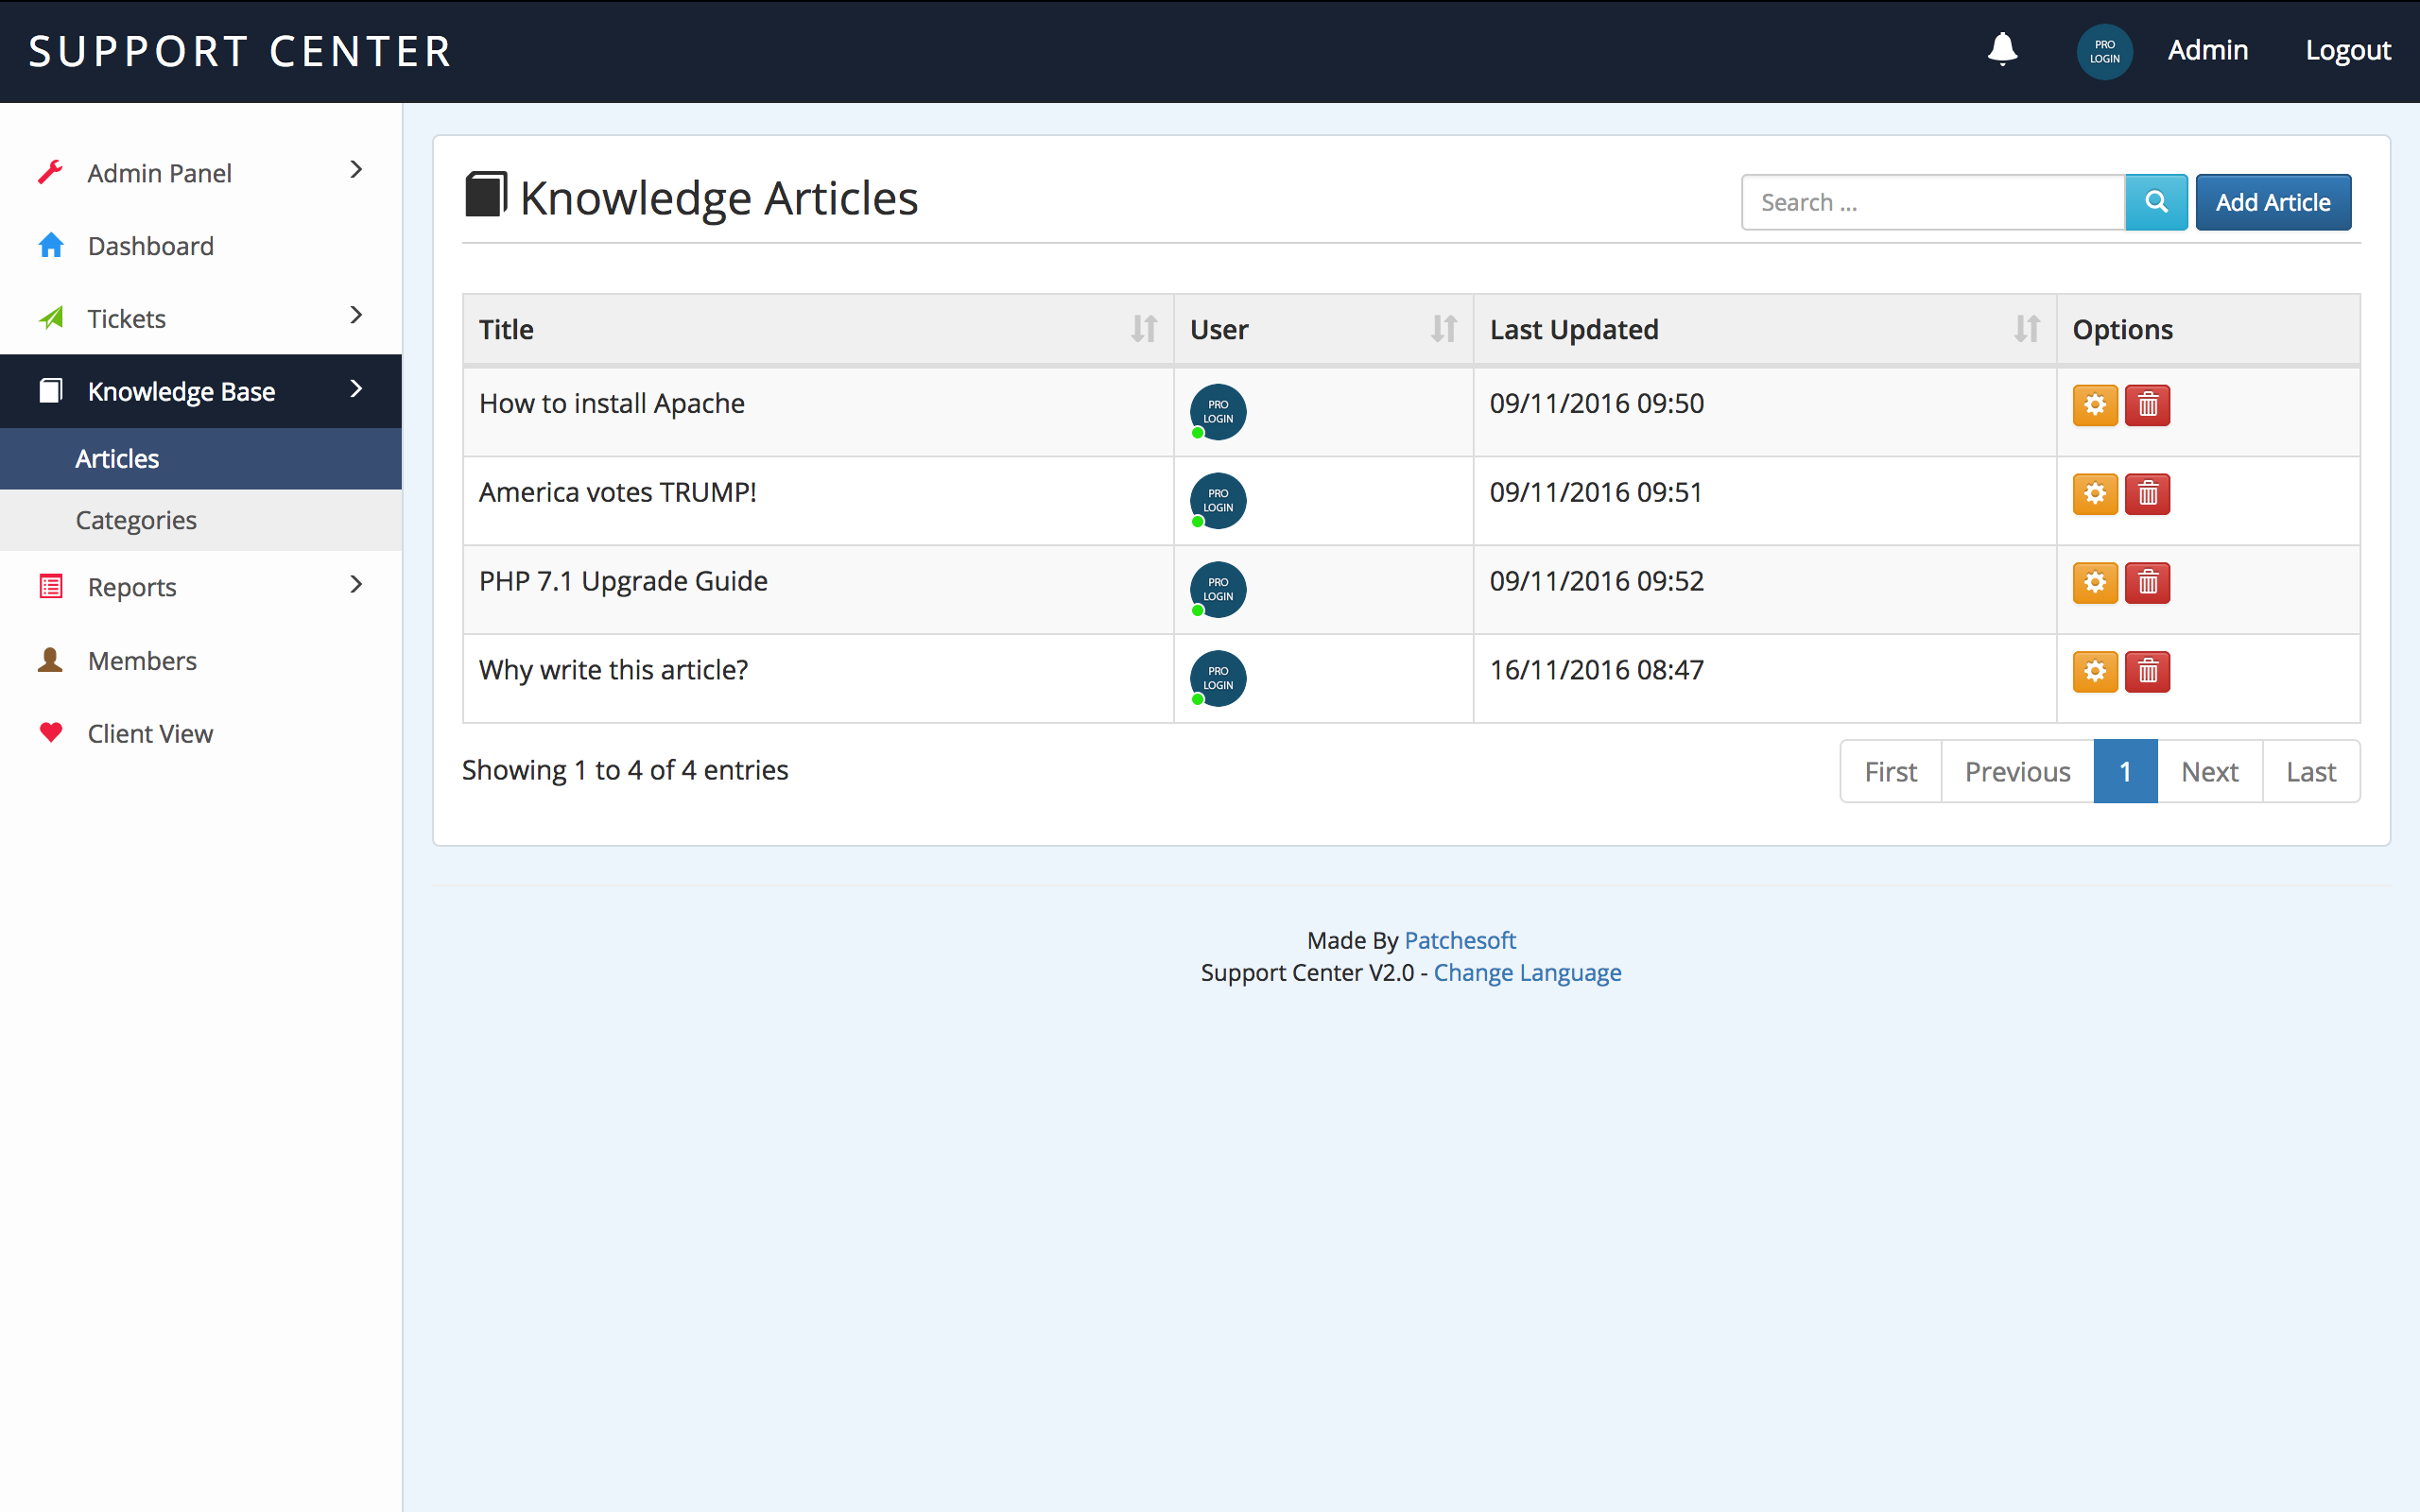
Articles can be organised into categories which can be created in the Categories section. You can use our text editor to add images, links and other types of media. There is also a pure HTML mode that allows you to write your articles in HTML markup.
Reports - top
The Report section allows you to view certain detailed information on your Ticket System. The Reports section can only be accessed by users with the Admin and Ticket Manager user roles.
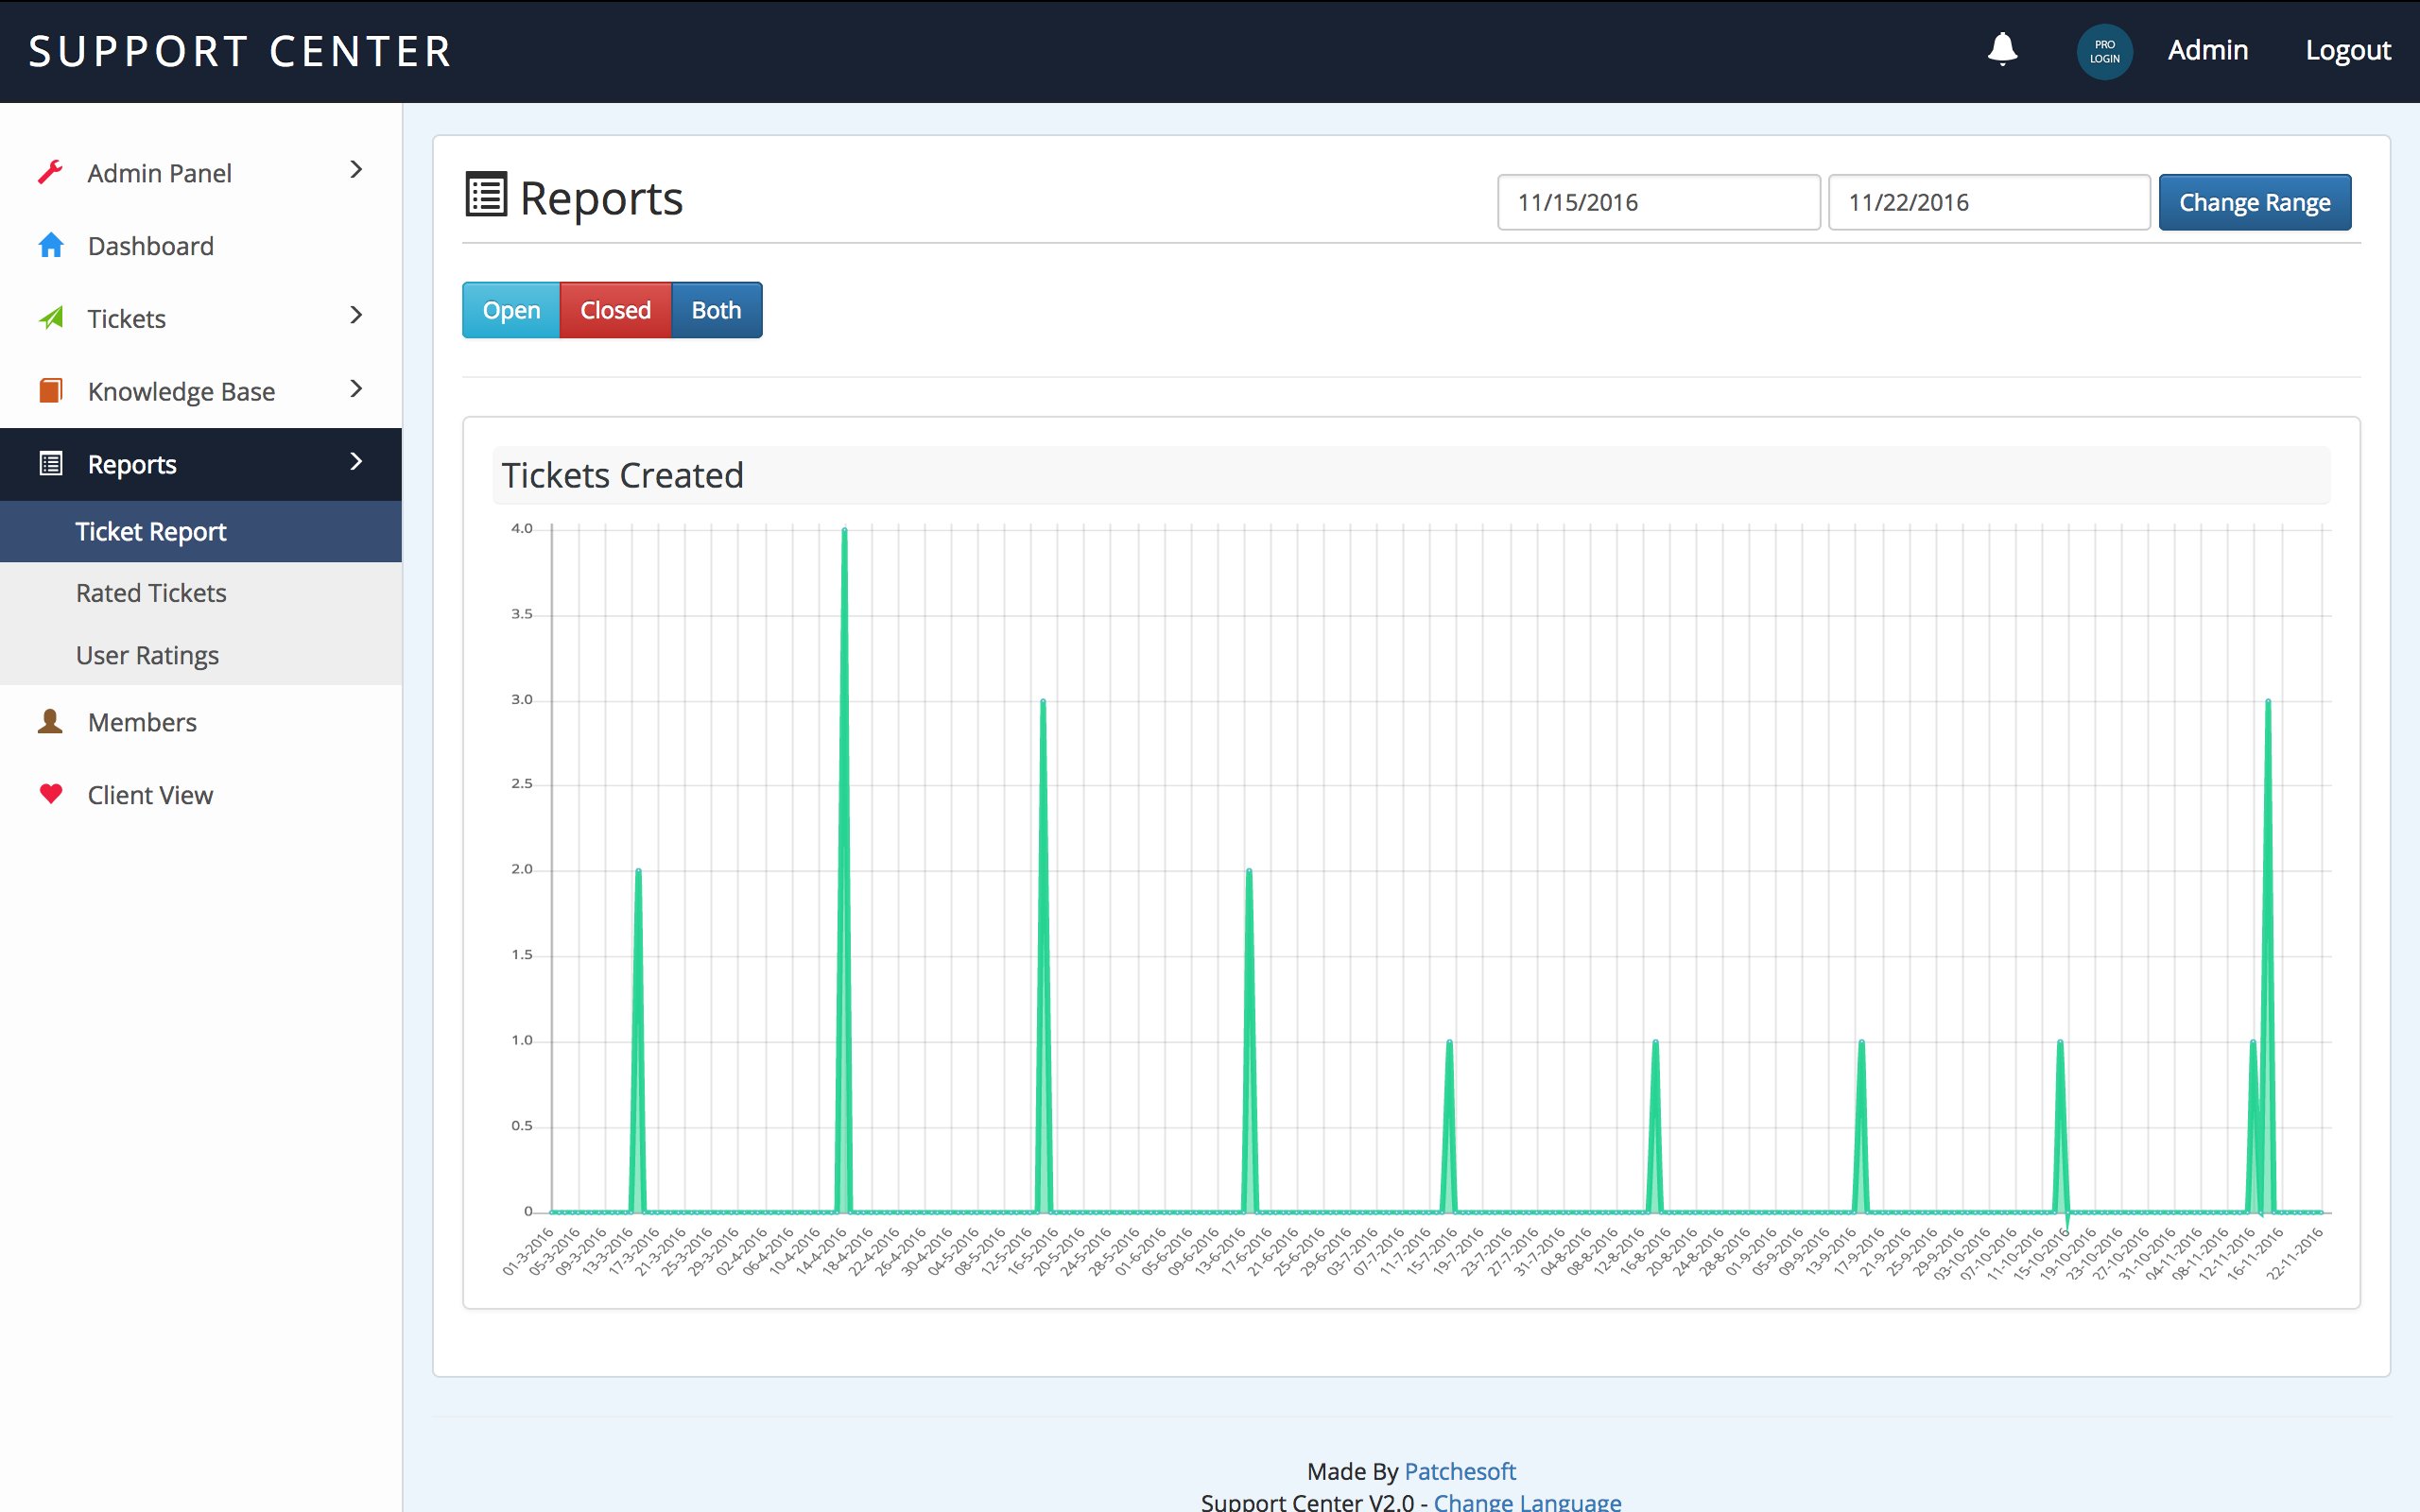
The Tickets Report allows you to view how many tickets were opened and closed for a certain period. You can specify the date range for which you'd like to view by changing two date points in the header. By default, it shows you the most recent tickets created/closed for the past 7 days.

The Rated Tickets section will show you the most recently rated Tickets on your system. Tickets can be rated by clients and this report will show you a list of tickets and their ratings.
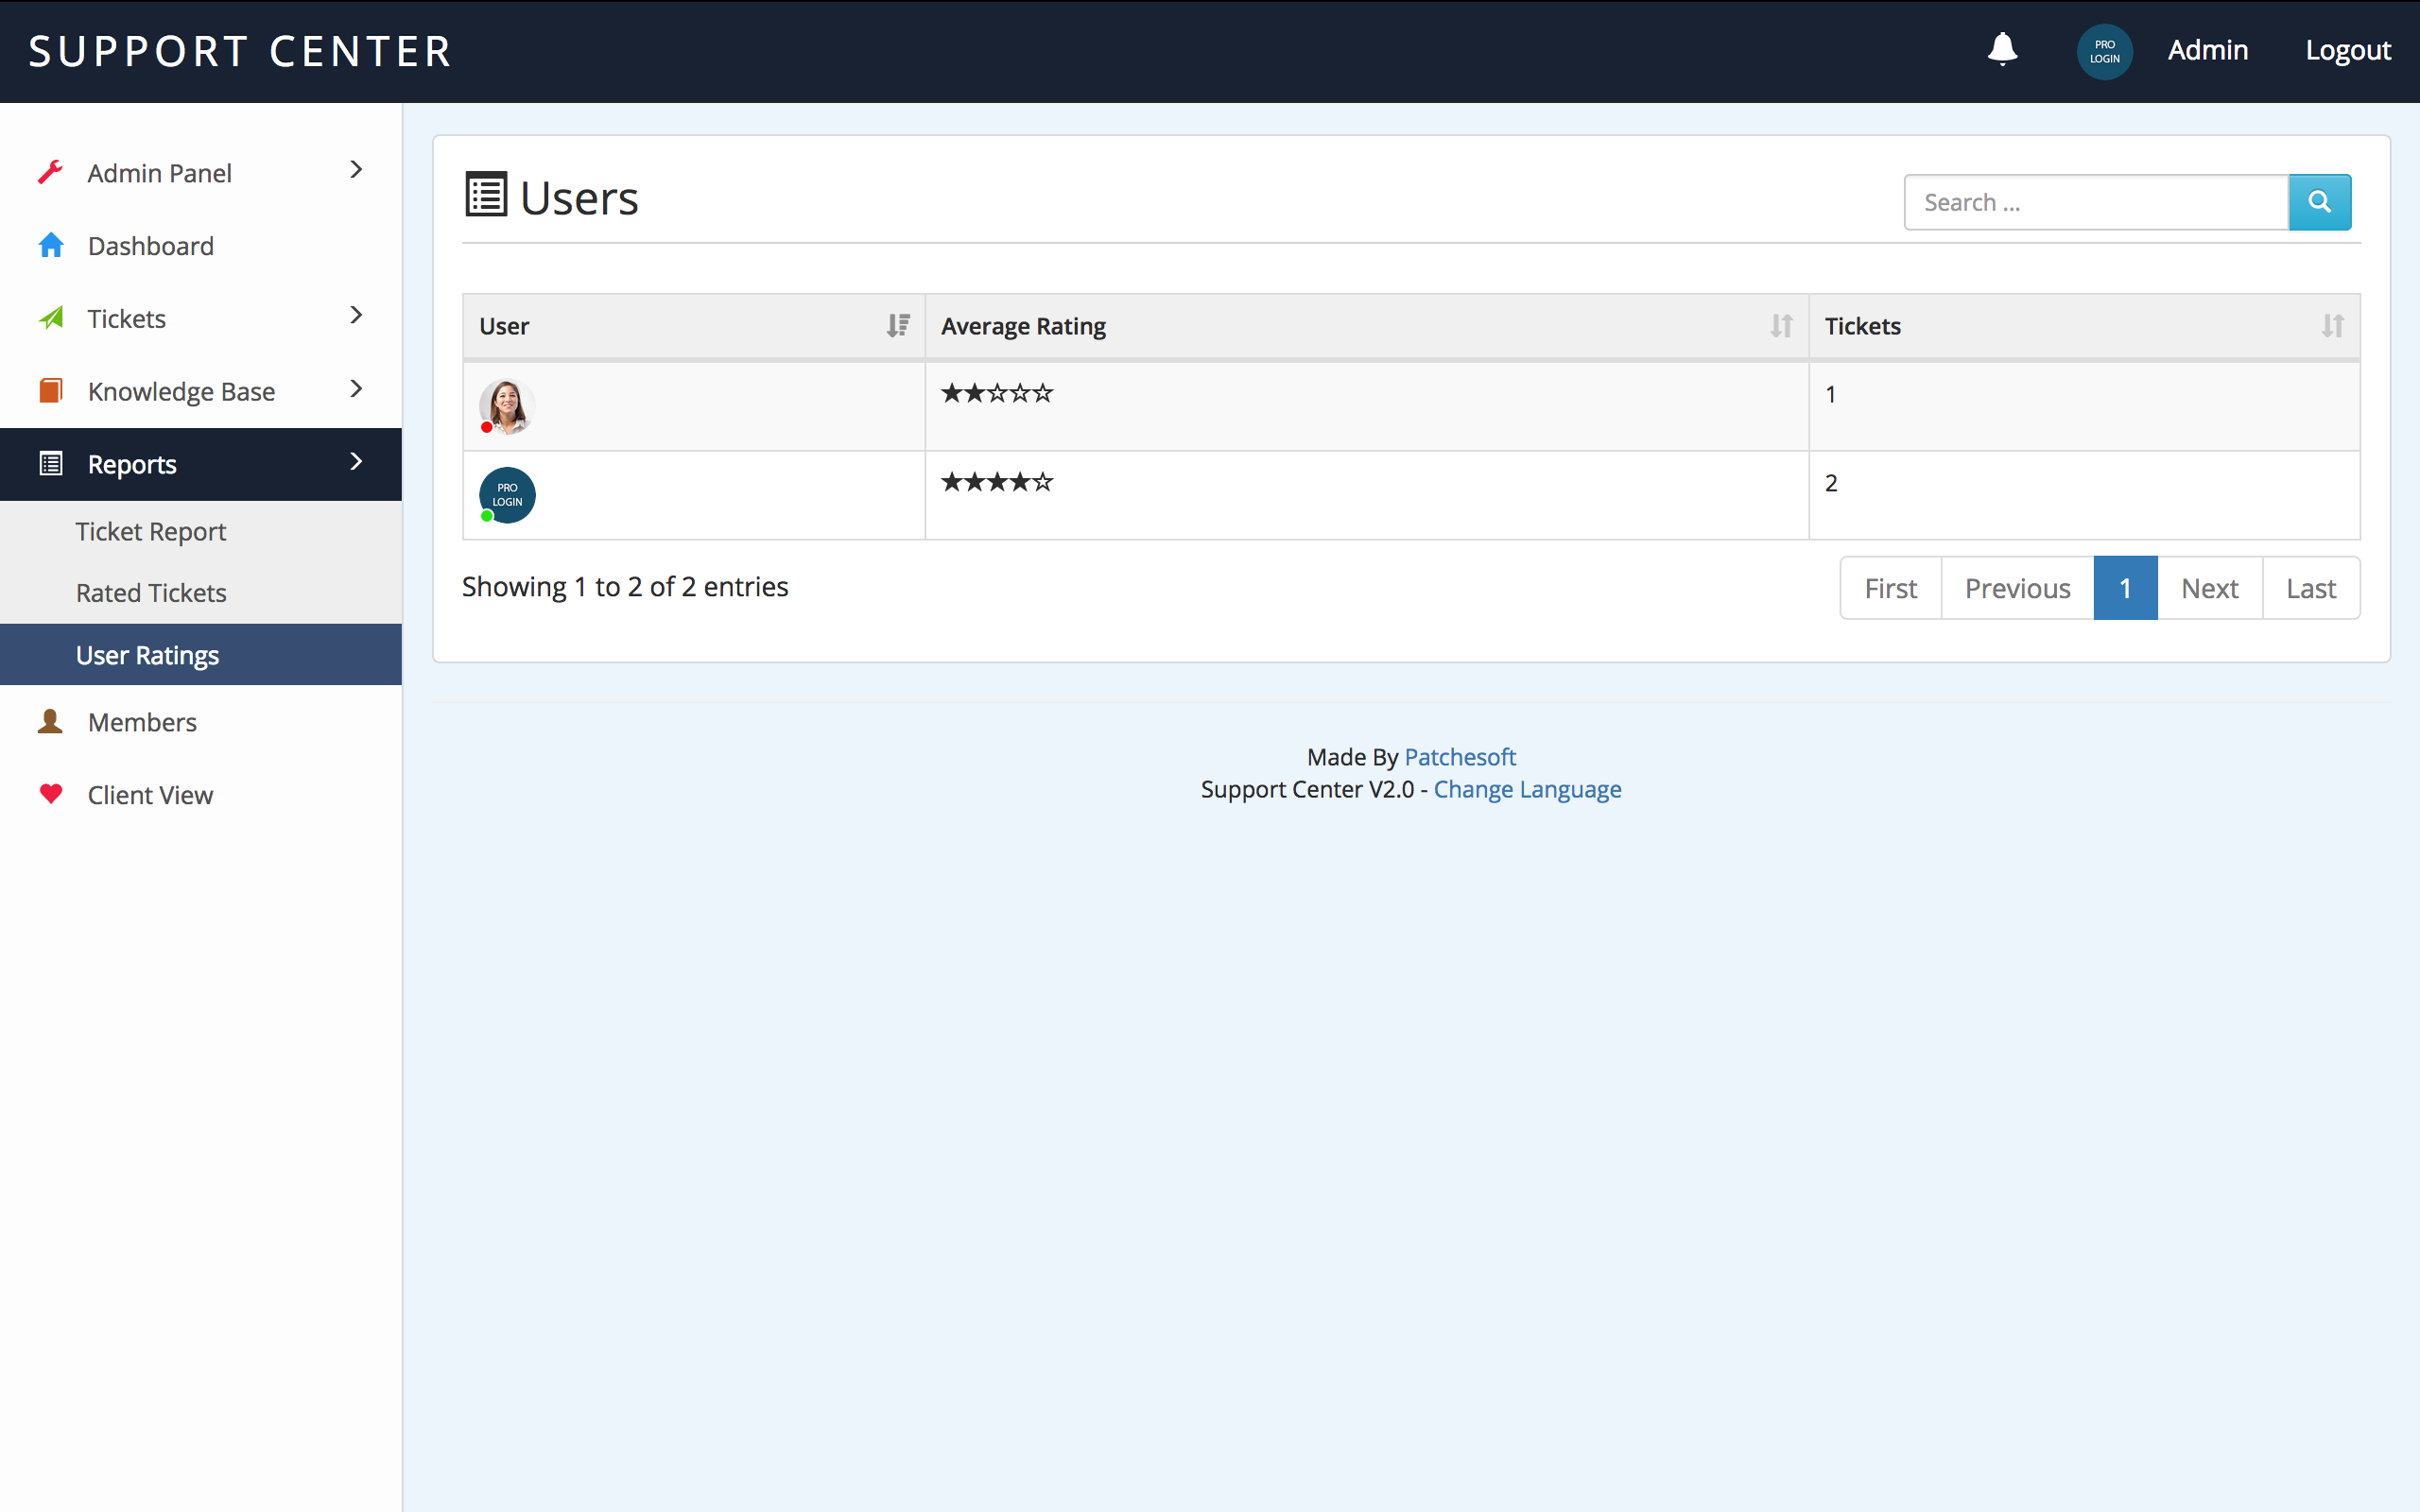
The User Ratings report will show you all staff members with rated tickets. It shows you their average ticket rating and the number of tickets they have been rated for. You can also order this section by rating.
Client View - top
A normal user on your system (i.e. someone who isn't a staff member) will be shown the Client View. This is a separate section of the Ticket System designed to be more useful to a new user. This section should only be used by the client as it does not contain any Admin options.
A user with the user role Client will be automatically directed to this section upon login.
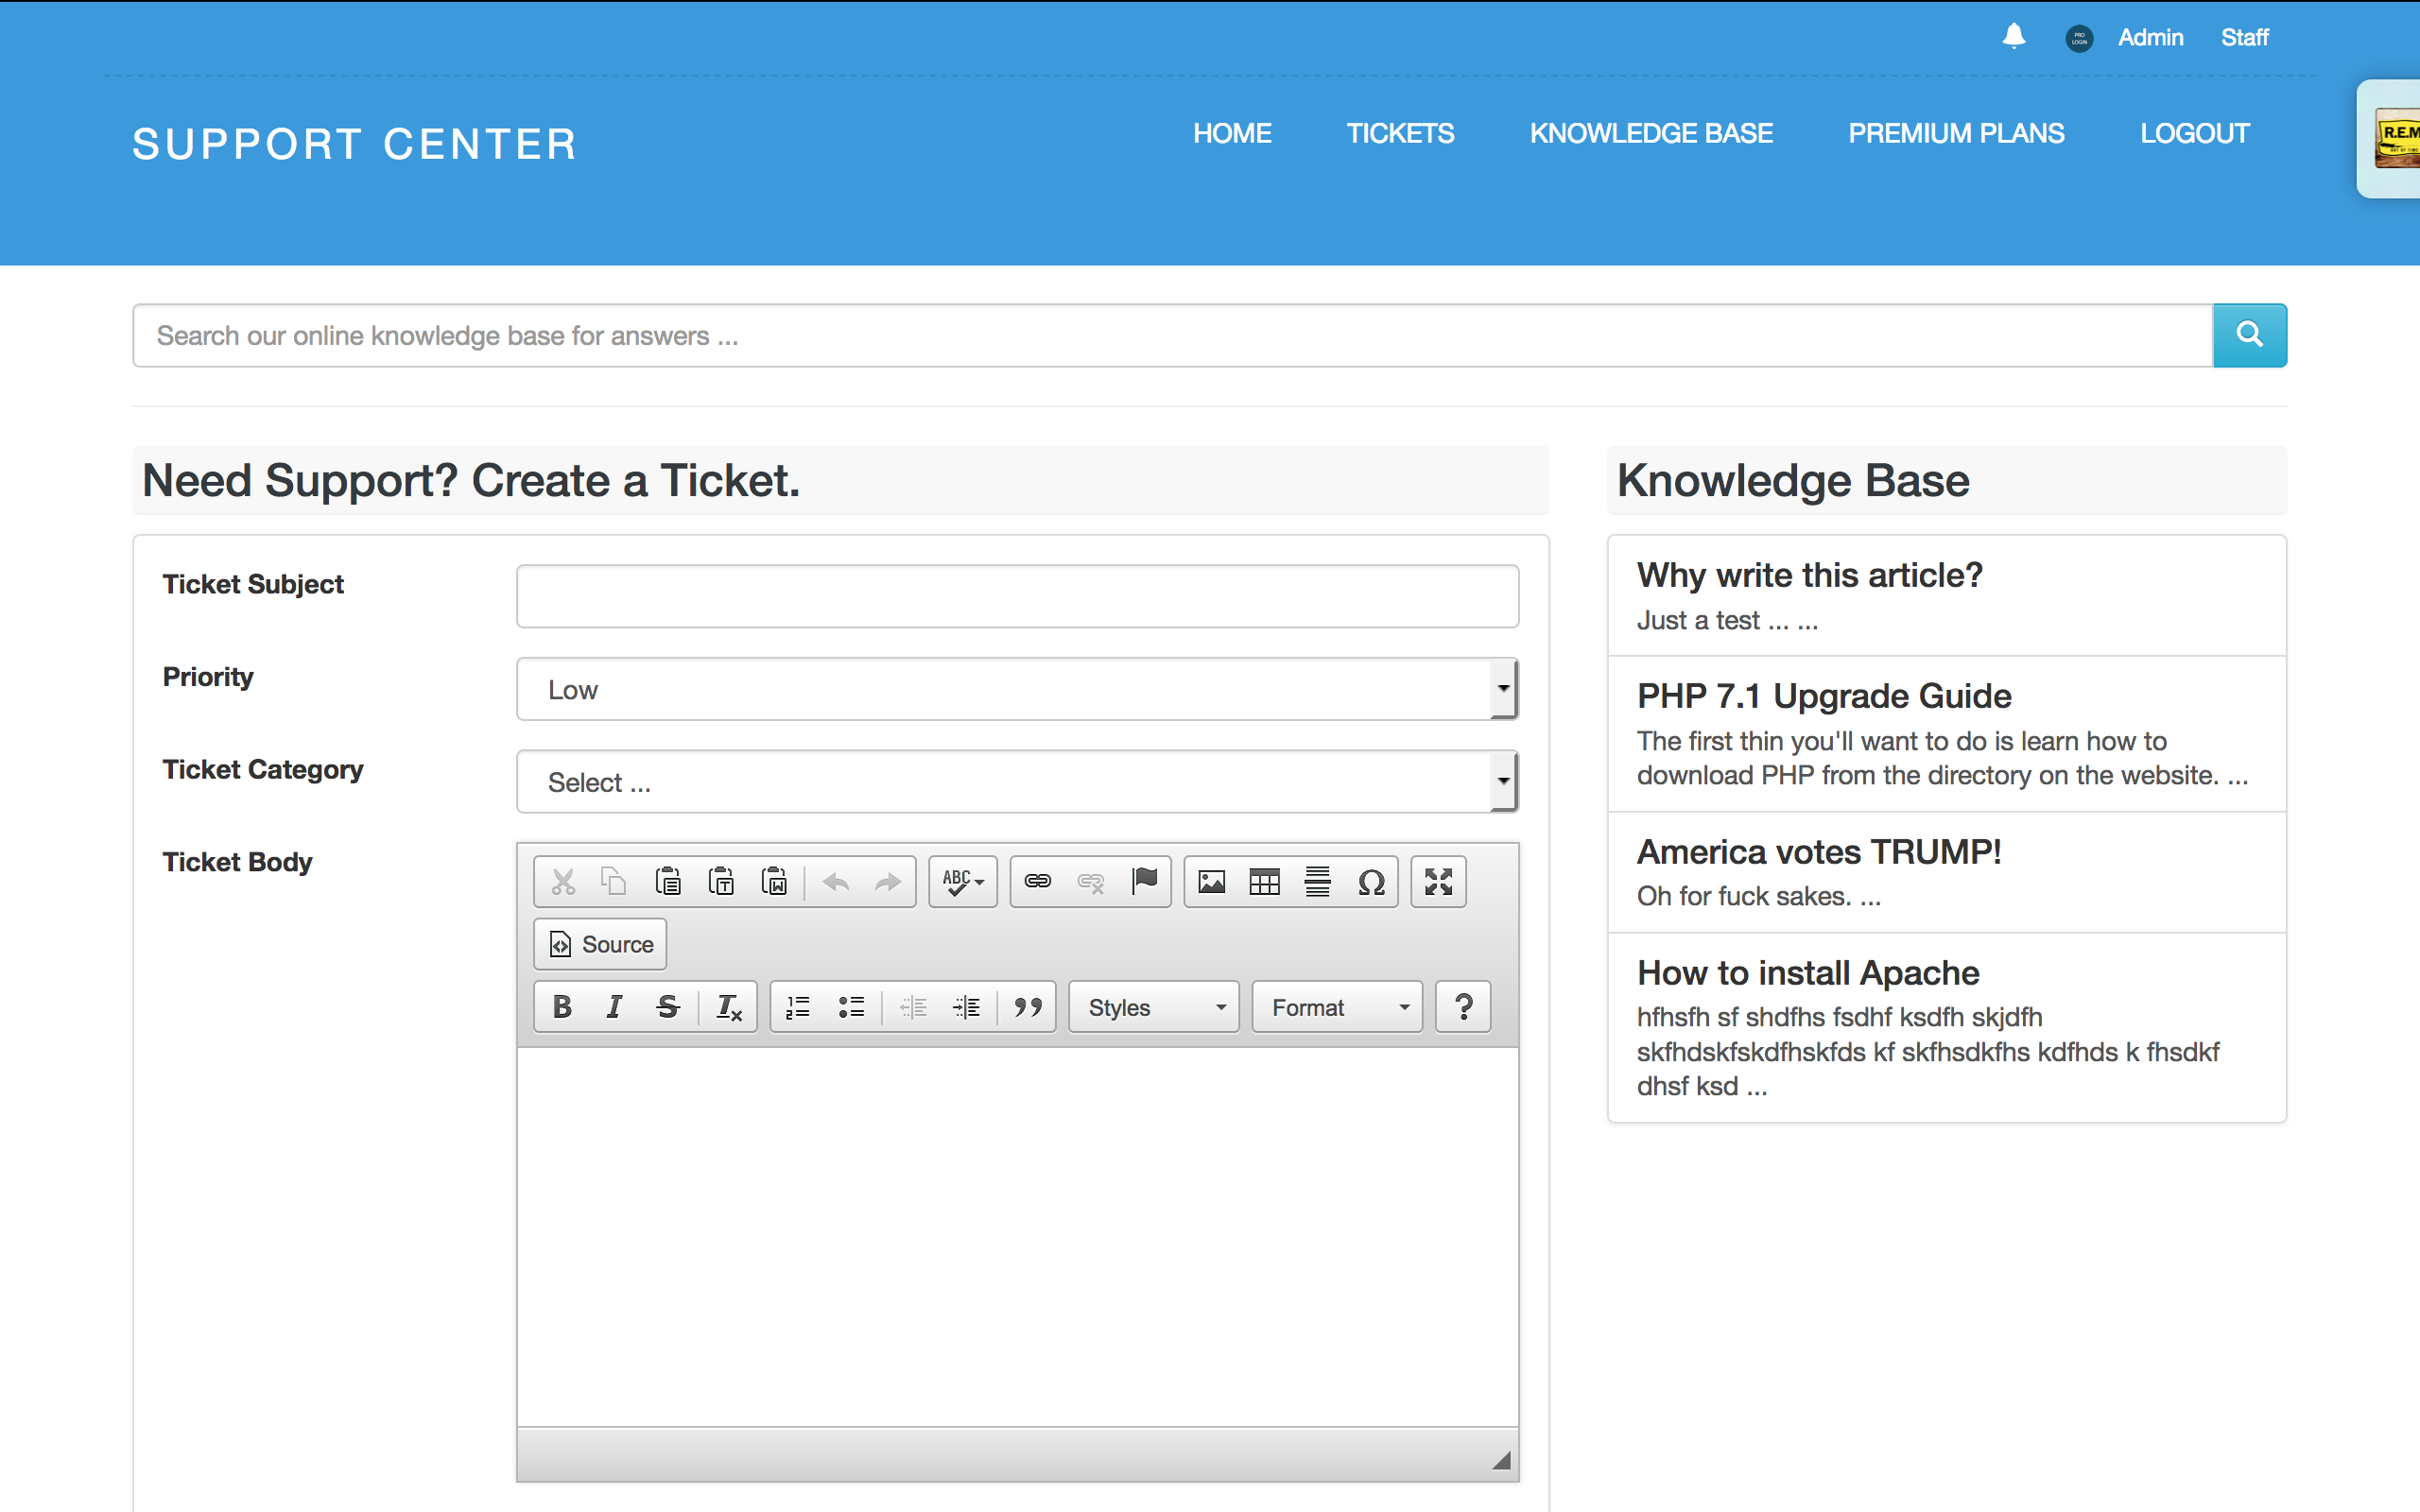
Clients will be greeted with the ticket creation form and the most recent Knowledge Base articles. You can either force the client to be logged in to create a ticket or allow users to create tickets without accounts, called Guest Tickets. These tickets have a one-time password which allows the client to view them by logging into them. The Guest Ticket details are automatically generated and emailed to the guest.
When the user begins typing in the Ticket Title, related Knowledge Base articles will begin to show up next to the Ticket area. These are based on keywords in the user's ticket title.
Once a user creates a ticket, your staff will be notified via notification that a new ticket has been created. If a staff member is assigned to specific categories and a new ticket has been created in that category, they will be alerted of the new ticket.
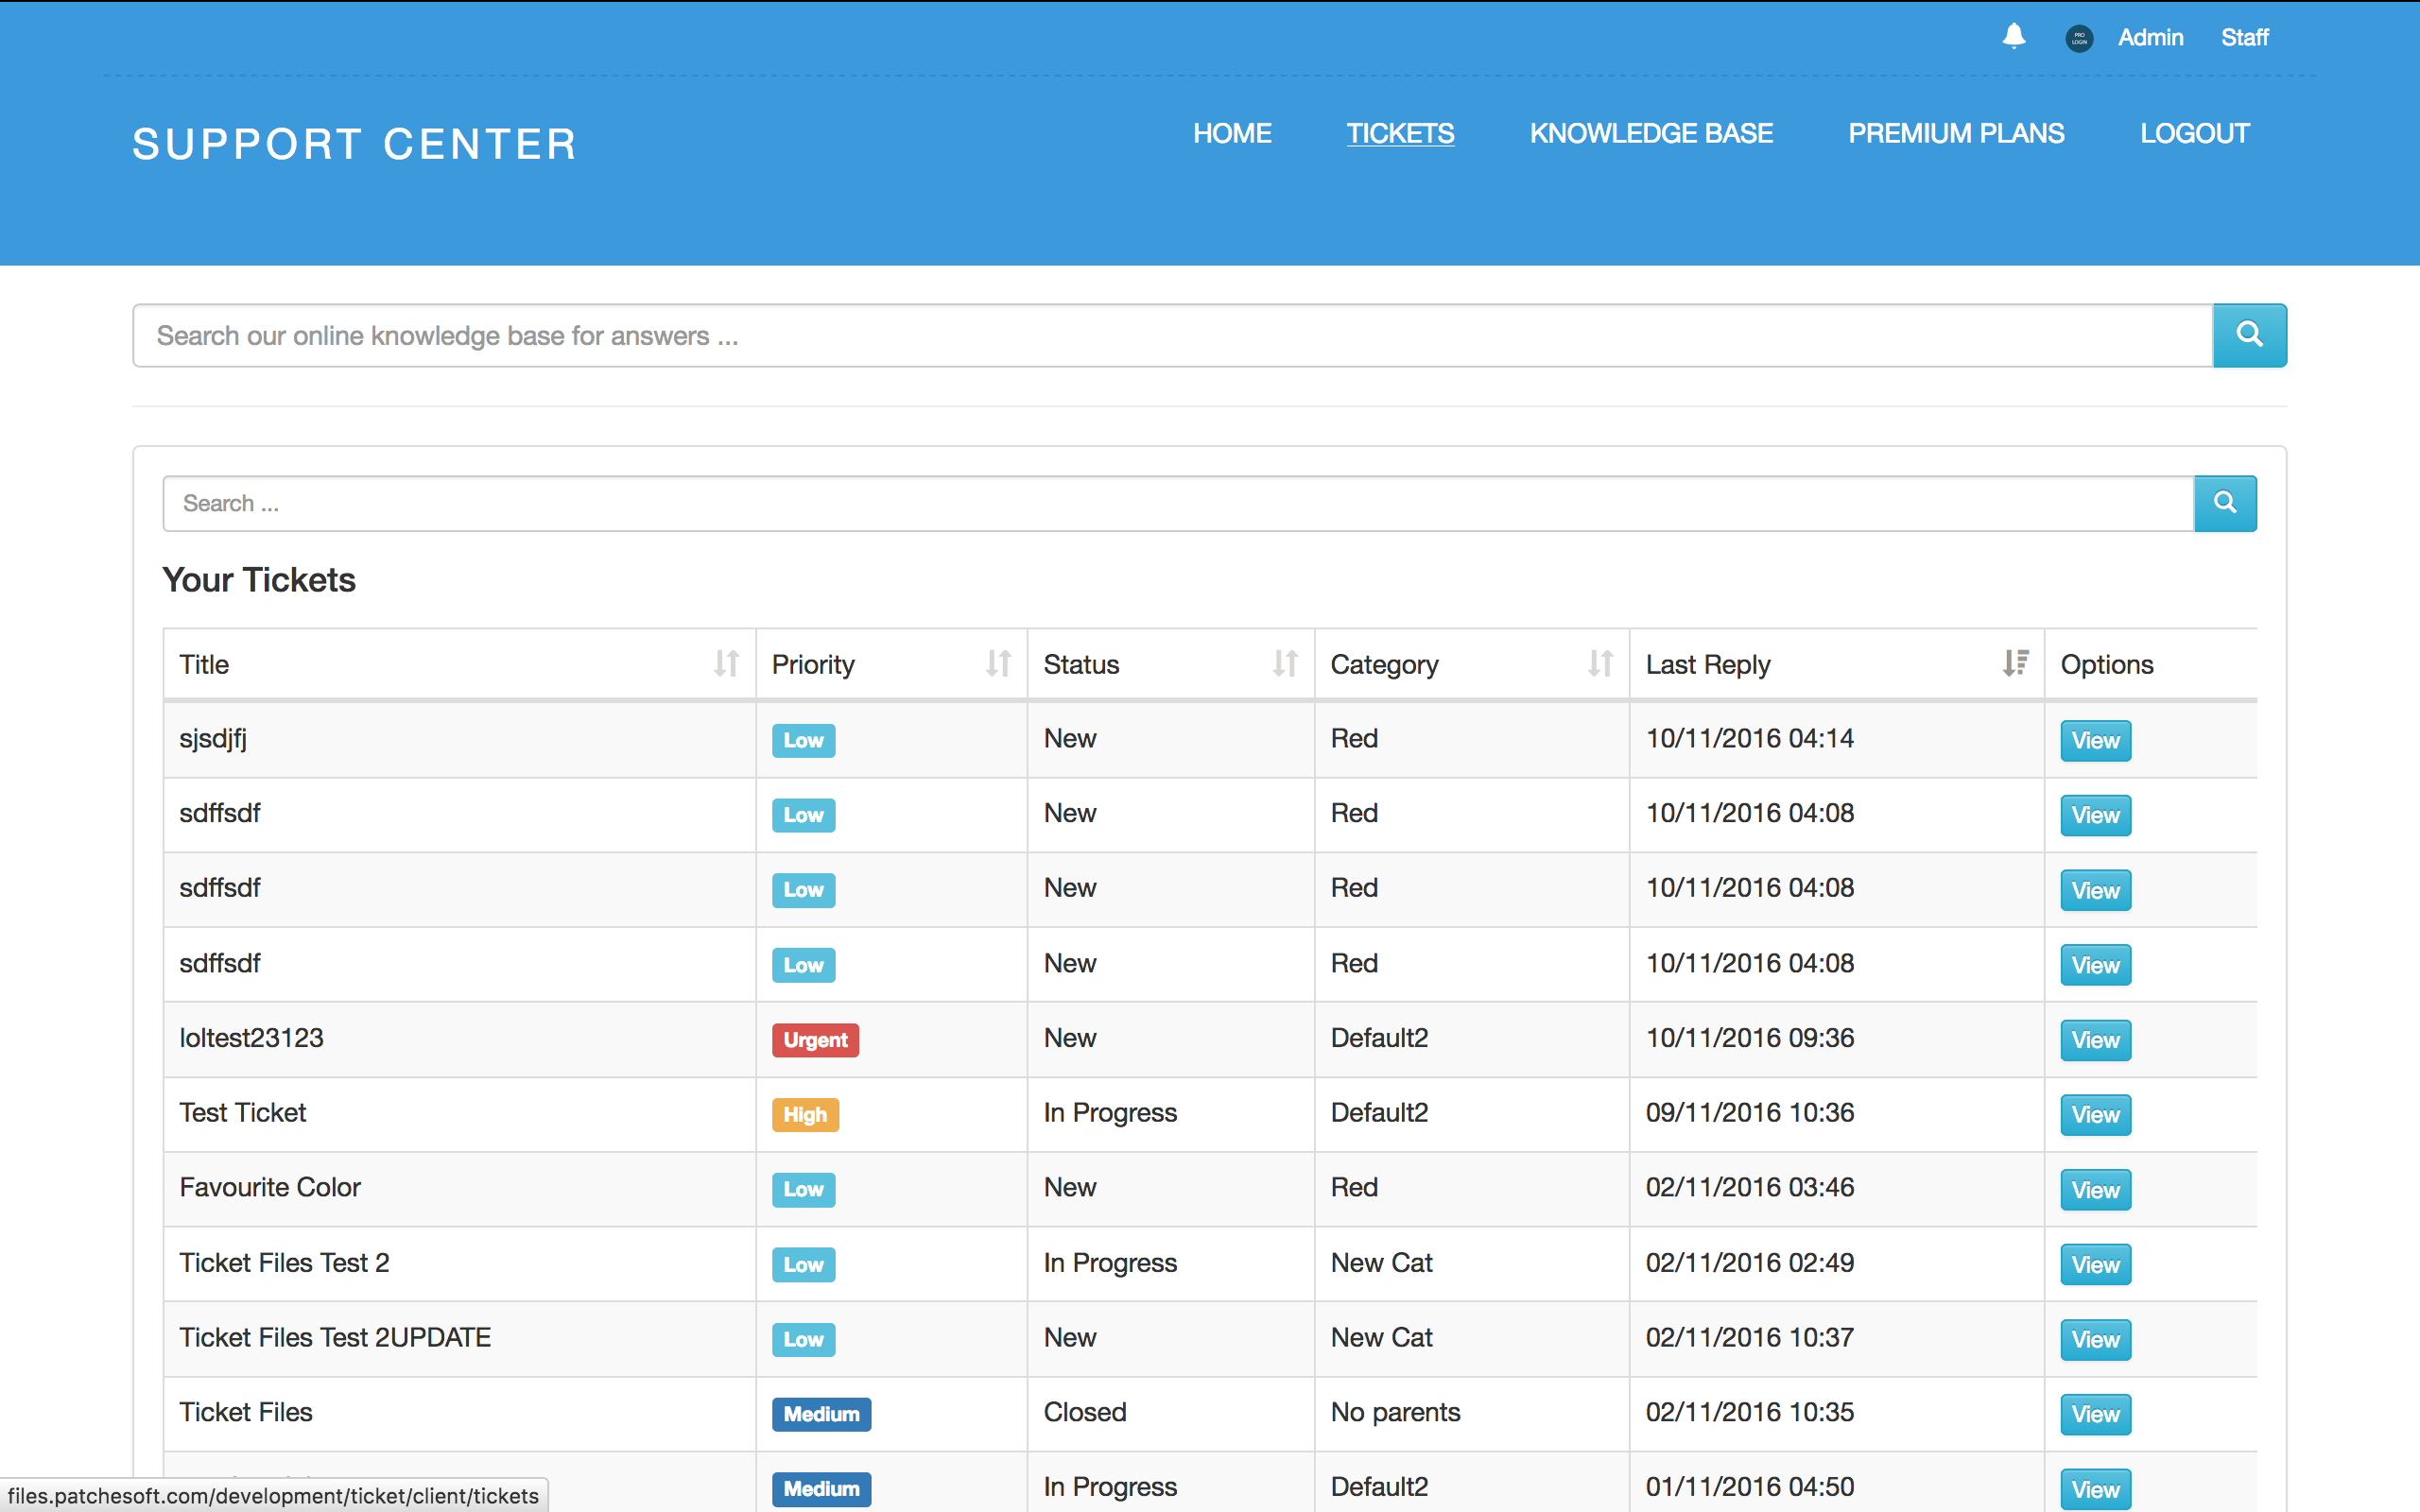
A logged in user will be able to see their tickets they have created in the Ticket Section. There is a useful search function added that allows the user to search via ticket title, category and more.
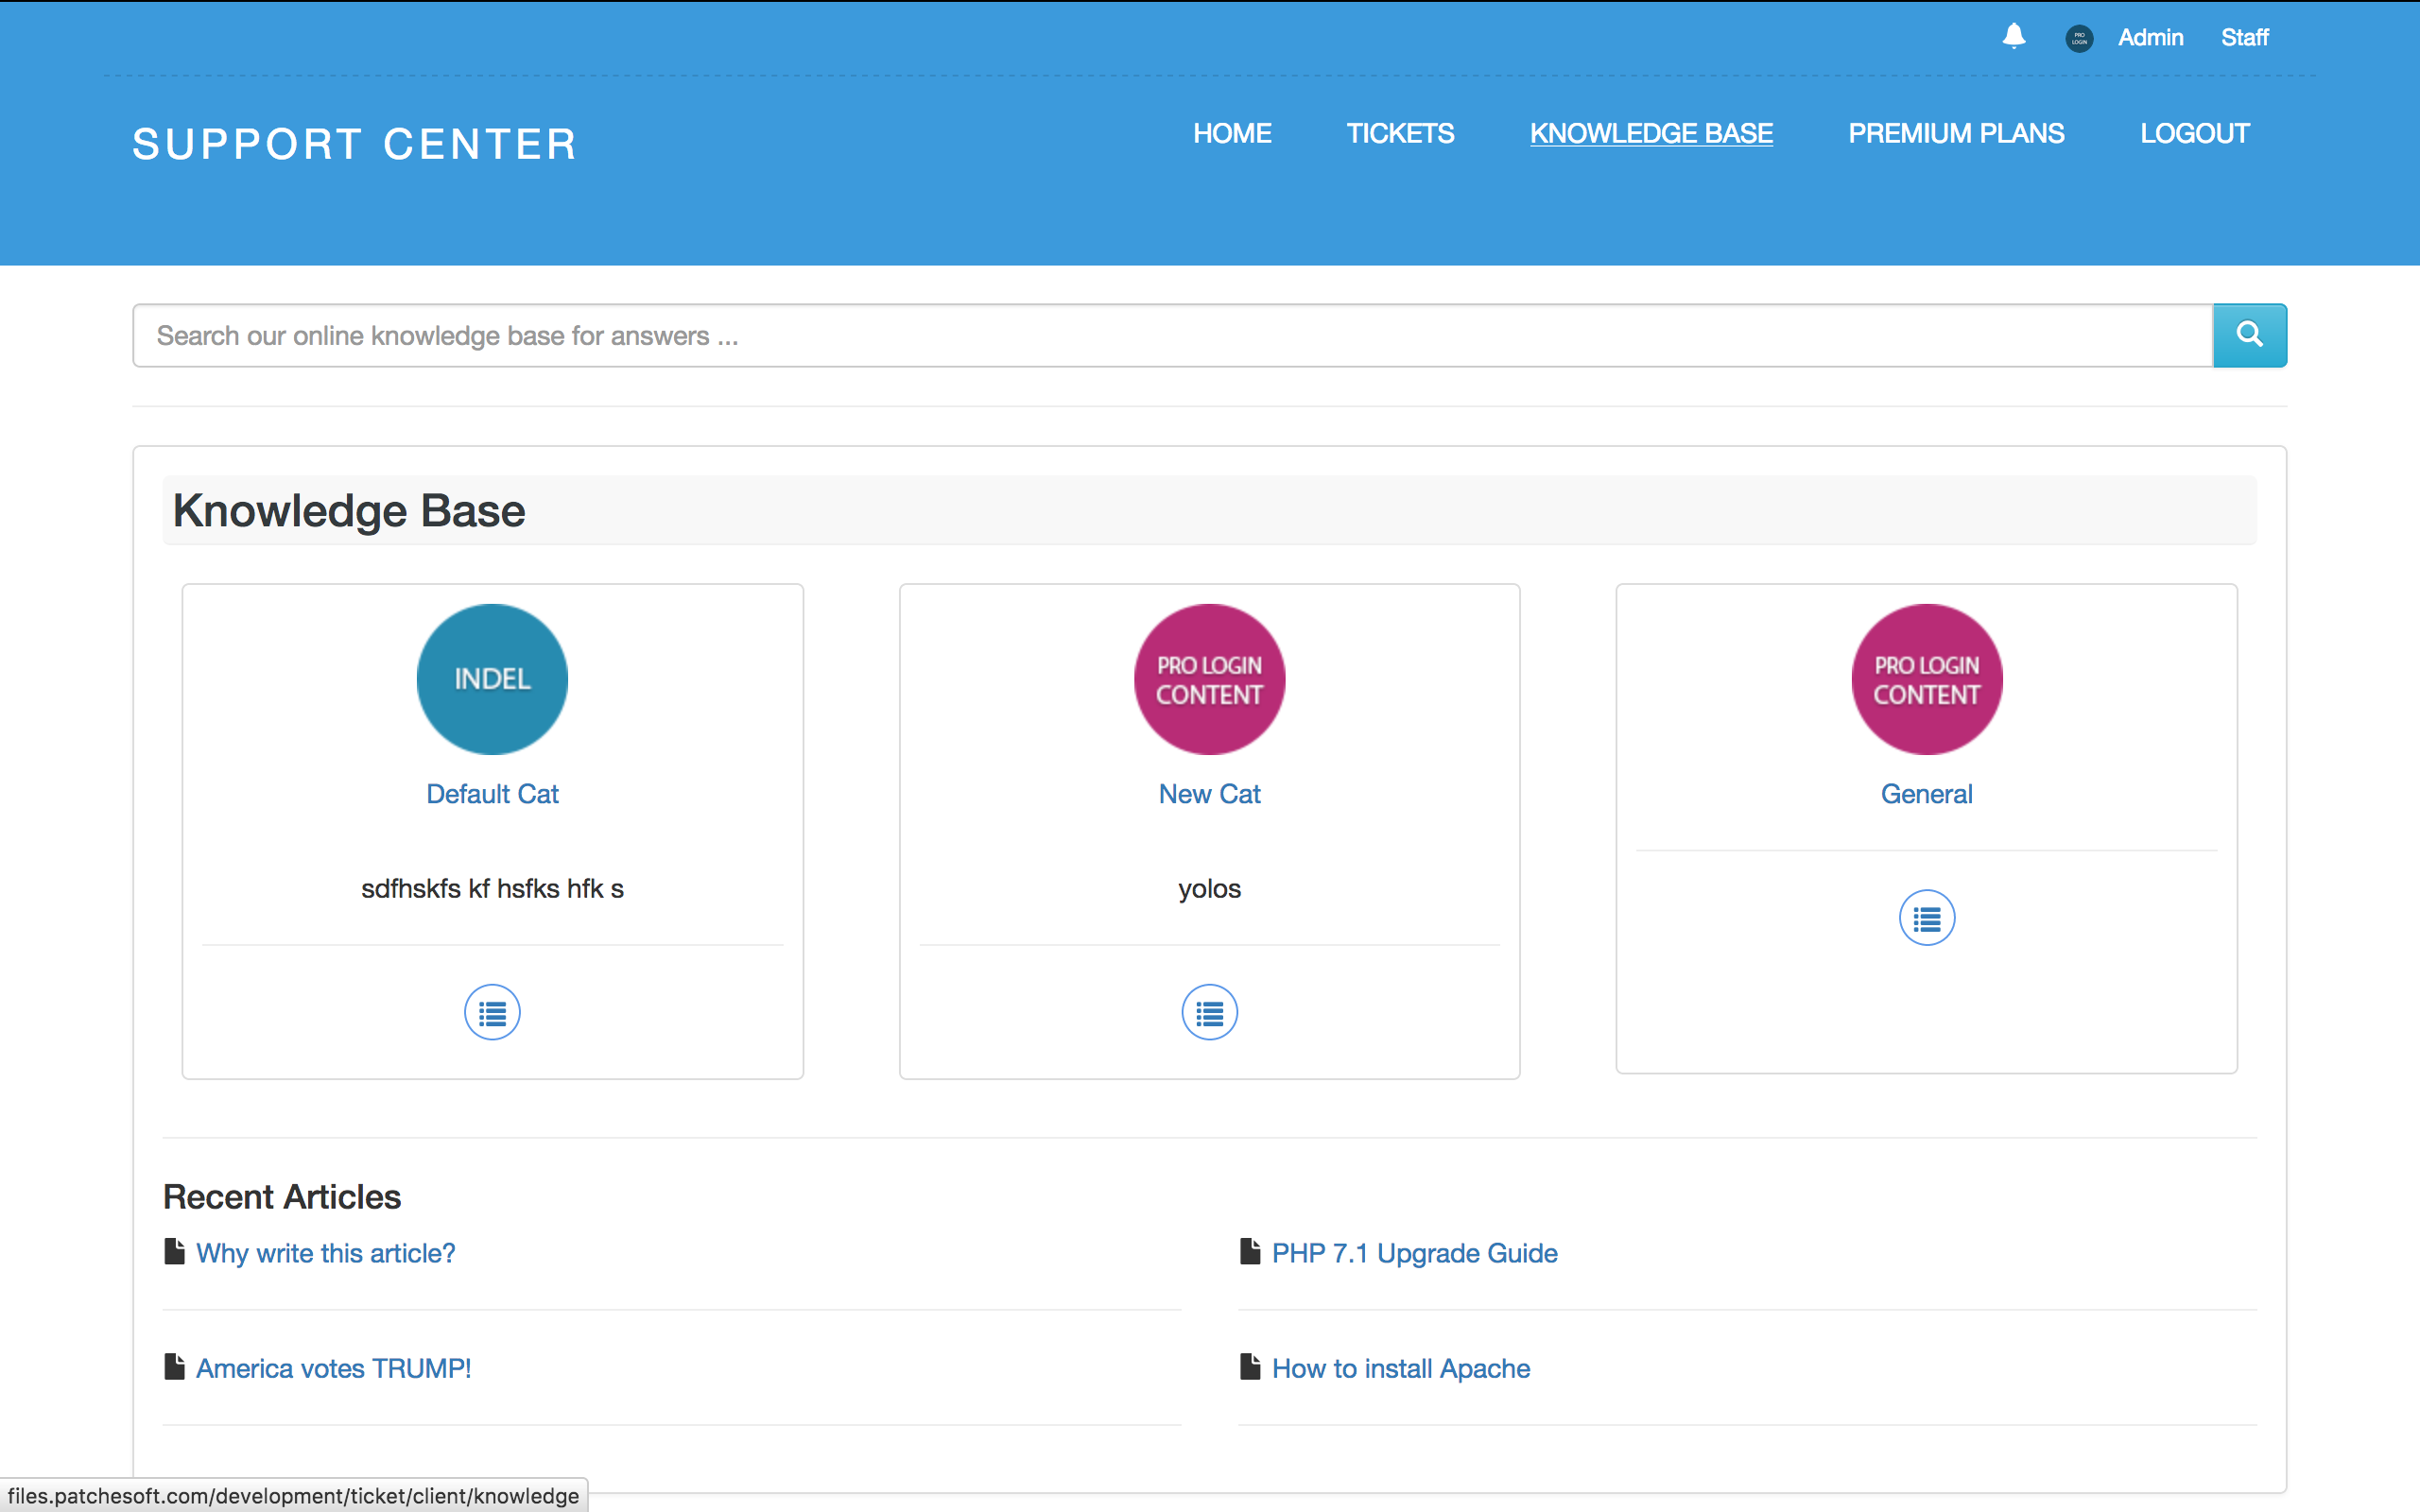
The Knowledge Base for the Client will list the various categories you have created and then also a list of recently added articles. You can click on the Category to see another list of articles under that list.
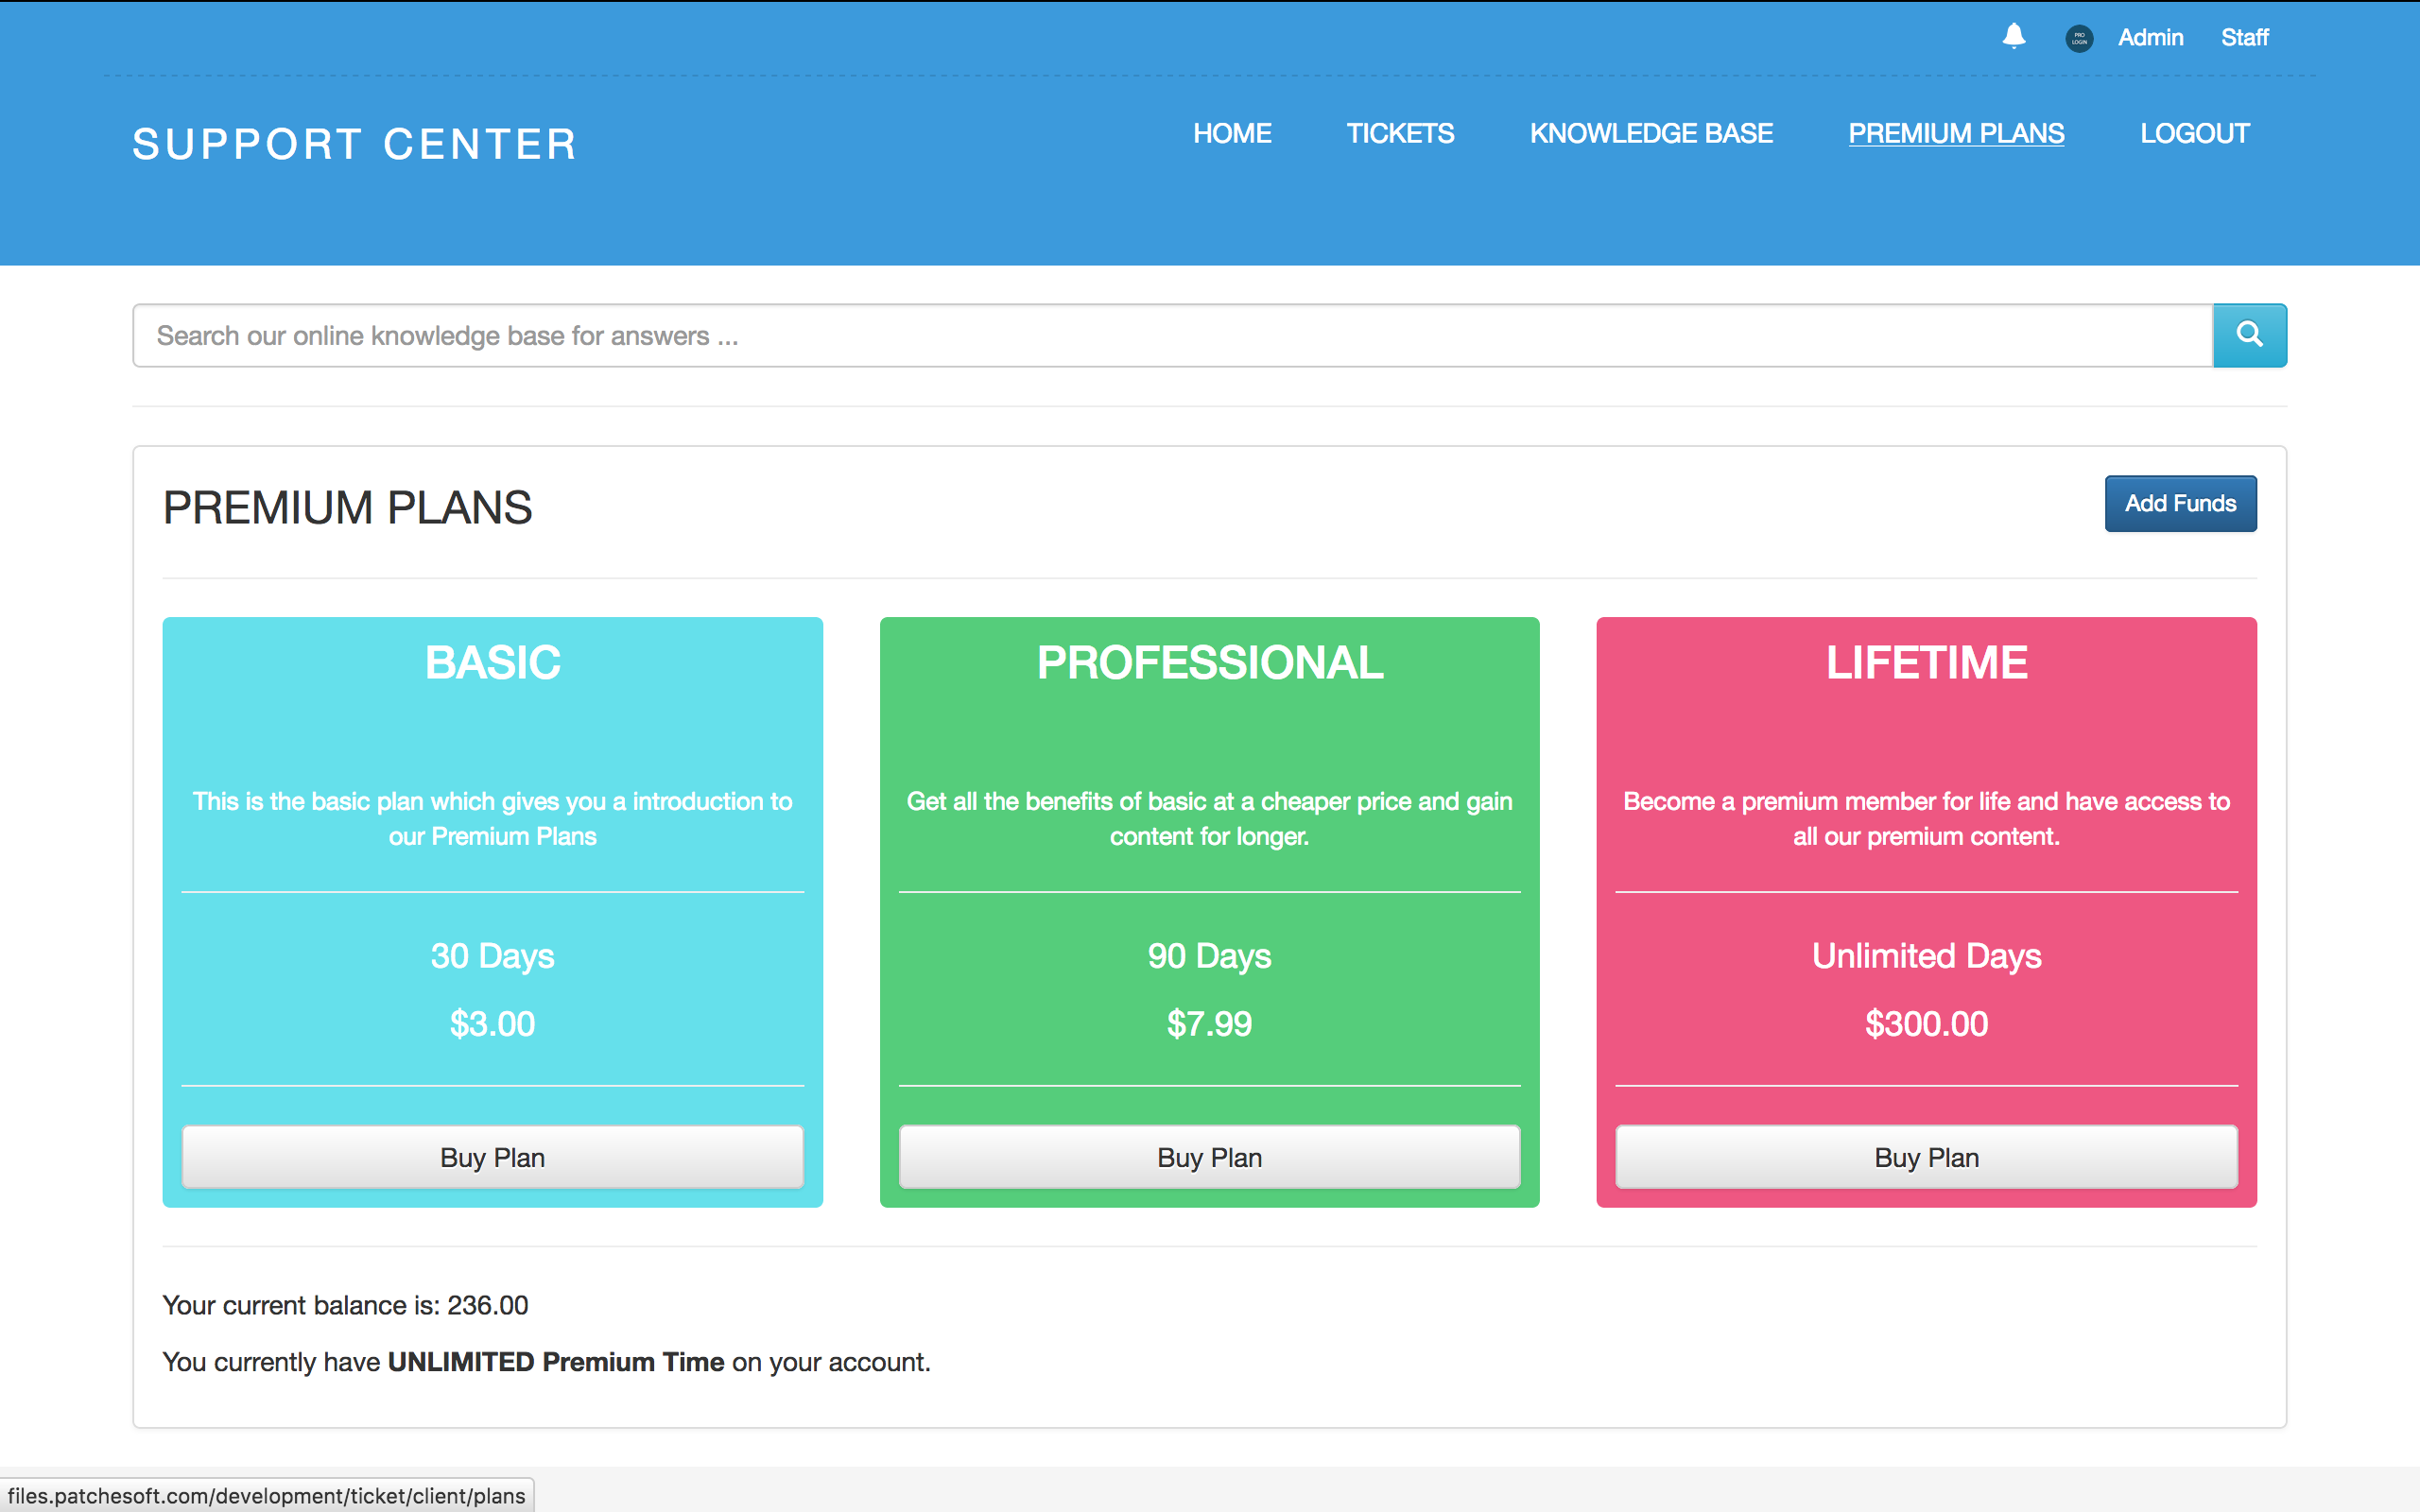
The Premium Plans section allows you to charge your users for support. This section will show different plans you have created in the Admin Panel. Depending on your settings, you can force a user to have an active Premium Plan in order to submit a ticket.
Users can buy Premium Plans with credits. Credits can be purchased through PayPal and Stripe and are automatically added to the users account.
Premium Plans can be easily disabled via the Admin Panel options.
Admin Panel - top
The Admin Panel allows you to keep your Support Centre up to date, manage members, change various settings and more. The default view of the Admin Panel will give you information about your users.
The Global Settings allows you to further customise your system.
There are quite a lot of options for the Admin Panel that help running your site that much easier. The first set of options is the Global Settings option. These options directly effect the site overall. Here you can change the Site Name, Logo, Disable Registration and more.
Other settings include Social Settings. These settings refer to allowing users to login to your site using their Social Network Accounts. You will need to obtain API keys from the Social Networks, you can do this quite easily and for free. Just follow our Social Network guide that is contained within the documentation folder.

Ticket Settings give you more control over how you want users to use your system. There are also IMAP settings added for Email Piping. Check out our documentation on Email Piping for more information on this.
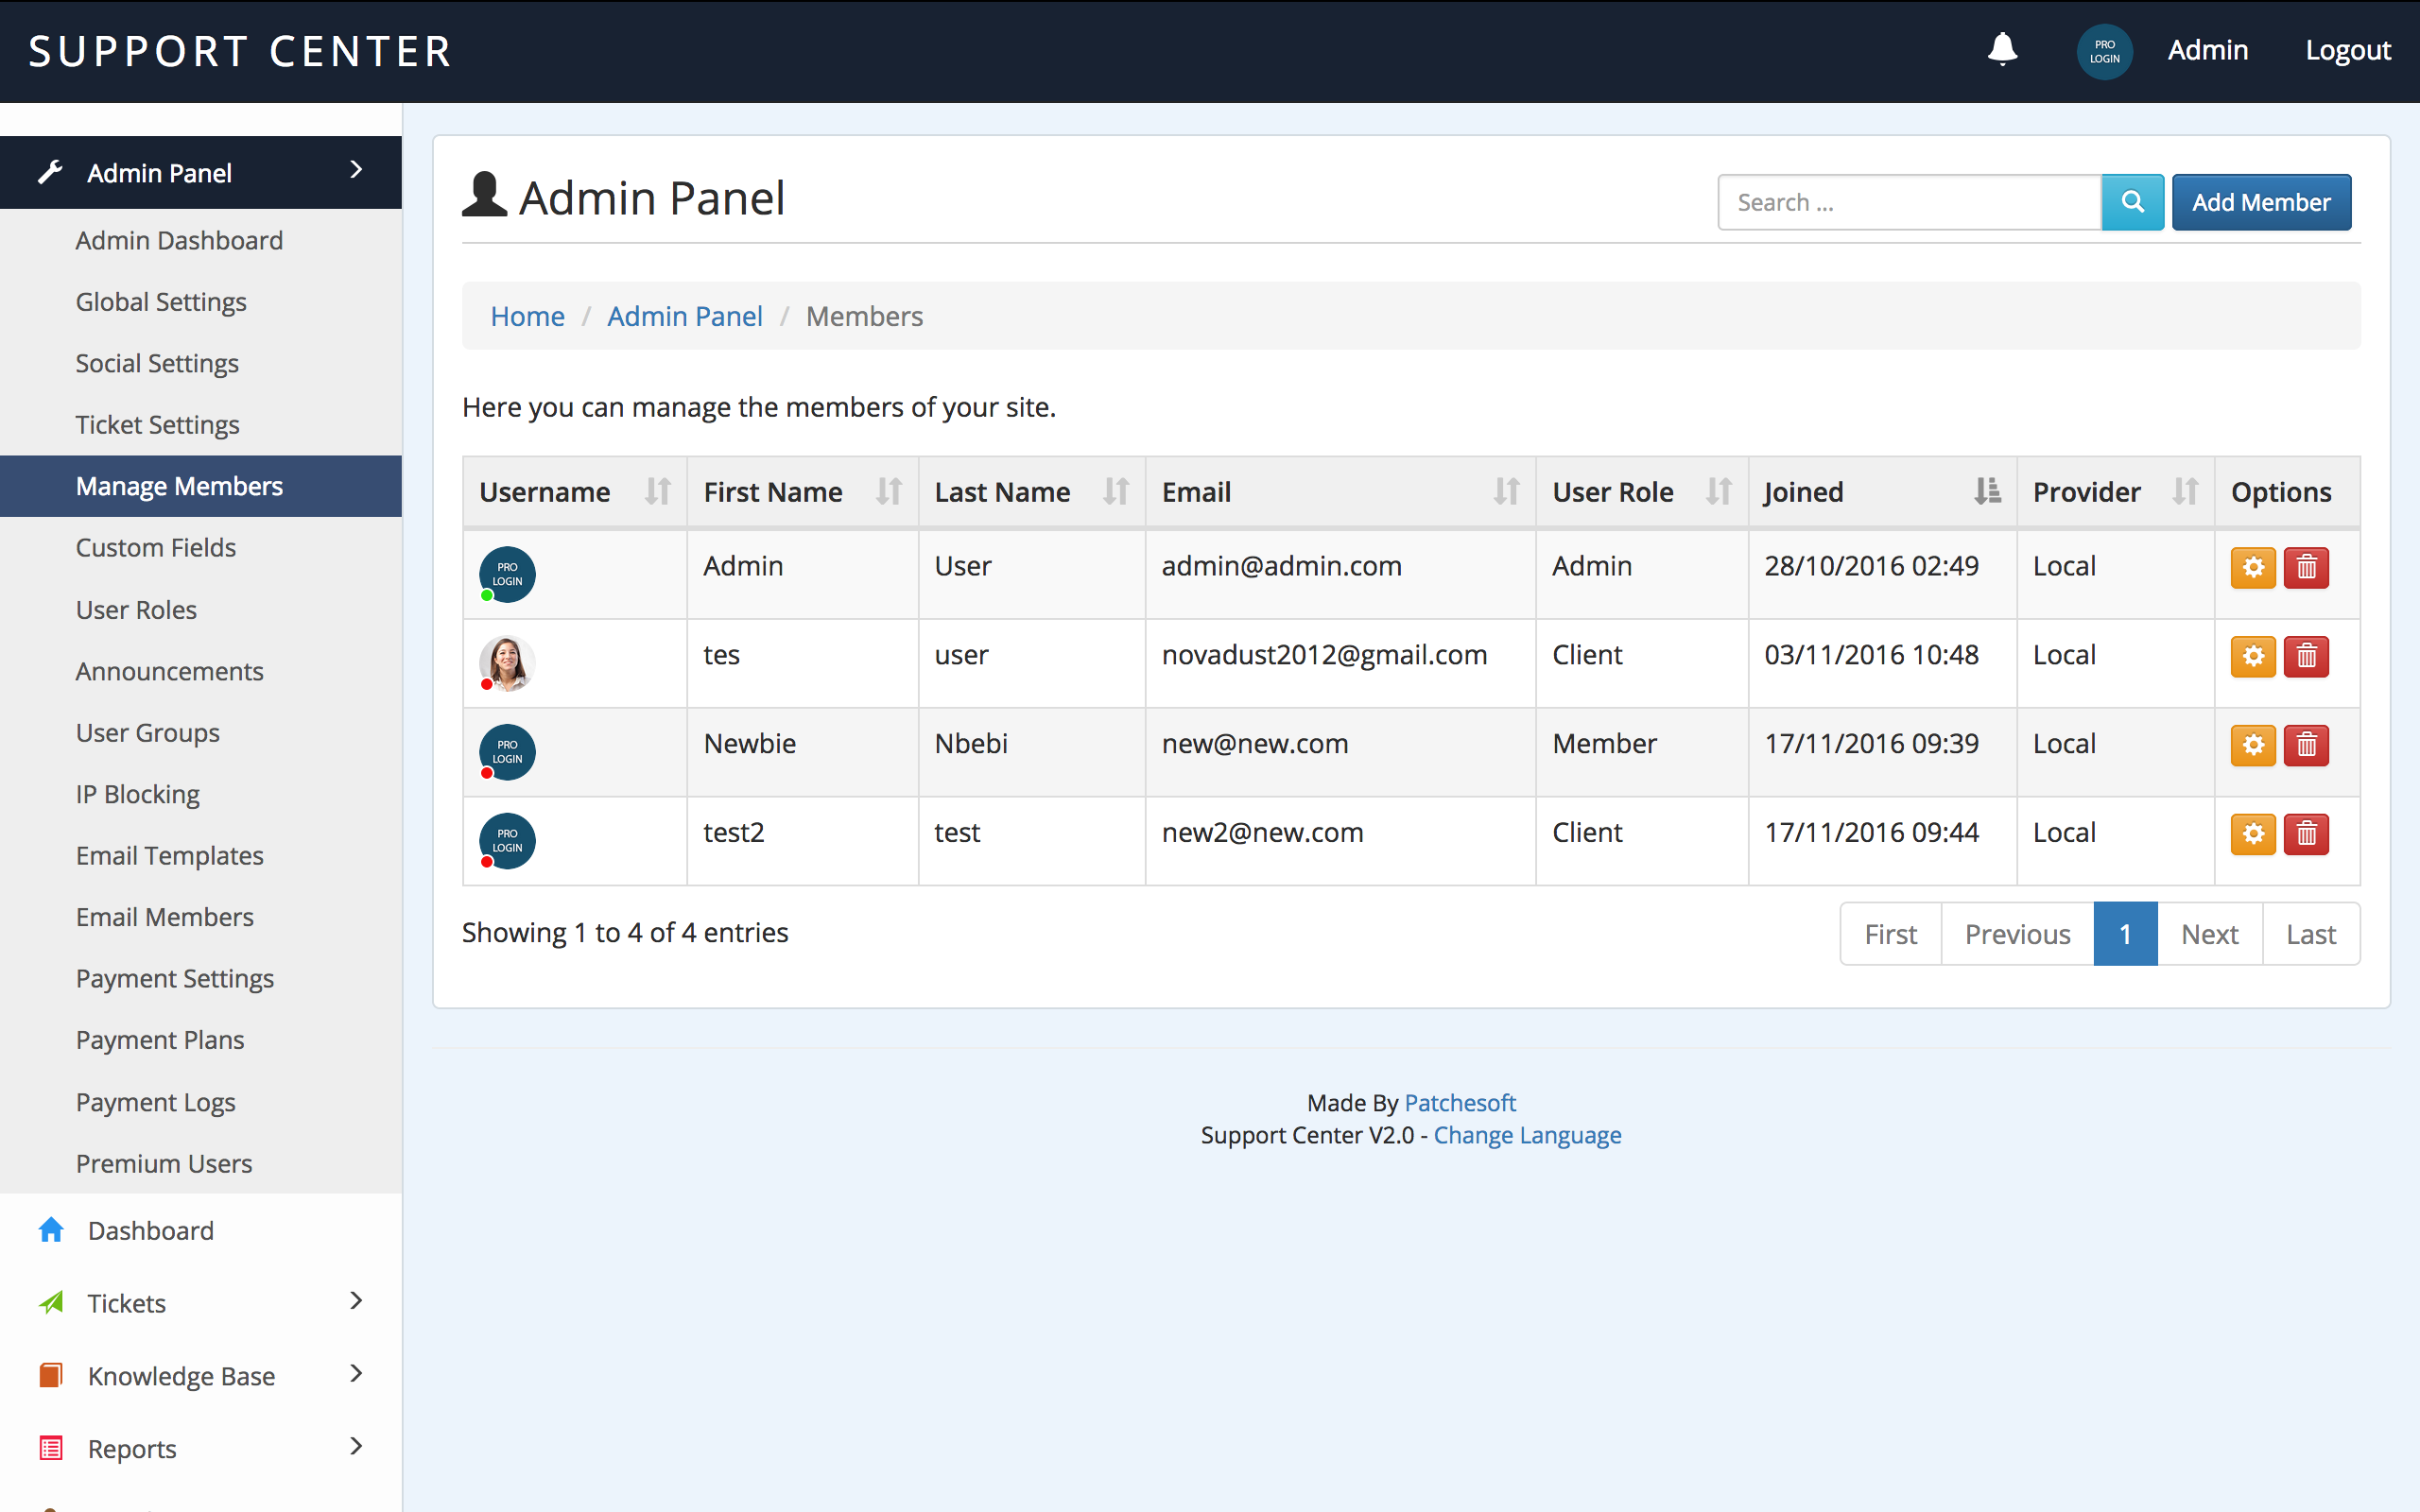
You can add/edit/delete members from the Manage Members section. Here you can also assign different User Roles to your members.
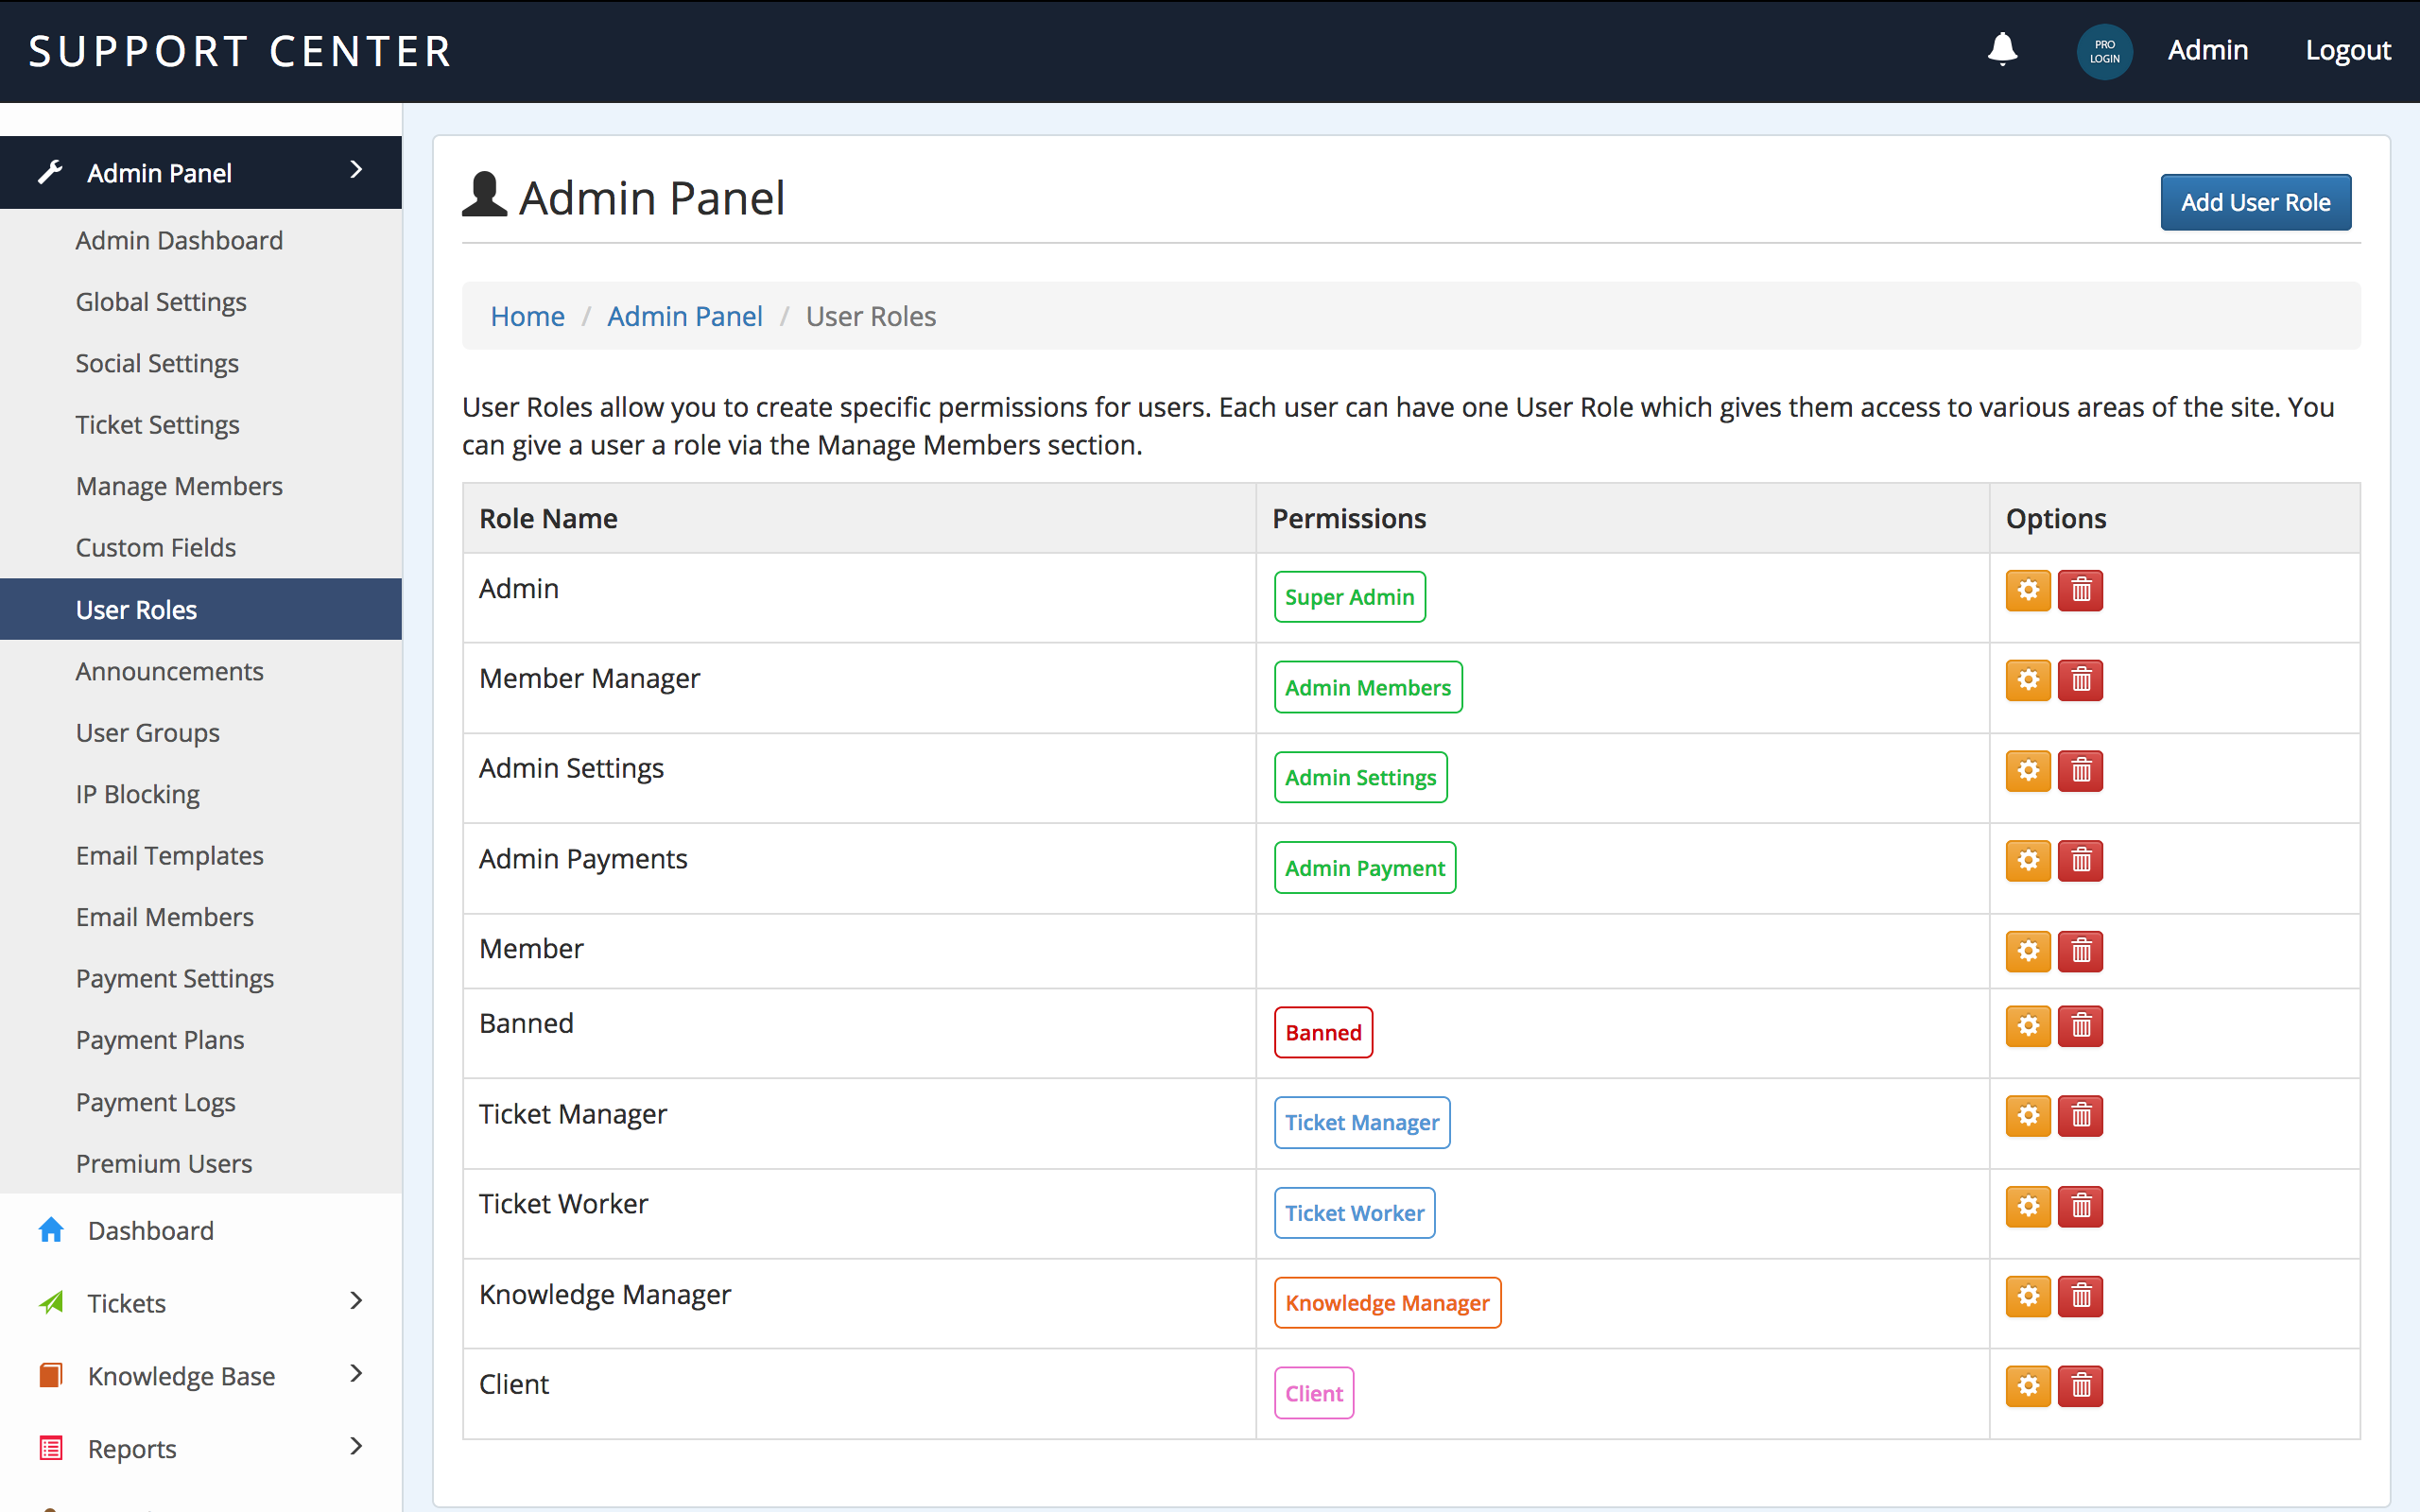
The system also employs a User Role system. User Roles have certain privliges to various areas of the site and you can create custom User Roles for your users.
Defined User Roles:
- Admin - complete access to every part of the site
- Member Manager - access to the Admin Panel's Manage Members section
- Admin Announcement - can post announcements on the system
- Admin Settings - access to the global settings and social settings pages
- Admin Payment - access to the payment settings in the Admin Panel
- Ticket Manager - Can access all tickets
- Ticket Worker - Can only access tickets assigned to them and in categories their user group is assigned to
- Knowledge Manager - Can add/edit/delete articles in the Knowledge Base
- Client - When logging in, the Client is automatically redirected to the Client View.
You can create custom roles which incorporate two or three of these roles such as:
CUSTOM ROLE NAME: User Moderator
ROLES: Member Manager, Admin Payment
Then if a user has the User Moderator User Role, they would be able to manage the member section in the admin panel and the admin payment settings areas.
Groups
Another option included in the software is User Groups. This section allows you to create groups for your users, allowing you to keep them more organised. You can also use groups to restrict access to certain pages. We have made a test page for this and you can view the coding behind it by editing the file application/controllers/Test.php.
We also have an in-built IP blocking system. Here you can add IP Address to a blacklist which will prevent those IP addresses from registering new accounts and logging in.
Email Templates allow you to edit Emails that are sent out to users. There is currently only one email you need to be aware of and that is the Forgotten Password email. If you wish to change this email and the way it's presented, feel free to edit the Email using this area.
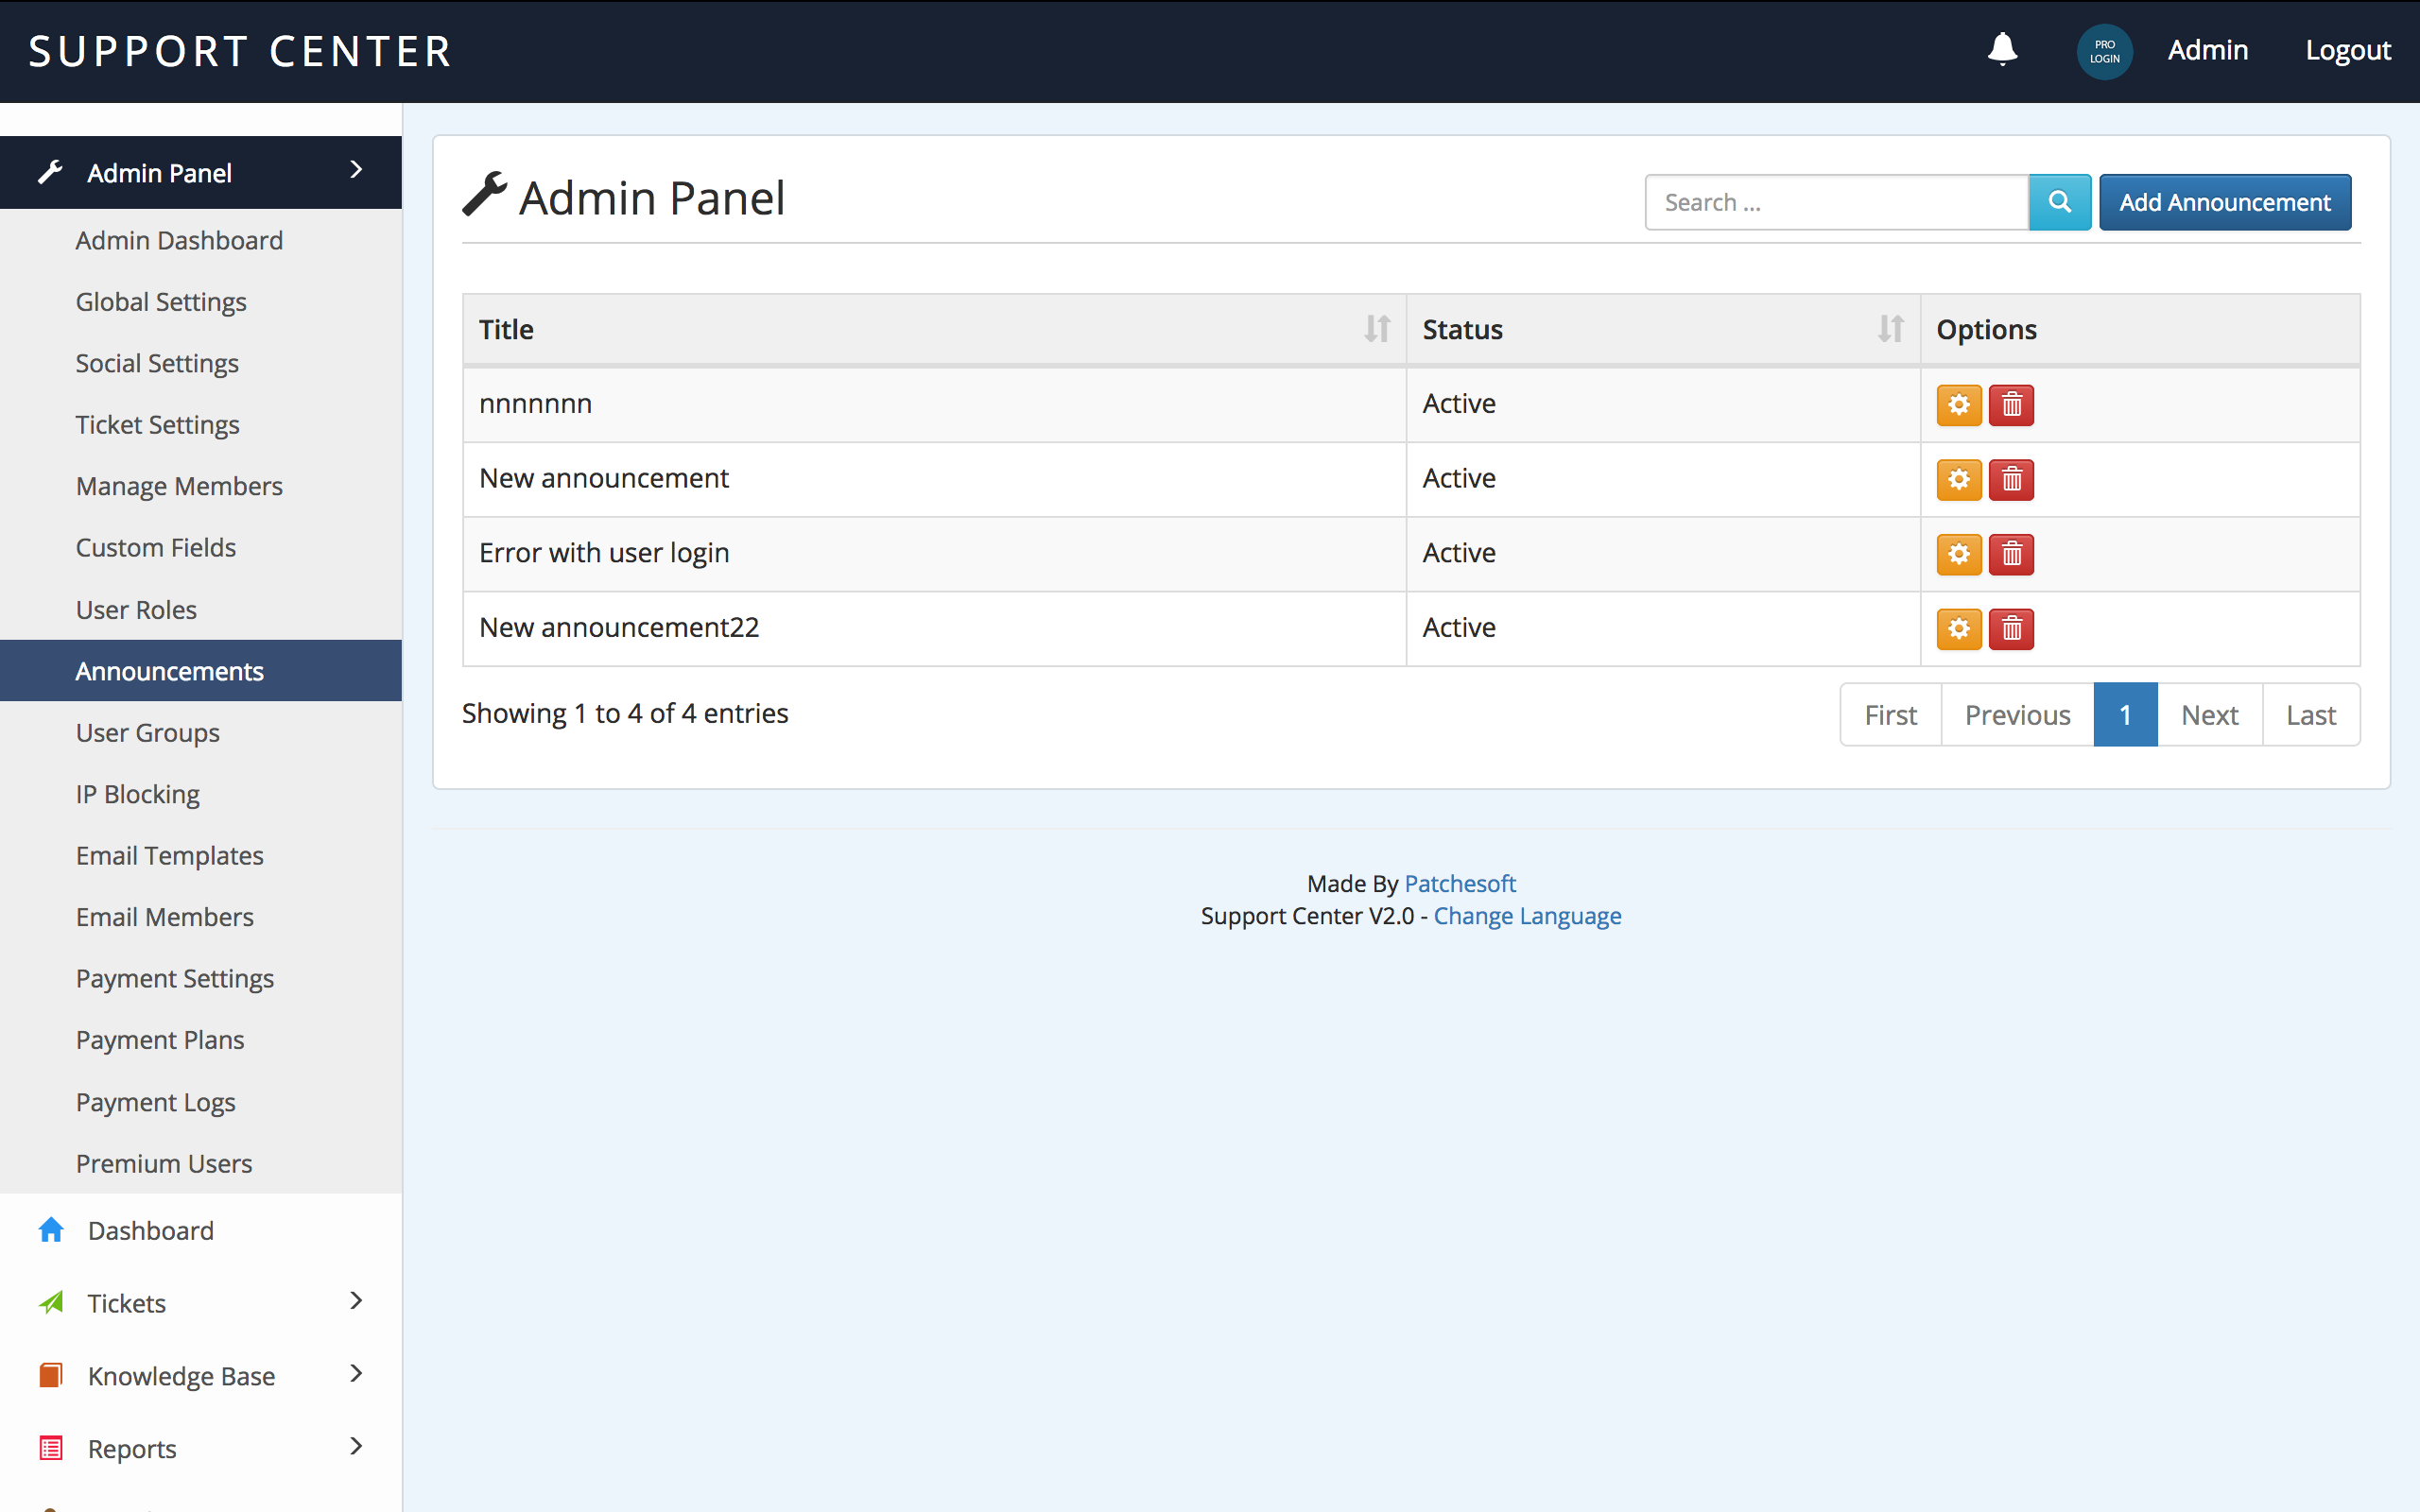
Announcements allow you to broadcast instant messages to all users who visit the Client View. Announcements can be set to active or inactive; active ones are shown and inactive ones are not. An announcement disappears for the user once they have read it.
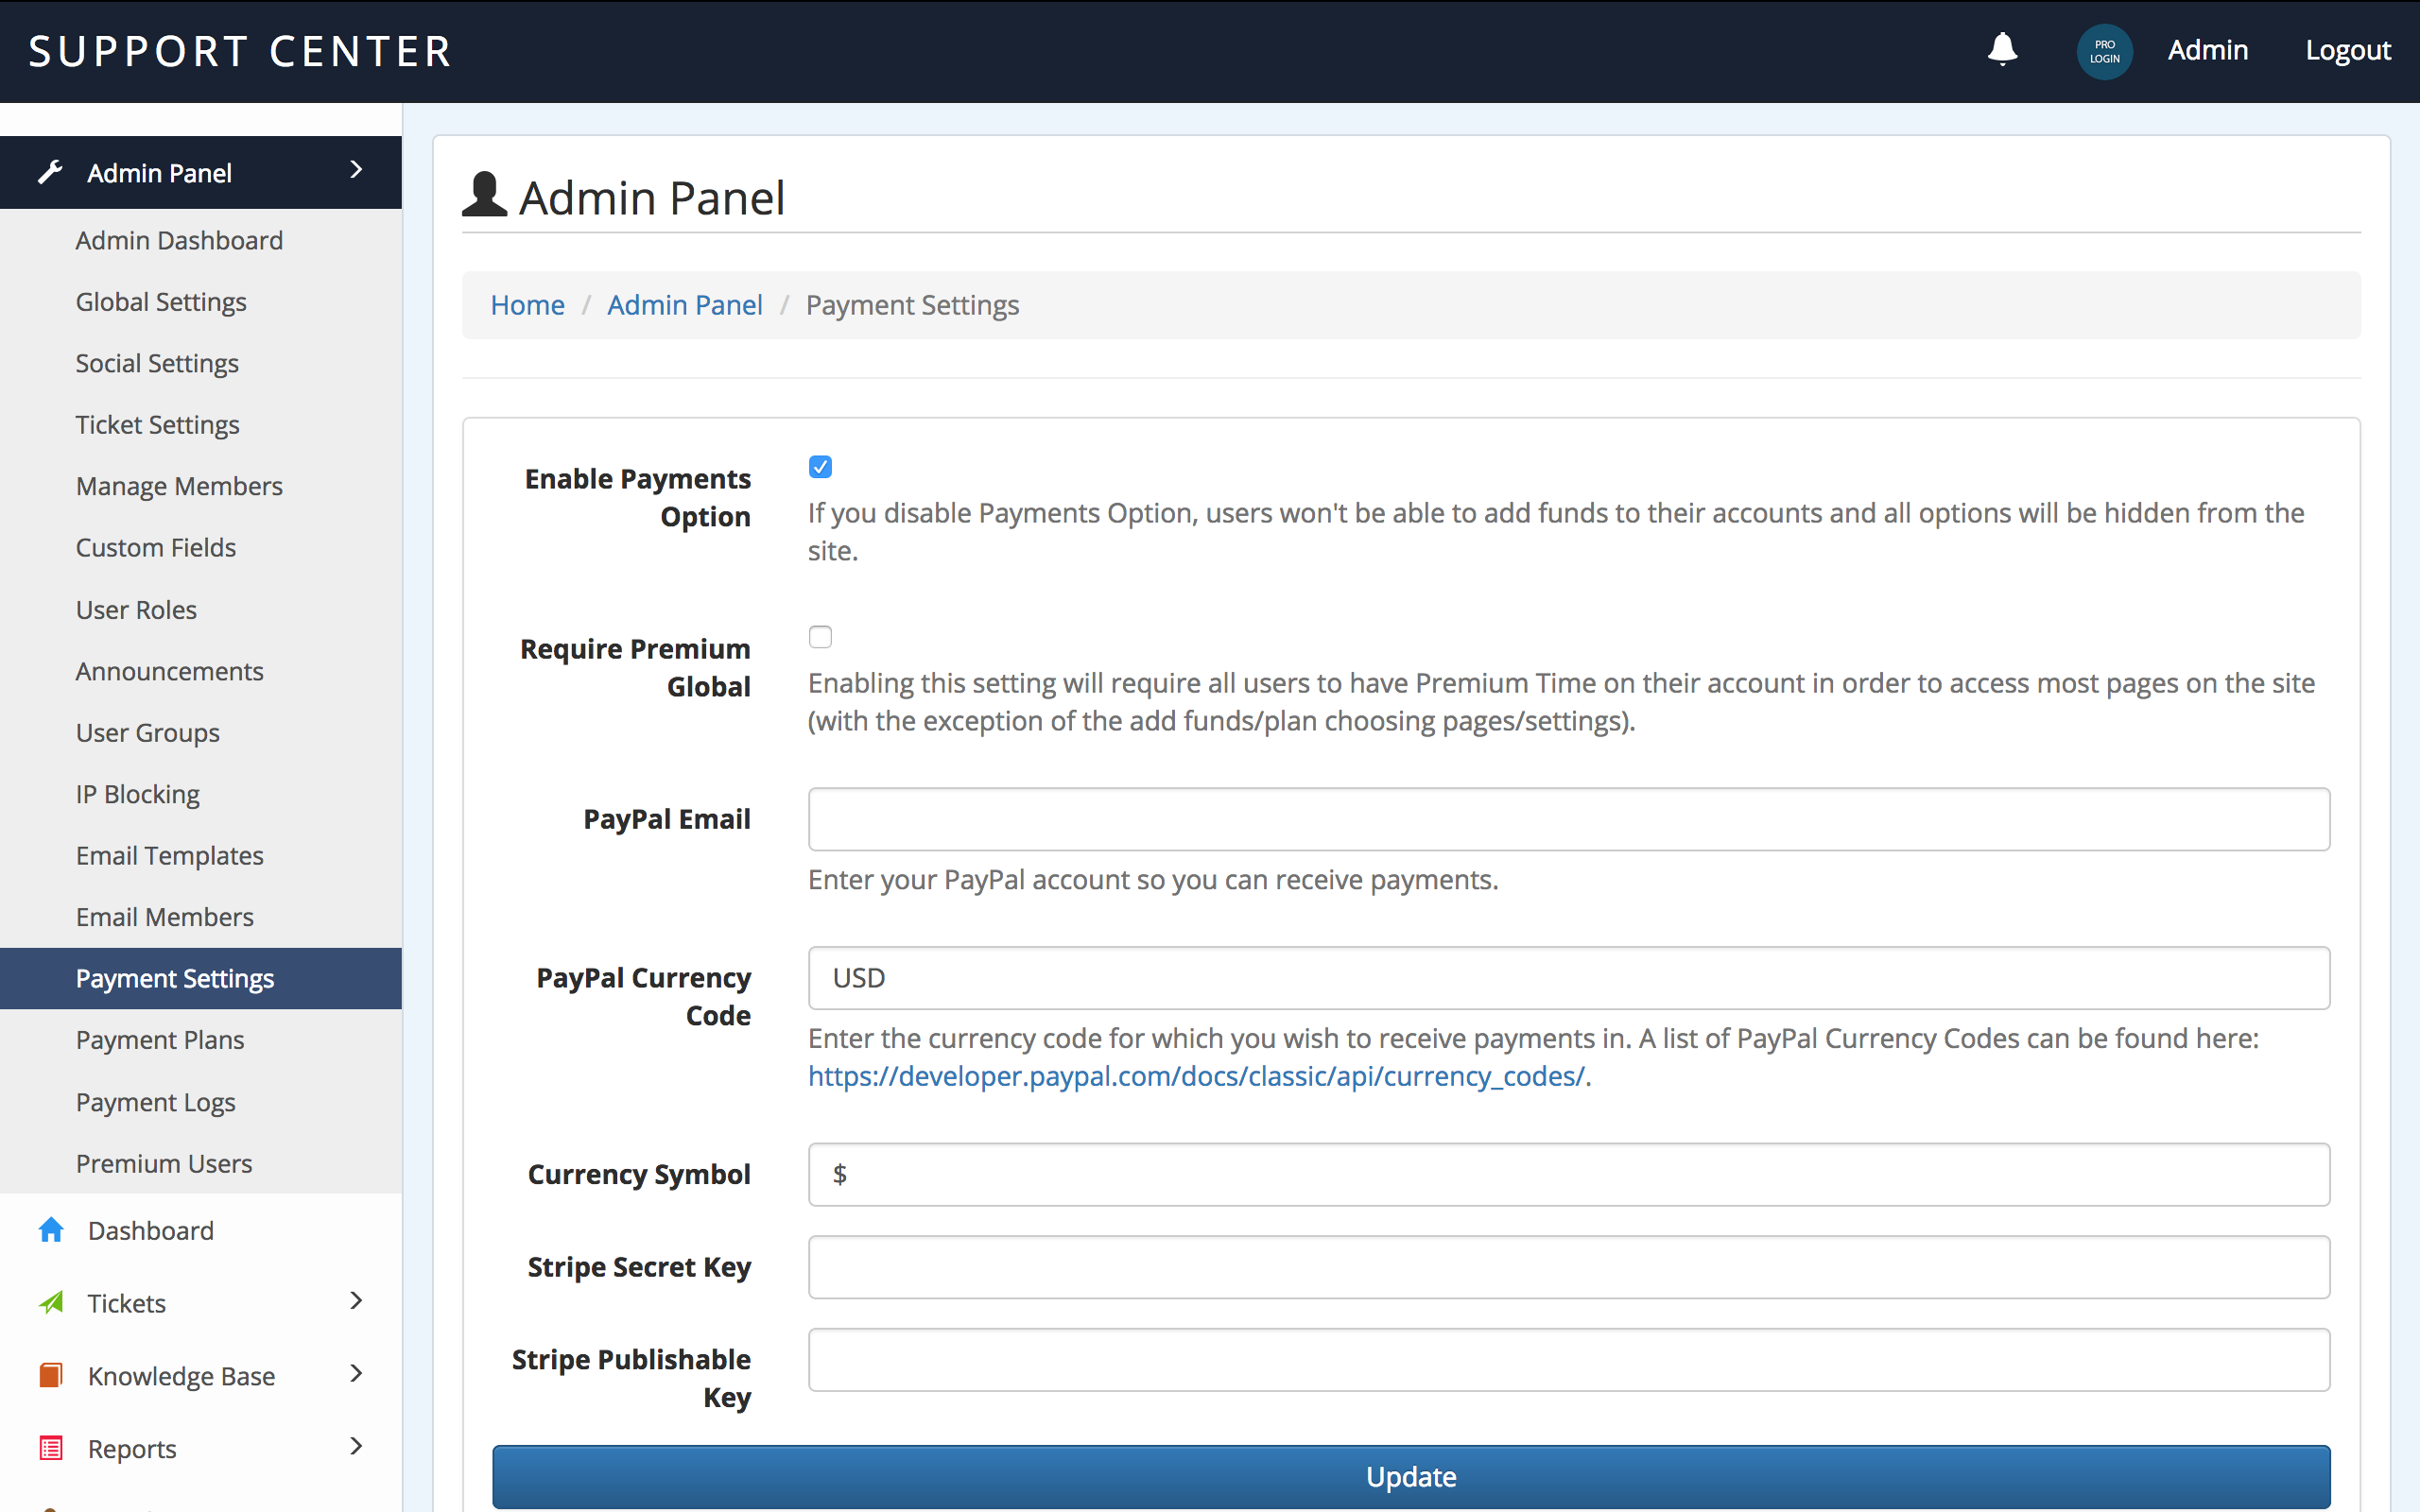
Payment Settings allow you to specify how you get paid when users buy credits on the Support Centre. Specify your PayPal email and Stripe API details so that users can use these to pay for credits.
This section can be completely disabled if you do not intend to charge for support.
Email Piping - top
Email Piping allows Client to respond to tickets using their email address. When a user creates a ticket, an email will be automatically sent to them with their new ticket details. If they reply to that email directly, you can use Email Piping to grab the reply and post the response as a ticket reply.
The process to do this requires you to have the ability to setup iMAP and a cron job. First, go to Ticket Settings:
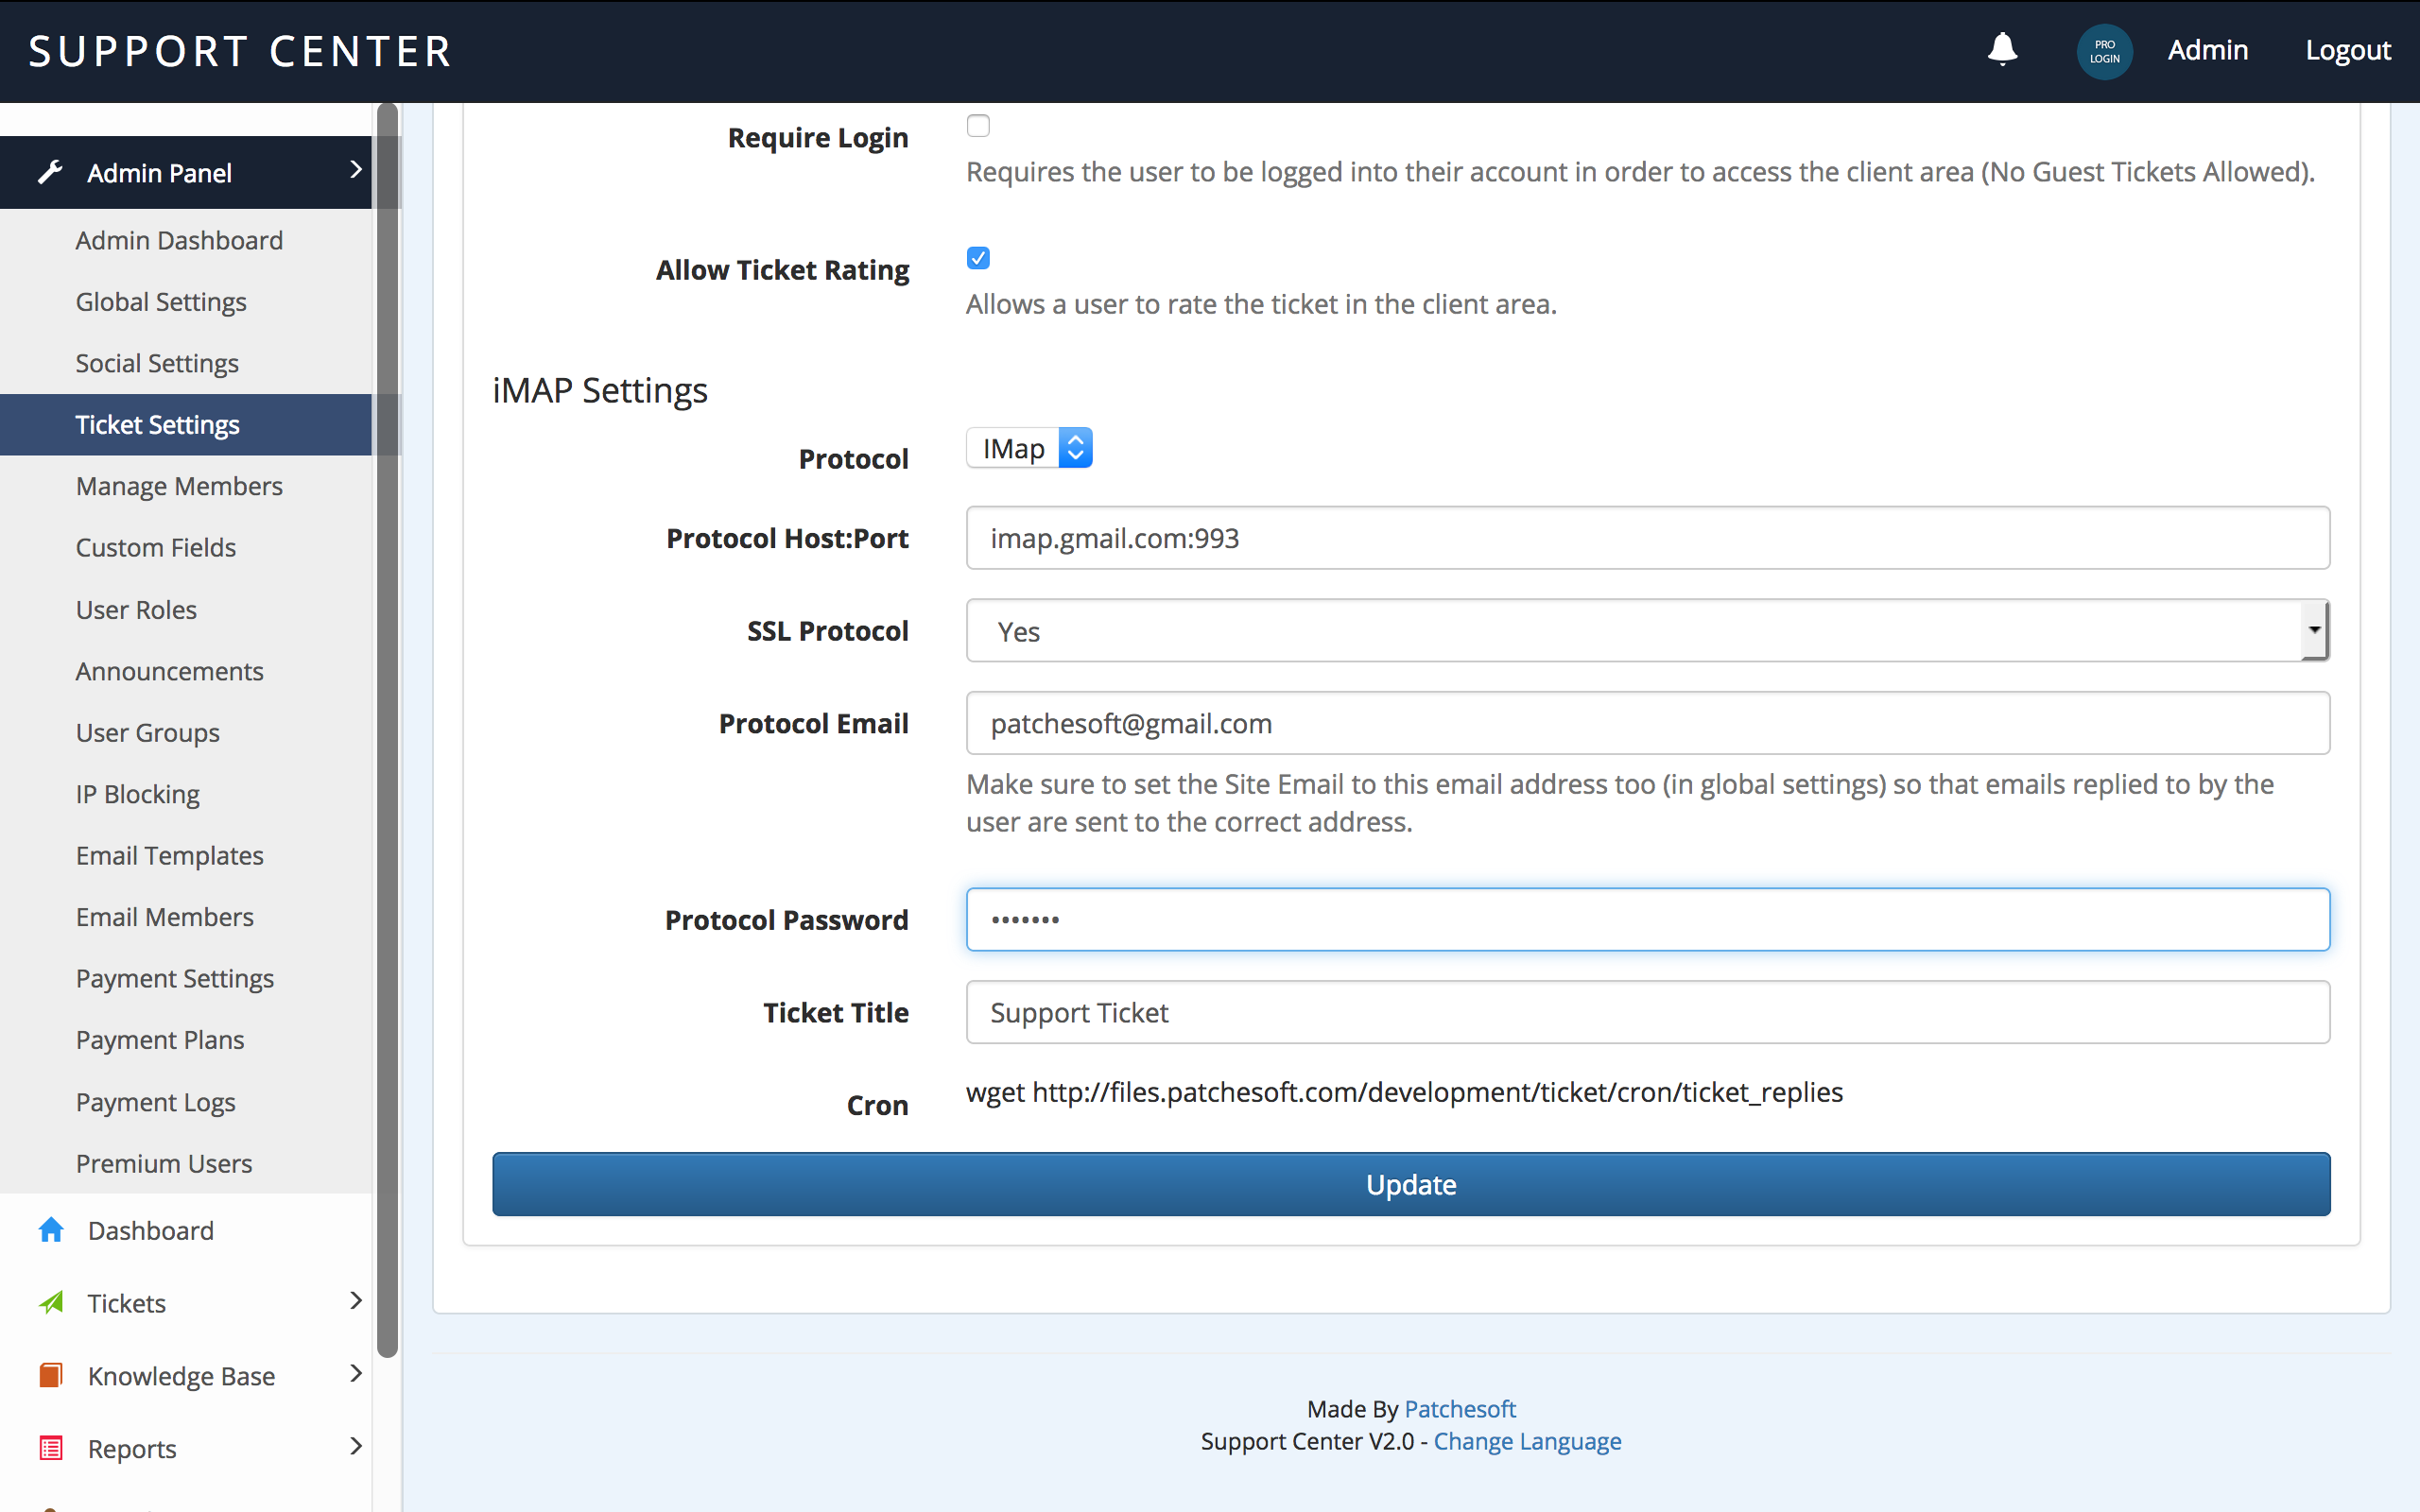
We recommend having a dedicated email address that is used to collect email replies. In the case above, I'm using my google mail account. Your email account must support iMAP and it must be enabled. You can easily enable the iMAP settings in gmail by going to Settings > Forwarding and POP/IMAP > Enable IMAP
The next step is to setup your site to use your new enabled iMAP email address. In the Admin Panel, go to Ticket Settings and enter your information. You'll need to enter the Protocol URL and Port, email address, password and a chosen Ticket Title.
For google, these settings are:
Protocol:Port = imap.gmail.com:993
Enable SSL: Yes
Protocol Email: (Your gmail address)
Protocol Password: (Your gmail account password)
Ticket Title: Support Ticket (whatever you like).
Note: Make sure to also set the Site Email to the same address as Protocol Email otherwise ticket replies won't go to your inbox. You can setup google as your site email by modifying the application/config/email.php config settings. It supports SMTP, mail and more protocols.
You'll also notice the Cron URL at the bottom. This URL is unique to each installation and needs to be run every couple of minutes. The cron will attempt to login to your mail account, search for ticket replies with the Ticket Title, find the correct Ticket ID in the mail and then post the replies to the ticket on the system. Once an email has been accessed, it's marked as read so it's not added again. It's a complicated process, but it allows your users to respond to their tickets by email.
Staff/Admins cannot respond to tickets via email piping (it is only setup for clients to use). Replying to these emails will send an email back- but the reply won't be added to the ticket system.
For your cron job settings, we recommend running it every 2 minutes:
*/2 * * * * wget http://example.com/cron/ticket_replies
You can test to see if your cron works by running the URL in your browser.
Some Caveats: Many email clients add in extra data to an email's body. Because of the way IMAP works in PHP, some of this data gets accidentally added to the ticket reply. You can ignore this for the most part.
Creating Your Own Content - top
If you want to add your own custom code to the system, follow this guide. This guide is only if you wish to add pages/content/features using PHP.
Creating your own pages in PHP requires you to use the CodeIgniter framework. It's quite simple to use if you have some programming experience. You can view our test content file here: application/controllers/Test.php
To create a page, first you will want to create a Controller file. This file will be where you main PHP code logic goes. Below is an example controller file. The file must be saved as the same name as the class (with a captial letter). So for example, the class here is called Example, so the controller file must be called Example.php. The file must be placed inside the application/controllers/ folder.
<?php if ( ! defined('BASEPATH')) exit('No direct script access allowed');

class Example extends CI_Controller
{

	public function __construct()
	{
		parent::__construct();
		$this->load->model("user_model");
		if(!$this->user->loggedin) {
			redirect(site_url("login"));
		}
	}

	public function index()
	{
		$this->template->loadContent("example/index.php", array(
			)
		);
	}
}

?>
The name of the Controller is also used to access the page. Since we named our controller Example, we can now access it using our URL like so: http://www.mysite.com/example/
There are a few more things to look at here too. If you notice inside the index() function, there is this line:
$this->template->loadContent("example/index.php", array(
			)
		);
This line is saying to load the HTML file stored in application/views/example/index.php. If you want to create your own HTML files, you can. Simply create a folder inside the application/views/ folder. Name it whatever you like. For this example, let's call it example. Inside that folder, create your very own PHP file that will be used to display the HTML. Let's create a file called test.php and put some code inside it:
Hello, this is a test! We save it as a .php file so that we can also include PHP code. Like this:
Now, we need to edit our controller file application/controllers/Example.php to use our new HTML file that we just created. So edit the loadContent() function to use it, like so:
$this->template->loadContent("example/test.php", array(
			)
		);
Now when you load the Example page, it will display the content inside application/views/example/test.php.
If you found that confusing, not to worry! There are thousands of guides out there that use the CodeIgniter framework. There is also the CodeIgniter Documentation, which gives a brilliant easy to understand overview of how to use the system. Don't forget to look at our own test file, which gives examples of how you can restrict access to pages (application/controllers/Test.php). You can also contact us via email if you need extra help.
CodeIgniter User Guide: http://www.codeigniter.com/user_guide/
Modifying the HTML & CSS - top
You can modify the HTML and CSS of the product to match the look and feel of your website. You can manually edit the CSS files that control the site's look and feel.
You can find the CSS file in styles/main.css. Here you will be able to see the current rules that have been created for the site. You may want to put your own rules at the bottom of the file, or even create your own CSS file and include that into the site layout. This will be useful should you ever wish to upgrade the product with a newer version and your settings won't be overwritten.
You may also wish to change the HTML of the site. All HTML files are inside the application/views/ folders. The layout HTML file can be found in application/views/layout/layout.php. This file is the core of the site structure. There are some PHP coding inside the HTML files which is used to generate the dynamic content; we suggest not modifying these as it could cause unexpected errors in your system.
Remember, you can find out more information on how to use Views, Controllers and Models using the CodeIgniter framework by reading their documentation: http://www.codeigniter.com/user_guide/
Languages - top
If you would like to translate your product into another language, then you can do so by modifying the language files. Follow the simple steps below to get started:
- Create a new folder inside the application/language/ folder. Give the folder the name of your language, such as spanish, italian etc. For this example, I will call mine french.
- Copy the 3 files from inside application/language/english/ to the newly created folder that you just made.
- Inside your new language folder you should now have a content_lang.php, error_lang.php and success_lang.php. You can also add the index.html file too.
You are now ready to begin editting these files.
The content_lang.php contains all translations for most of the content pages on the site. The error_lang.php file contains all the error messages that are given to users when they do something wrong. You are free to translate them all or just a few. The main one should be the content_lang.php as those translations are the ones your users will mostly see.
To edit the translations, all you need to do is type the new correct text inside the double quotes. For example, the following is a couple of lines from the content_lang.php file:
			$lang['ctn_3'] = "Provide Us Feedback";
			$lang['ctn_4'] = "Email Address";
To translate, you just need to modify the text within the double quotes. For example, a french translation would be:
			$lang['ctn_3'] = "Fournir nous Commentaires";
			$lang['ctn_4'] = "Adresse e-mail";
Save the file when your done. The final step for your translations to take place, you need to edit the application/config/config.php file. Change the following line:
$config['language'] = 'english';
to the name of the folder that you stored your new language files in. In my case, it was french, so I change it to:
$config['language'] = 'french';
Save config.php and you should see your new translations take place.
Extra
You may also need to add the System translation files. These files are for generic System errors. We recommend performing the following steps:
You need to create a folder in your Systems language folder for your new language. The folder name needs to be the same name as your new language. In the example below, it's "spanish". Please follow these steps:
- 1) Create a folder inside system/language/ called spanish
- 2) Locate the following folder: system/language/english/
- 3) Copy all the files inside this folder to your newly created folder (system/language/spanish/)
Dynamic/Multiple Languages
This software also has the option for the user to change the language themselves. The available languages are based on the translations you have done. A user can change the language of the site by clicking the Change Language link in the footer of the site.
You can add as many available languages are you like. You just need to make sure you have created the language files and folders, as outlined in the guide above.
To make a language available for selection, you need to edit the main config file: application/config/config.php. Look for this line:
			$config['available_languages'] = array(
	          "english" => array(
		      "display_name" => "English",
		      "rtl_support" => 0
	          )
            );
This is where you need to add your other languages. For example, to add your French language, edit the code so it says:
			$config['available_languages'] = array(
	          "english" => array(
		      "display_name" => "English",
		      "rtl_support" => 0
	          ),
              "french" => array(
		      "display_name" => "French",
		      "rtl_support" => 0
	          )
            );
Now when the user visits the Change Language page, the option for French will appear in the menu. Remember, make sure the language files (in this case French) have been added too as outlined in the Language Guide above.
RTL-SUPPORT: If you need to enable right-to-left text, for your language you need to change "rtl_support" => 0 to "rtl_support" => 1. This will then set the page to change text to RTL.
Credits - top
This document is used to credit various tools, images, styles and general users who have helped make this product what it is. Feel free to give their websites a visit and look around- you might even find some useful tools for your own website.
- Bootstrap 3.0 http://getbootstrap.com/
- CodeIgniter http://ellislab.com/codeigniter
- Lib Filter http://code.iamcal.com/php/lib_filter/
- PHPass http://www.openwall.com/phpass/
- Libel Suit Font http://typodermicfonts.com/
- CK Editor http://ckeditor.com/
- Datatables https://datatables.net/
- Chosen https://github.com/harvesthq/chosen/
Update Log - top
Welcome to the Update Guide. This guide is to help you update your system to the latest version. We know that a lot of our customers do their own custom updates to their systems and so having to overwrite their files all the time can sometimes cause them problems. This update guide is to show you which files need to be updated in order for your system to be fully updated.
Version 2.2 - (Released: 13/04/2017)
This update contains new features and bug fixes. The following changes were made:
- Updated to CodeIgniter 3.1.4
- Implemented new Admin theme layouts: basic, light blue, Titan, Dark Fire.
- Updated Language Switcher to accomodate new RTL support.
- Fixed issue with words being broken in summaries for knowledge base articles.
- Added support for Greek and French characters
- Fixed issue with guest clients viewing attached files
- Added option to Ticket Settings to allow you to specify the strings for obtaining Ticket ID information in Crons.
- Fixed an issue with canned responses and images
- Improved pagination results for tickets when searching
- Added option to turn on Captcha for Ticket Creation
- Implemented Ticket Reminder option
- Email Templates have been recoded- can now add language specific templates for various areas of the system.
- Revamped User Roles system in Admin Panel to make it easier to create new User Roles
- Updated Cron to better extract Outlook replies for Ticket Posting.
- Custom Fields now accept values of 0.
- Implemented new Custom Field Type for Tickets: Envato License Code. Allows you to check product codes of items that you have sold and look at how much support time is left.
- Option to mark all notifications as read added
- Option to automatically assign staff user to ticket when replying to it.
- Option to make Ticket Custom Fields hidden on the client side added
- Implemented new Merge Tickets option
- Added Edit User link to Ticket View
- When selecting "Close Ticket" option, the Ticket Notes modal will now open automatically, allowing you to enter admin-viewable notes about the ticket.
- Added debugging tools to Admin Panel: Email Debugging and Notification Syncer
- Fixed an issue with guests viewing attachments
- Added option to Global Settings allowing you to set the amount of time to cache the dashboard data
- Fixed an isset issue with editing tickets
- Category description now shows once selected in the Client Ticket Form.
In order to update, please overwrite the following files:
- Config
- application/config/config.php
- application/config/email.php
- Controllers
- application/controllers/Admin.php
- application/controllers/Tickets.php
- application/controllers/Client.php
- application/controllers/Home.php
- application/controllers/Knowledge.php
- application/controllers/Cron.php
- application/controllers/Login.php
- application/controllers/Register.php
- Hooks
- application/hooks/Language_Switcher.php
- Models
- application/models/Admin_model.php
- application/models/Tickets_model.php
- application/models/Home_model.php
- application/models/User_model.php
- Views
- application/views/admin/settings.php
- application/views/admin/ticket_settings.php
- application/views/layout/*
- application/views/home/change_language.php
- application/views/home/notifications.php
- application/views/home/ajax_notifications.php
- application/views/client/index.php
- application/views/client/get_articles.php
- application/views/client/view_ticket.php
- application/views/client/tickets.php
- application/views/client/edit_ticket.php
- application/views/tickets/view_ticket.php
- application/views/tickets/ajax_custom_fields.php
- application/views/tickets/add_custom_field.php
- application/views/tickets/edit_custom_field.php
- application/views/tickets/edit_ticket.php
- application/views/tickets/add.php
- application/views/tickets/merge_ticket.php
- application/views/admin/email_templates.php
- application/views/admin/edit_email_template.php
- application/views/admin/user_roles.php
- application/views/admin/edit_user_role.php
- application/views/admin/tools.php
- application/views/admin/tool_noti_sync.php
- application/views/admin/tool_email_debug.php
- application/views/admin/payment_logs.php
- Language
- application/language/english/content_lang.php
- application/language/english/success_lang.php
- application/language/english/error_lang.php
- Styles
- styles/layouts/*
- styles/elements.css
- Libraries
- application/libraries/Settings.php
- application/libraries/Template.php
- application/libraries/Lib_filter.php
- application/libraries/IMap.php
- application/libraries/Envato.php
- application/libraries/Common.php
- Scripts
- scripts/libraries/sortable/*
- System
- system/*
DATABASE UPDATE
This update contains a change to the database tables. In order to make the system work, you will need to execute the update.sql found in updates/version2.2/sql/update.sql.
Just import this file into your database manager (like phpMyAdmin) and it should update your database tables for you.
LANGUAGE UPDATE
For those who have up-to-date language files, you will need to add some new lines to your language files in order to translate the new content being added. Follow the simple edits below:
Modify file application/language/english/content_lang.php (or replace english with the name of your language folder)
Add the following lines of code to the bottom of your language file
// Version 2.2.
$lang['ctn_669'] = "Welcome";
$lang['ctn_670'] = "Site Theme";
$lang['ctn_671'] = "Enable Captcha on Ticket Form";
$lang['ctn_672'] = "Enables a captcha on the Ticket Creation Form to prevent spam. Will use Google ReCaptcha if settings enabled, else uses default CodeIgniter Captcha.";
$lang['ctn_673'] = "Send Reminder";
$lang['ctn_674'] = "This is a notification that a ticket requires your attention!";
$lang['ctn_675'] = "Sent a reminder to the user";
$lang['ctn_676'] = "Available Permissions";
$lang['ctn_677'] = "Current Permissions";
$lang['ctn_678'] = "Drag and drop permissions to customise this User Role.";
$lang['ctn_679'] = "Envato License Code";
$lang['ctn_680'] = "Envato Product";
$lang['ctn_681'] = "Supported Until";
$lang['ctn_682'] = "API Error";
$lang['ctn_683'] = "Assign Yourself To Ticket";
$lang['ctn_684'] = "Hide Client Side";
$lang['ctn_685'] = "If selected, this Custom Field will not be shown on the Client side, only the Admin side.";
$lang['ctn_686'] = "Tools";
$lang['ctn_687'] = "Here are a few tools to help with maintaining your application.";
$lang['ctn_688'] = "Email Debugging";
$lang['ctn_689'] = "Notification Syncer";
$lang['ctn_690'] = "If your notification's unread count sometimes goes out of sync, you can use this tool to resync it.";
$lang['ctn_691'] = "Debug";
$lang['ctn_692'] = "Resync Notifications";
$lang['ctn_693'] = "This tool can be used to debug email sending. Your email settings can be found in: application/config/email.php. For more information on what options are available, check out this CodeIgniter User Guide:";
$lang['ctn_694'] = "This tool will output all email error and debug messages after attempting to send an email. Enter an email you'd like to send a test message to and then click send.";
$lang['ctn_695'] = "Send Email To";
$lang['ctn_696'] = "Send Email and Debug";
$lang['ctn_697'] = "IMap Strings";
$lang['ctn_698'] = "These strings must be inside your Email Templates in order for the Cron to grab the required information.";
$lang['ctn_699'] = "IMap Ticket String";
$lang['ctn_700'] = "This string is used to obtain the ticket ID from the email. It should be the line leading up to the ID.";
$lang['ctn_701'] = "IMap Ticket Reply String";
$lang['ctn_702'] = "The string used to notify the end of the reply. It should be a full line.";
$lang['ctn_703'] = "Envato API";
$lang['ctn_704'] = "Envato Personal Token";
$lang['ctn_705'] = "Used to connect to the Envato API when checking product codes in Ticket Custom Fields.";
$lang['ctn_706'] = "Hook";
$lang['ctn_707'] = "Email Activation";
$lang['ctn_708'] = "Ticket Reply";
$lang['ctn_709'] = "Ticket Creation";
$lang['ctn_710'] = "Guest Ticket Creation";
$lang['ctn_711'] = "Ticket Reminder";
$lang['ctn_712'] = "The hook is used to identify the correct email template to get when we need to send an email in a specific function.";
$lang['ctn_713'] = "String used to split the email messages when reading them from IMAP.";
$lang['ctn_714'] = "String used to display ticket id when reading them from IMAP.";
$lang['ctn_715'] = "Languages";
$lang['ctn_716'] = "Add Email Template";
$lang['ctn_717'] = "Mark All As Read";
$lang['ctn_718'] = "Merge Ticket";
$lang['ctn_719'] = "Merging Ticket";
$lang['ctn_720'] = "Merge All Replies";
$lang['ctn_721'] = "Replace User";
$lang['ctn_722'] = "Merge Ticket History";
$lang['ctn_723'] = "Replace Ticket Data";
$lang['ctn_724'] = "Merge Ticket Files";
$lang['ctn_725'] = "Copies all replies from this ticket to the Primary Ticket";
$lang['ctn_726'] = "Replaces the user data of this ticket with the Primary Ticket";
$lang['ctn_727'] = "Copies all ticket history from this ticket to the Primary Ticket";
$lang['ctn_728'] = "Replaces ticket data, including custom fields, ticket notes, date created, assigned user of the merged ticket with the Primary Ticket.";
$lang['ctn_729'] = "Copies all attached ticket files from this ticket to the Primary Ticket";
$lang['ctn_730'] = "Primary Ticket";
$lang['ctn_731'] = "Select a ticket that you wish to be the Primary Ticket. The merging ticket data will be added to the Primary Ticket.";
$lang['ctn_732'] = "Select Ticket";
$lang['ctn_733'] = "Select from a list of recent created tickets.";
$lang['ctn_734'] = "Search for ticket";
$lang['ctn_735'] = "Enter ticket #ID";
$lang['ctn_736'] = "Merge Tickets";
$lang['ctn_737'] = "Dashboard Cache Time";
$lang['ctn_738'] = "The amount of time in seconds how long the data on the dashboard is cached for. Set to 0 for zero cache.";
Modify file application/language/english/error_lang.php (or replace english with the name of your language folder)
Add the following lines of code to the bottom of your language file
// V2.2
$lang['error_127'] = "Invalid Primary Ticket!";
Modify file application/language/english/success_lang.php (or replace english with the name of your language folder)
Add the following lines of code to the bottom of your language file
// v2.2
$lang['success_69'] = "The client was notified of the ticket!";
$lang['success_70'] = "The email template was deleted!";
$lang['success_71'] = "The email template was successfully added!";
$lang['success_72'] = "The ticket was merged!";
Save the files
CLEAN INSTALL
Remember, if you have trouble updating, you can always do a clean install. Just follow the guide in the Documentation Guide as you did before and you will have the latest version of the system ready.
Version 2.1 - (Released: 08/02/2017)
- Updated to the latest version of CodeIgniter 3.1.3
- Fixed bug with Clients
- Fixed bug with forgotten password
- Fixed a bug with knowledge search
- Fixed a bug when editing tickets with required fields
- Added Avatar Height and Width options to Admin Panel
- Fixed missing translation texts
- Language Switcher added to Client view
- Social Media login options only show up for ones you have entered keys for
- Register button no longer shows when disabled registration on login page
- Added option to add sub-categories to Knowledge Base Categories.
- Added Ticket Number to Client View.
- Added Ticket Number to Admin Ticket View
- Added Last Reply User Icon to Admin Ticket table
- Removed Output messages from cron. Toggle debug on/off.
- Fixed missing notification string in cron
- Added in Print View for Tickets.
- Can now create tickets via emails sent to your assigned email using IMAP/Cron
- Implemented new GMAIL message cleaner for IMAP (helps get email content better).
- Fixed various issues with IMAP.
- Can set default category that newly created IMAP tickets go to in Ticket Settings.
- Revamped Ticket View page
- Added Ticket History which logs all actions made to tickets.
- Revamped Client Ticket View Page
- Added new Canned Responses Keywords (first name and last name)
- Added new section called Custom Views.
- Custom Views allow you to save different views of the Ticket Table: view by a certain status, category and order type. Easily switch between different custom views from the view tickets page. Staff can manage their own Custom Views from the Custom Views section.
- Added First and Last name to Canned Responses
- Can now directly add user to a User Group when creating new member in Admin Panel
- Added 2Checkout Payment Gateway
- Implemented Payment Logs for User
In order to update, please overwrite the following files:
- Controllers
- application/controllers/Client.php
- application/controllers/Login.php
- application/controllers/Admin.php
- application/controllers/User_settings.php
- application/controllers/Home.php
- application/controllers/Knowledge.php
- application/controllers/Tickets.php
- application/controllers/Cron.php
- application/controllers/IPN.php
- application/controllers/Funds.php
- Models
- application/models/Tickets_model.php
- application/models/Knowledge_model.php
- application/models/User_model.php
- application/models/IPN_model.php
- Libraries
- application/libraries/Settings.php
- application/libraries/IMap.php
- application/libraries/User.php
- application/libraries/Lib_filter.php
- Views
- application/views/client/knowledge_search.php
- application/views/client/view_knowledge_cat.php
- application/views/client/tickets.php
- application/views/client/index.php
- application/views/client/view_ticket.php
- application/views/client/funds.php
- application/views/client/payment_log.php
- application/views/client/plans.php
- application/views/layout/client_layout.php
- application/views/layout/layouts.php
- application/views/login/index.php
- application/views/knowledge/categories.php
- application/views/knowledge/edit_cat.php
- application/views/tickets/index.php
- application/views/tickets/view_ticket.php
- application/views/tickets/print_ticket.php
- application/views/tickets/ticket_history.php
- application/views/tickets/add_canned_responses.php
- application/views/tickets/edit_canned_responses.php
- application/views/tickets/index.php
- application/views/tickets/custom_view.php
- application/views/tickets/edit_custom_view.php
- application/views/admin/ticket_settings.php
- application/views/admin/settings.php
- application/views/admin/members.php
- application/views/admin/payment_settings.php
- application/views/home/change_language.php
- application/views/funds/index.php
- application/views/funds/payment_log.php
- Styles
- styles/client.css
- styles/main.css
- System
- system/*
Please also change this line in your application/config/config.php:
$config['csrf_exclude_uris'] = array('invoice/view', 'ipn/process2', 'funds', 'ipn/stripe/[0-9]+', 'ipn/checkout2/[0-9]+');
DATABASE UPDATE
This update contains a change to the database tables. In order to make the system work, you will need to execute the update.sql found in updates/version2.1/sql/update.sql.
Just import this file into your database manager (like phpMyAdmin) and it should update your database tables for you.
LANGUAGE UPDATE
For those who have up-to-date language files, you will need to add some new lines to your language files in order to translate the new content being added. Follow the simple edits below:
Modify file application/language/english/content_lang.php (or replace english with the name of your language folder)
Add the following lines of code to the bottom of your language file
// 2.1
$lang['ctn_611'] = "Ticket #";
$lang['ctn_612'] = "has replied to your Ticket and awaits your response.";
$lang['ctn_613'] = "2Checkout Account No";
$lang['ctn_614'] = "2Checkout Secret";
$lang['ctn_615'] = "Default Category";
$lang['ctn_616'] = "This is the default category that newly created tickets go to when they are generated by the CRON file using IMAP.";
$lang['ctn_617'] = "Fetch Ticket Replies";
$lang['ctn_618'] = "Fetch New Tickets (creation)";
$lang['ctn_619'] = "Avatar Height";
$lang['ctn_620'] = "The maximum height an avatar can be.";
$lang['ctn_621'] = "Avatar Width";
$lang['ctn_622'] = "The maximum width an avatar can be.";
$lang['ctn_623'] = "Payment Log";
$lang['ctn_624'] = "Buy";
$lang['ctn_625'] = "Category Parent";
$lang['ctn_626'] = "If you want this category to be a sub-category, select its parent here.";
$lang['ctn_627'] = "Custom Views";
$lang['ctn_628'] = "Posted On";
$lang['ctn_629'] = "Ticket Details";
$lang['ctn_630'] = "Assign";
$lang['ctn_631'] = "Are you sure you want to assign yourself to this ticket?";
$lang['ctn_632'] = "Print View";
$lang['ctn_633'] = "Ticket History";
$lang['ctn_634'] = "View All";
$lang['ctn_635'] = "Order By";
$lang['ctn_636'] = "TicketID";
$lang['ctn_637'] = "Order Sort";
$lang['ctn_638'] = "Ascending";
$lang['ctn_639'] = "Descending";
$lang['ctn_640'] = "Update Custom View";
$lang['ctn_641'] = "Add Custom View";
$lang['ctn_642'] = "Custom View";
$lang['ctn_643'] = "Remove";
$lang['ctn_644'] = "First name of the client";
$lang['ctn_645'] = "Last name of the client";
$lang['ctn_646'] = "First name of the staff";
$lang['ctn_647'] = "Last name of the staff";
$lang['ctn_648'] = "View Ticket";
$lang['ctn_649'] = "Ticket was created [CLIENT].";
$lang['ctn_650'] = "Ticket reply was added [CLIENT].";
$lang['ctn_651'] = "Ticket reply was modified from:";
$lang['ctn_652'] = "To";
$lang['ctn_653'] = "Ticket reply was deleted";
$lang['ctn_654'] = "Ticket was modified in Edit section [CLIENT]";
$lang['ctn_655'] = "Ticket was rated";
$lang['ctn_656'] = "stars";
$lang['ctn_657'] = "Guest logged into view ticket.";
$lang['ctn_658'] = "Ticket was created [IMAP/CRON]";
$lang['ctn_659'] = "Ticket reply was added [IMAP/CRON]";
$lang['ctn_660'] = "Ticket was generated via IMAP/Cron.";
$lang['ctn_661'] = "was assigned to ticket.";
$lang['ctn_662'] = "was assigned to ticket.";
$lang['ctn_663'] = "You have been assigned to a ticket.";
$lang['ctn_664'] = "Ticket status was changed to";
$lang['ctn_665'] = "Replied to the ticket.";
$lang['ctn_666'] = "Ticket was modified in Edit area.";
$lang['ctn_667'] = "Deleted a ticket file attachment.";
$lang['ctn_668'] = "Ticket was created [ADMIN]";
Modify file application/language/english/error_lang.php (or replace english with the name of your language folder)
Add the following lines of code to the bottom of your language file
// V2.1
$lang['error_124'] = "View does not exist";
$lang['error_125'] = "Invalid View!";
$lang['error_126'] = "Invalid Ordering Type";
Modify file application/language/english/success_lang.php (or replace english with the name of your language folder)
Add the following lines of code to the bottom of your language file
// v2.1
$lang['success_64'] = "The user was assigned to the ticket!";
$lang['success_65'] = "The view was set as your custom view!";
$lang['success_66'] = "The custom view was updated";
$lang['success_67'] = "The custom view was added";
$lang['success_68'] = "The custom view was deleted!";
Save the files
CLEAN INSTALL
Remember, if you have trouble updating, you can always do a clean install. Just follow the guide in the Documentation Guide as you did before and you will have the latest version of the system ready.
Version 2.0.1 - (Released: 08/12/2016)
This update contains minor twekas and bug fixes. The following changes were made:
- Added heading tags to HTML filter
- Facebook name fix
- Fix for Admin Permissions
- Client Notification List added
- Fixed Notification Link
- Fixed glyphicons colour on Premium Plans
- Added Last Updated to Article Page
- Fixed Category Display in Client View
- Added Category to Knowledge Base Articles view in staff area
In order to update, please overwrite the following files:
- Controllers
- application/controllers/Login.php
- application/controllers/Home.php
- application/controllers/Admin.php
- application/controllers/Client.php
- application/controllers/Knowledge.php
- Languages
- application/language/english/Content_lang.php
- Libraries
- application/libraries/Lib_filter.php
- application/libraries/Settings.php
- Views
- application/views/client/plans.php
- application/views/client/notifications.php
- application/view/client/knowledge.php
- application/views/client/view_knowledge.php
- application/views/layout/layout.php
- application/views/layout/client_layout.php
- application/views/knowledge/index.php
- Styles
- styles/client.css
CLEAN INSTALL
Remember, if you have trouble updating, you can always do a clean install. Just follow the guide in the Documentation Guide as you did before and you will have the latest version of the system ready.
VERSION 2.0
This is a brand new version of the Support Centre. In order to use this new version it requires a complete fresh install. There was no way we could convert the old system to the new one due to the many changes and improvements made. If you're having trouble installing the new version, let us know and we'll be happy to fix it.
Thanks!